
Painting Robot Documentation
This is the first production task of the semester for the course Introduction to Robotics. The prompt was very simple, but also tricky: Build a robot that paints. I worked with my friend Linda to accomplish it.
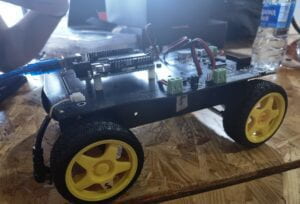
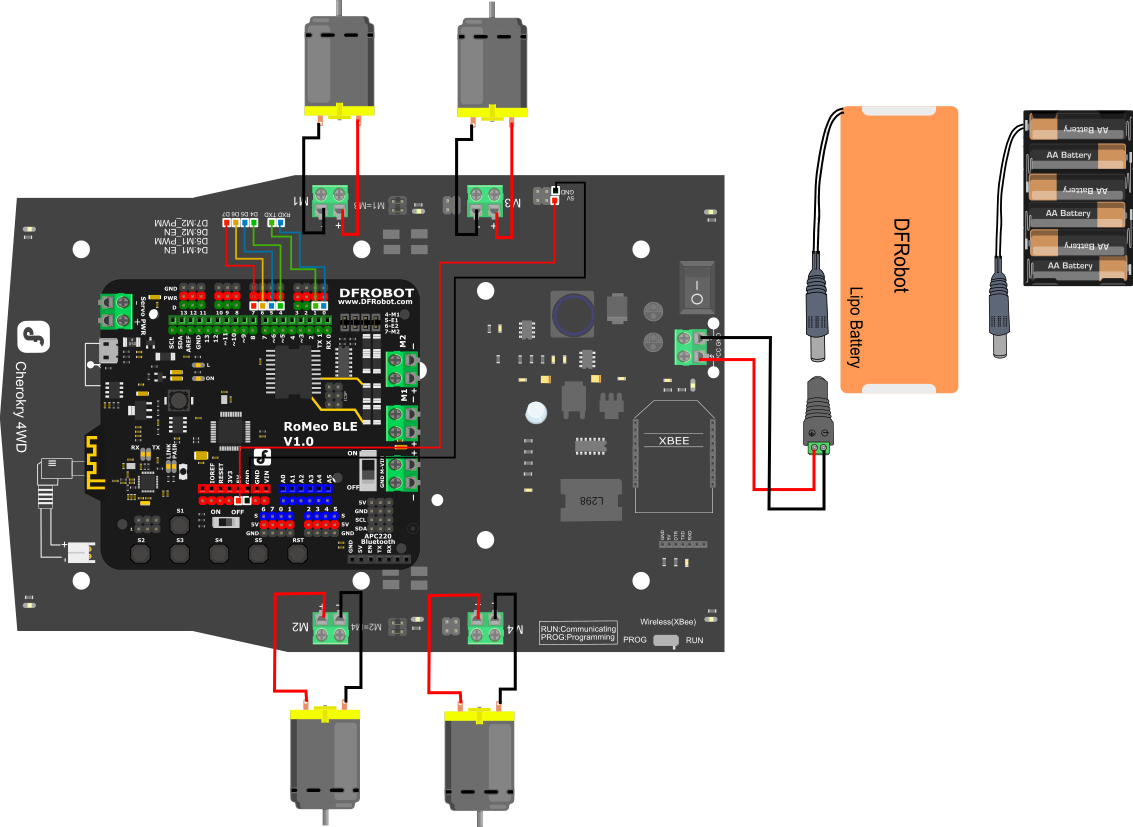
For simplicity, we used Cherokey 4WD robot kit. It is an Arduino based robotics kit. Linda and I have both taken Interaction Lab so it was quick to get started. Looking forward to exploring more robotic platforms in later courses.
We referred to the Cherokey official website for detailed instructions on how to assemble the kit. The instructions are very detailed and clear, so the assembly process goes very smoothly.
ROB0117 Instruction Manual – pressed
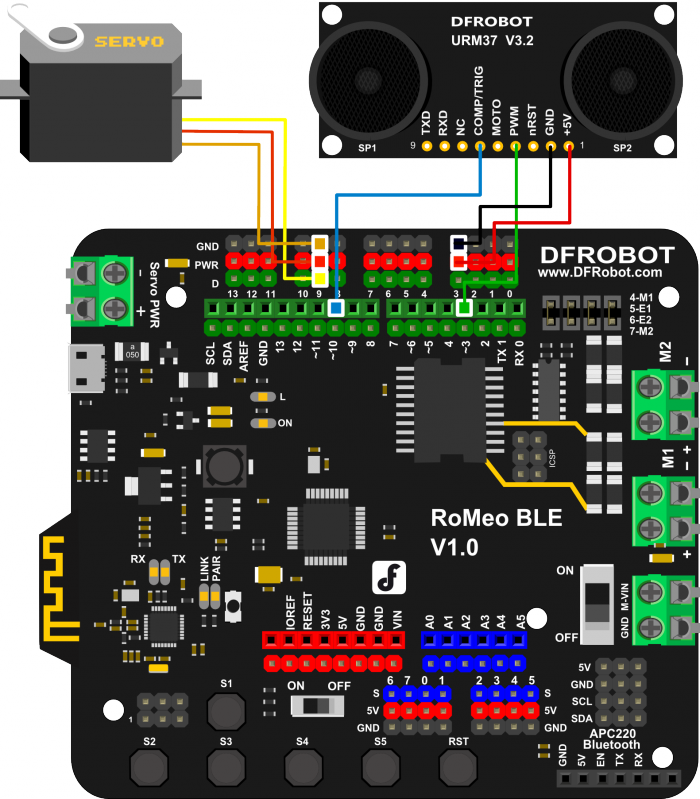
We started with the Arduino UNO as the main control board, and later we decided to switch to the RoMeo BLE microcontroller in the instructions, with ready-made circuit diagrams and test program.
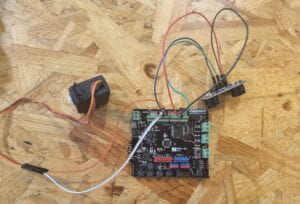
Since the semester had just started and the fabrication lab was often unoccupied, we did not have access to a Phillips screwdriver to remove the main board at that time. We tried to connect the ultrasonic sensor circuit on the RoMeo BLE microcontroller, but it didn’t work in the end.
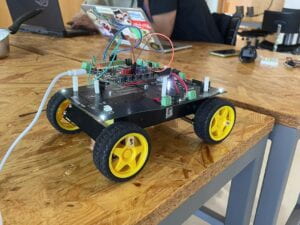
After getting a Phillips screwdriver, we quickly assembled the rest of the parts and ran the test program. The robot was ready to move!
Simple Test Program
int speedPin_M1 = 5;     //M1 Speed Control
int speedPin_M2 = 6;     //M2 Speed Control
int directionPin_M1 = 4;     //M1 Direction Control
int directionPin_M2 = 7;     //M1 Direction Control

void setup(){
}

void loop(){
    carAdvance(100,100);
    delay(1000);
    carBack(100,100);
    delay(1000);
    carTurnLeft(250,250);
    delay(1000);
    carTurnRight(250,250);
    delay(1000);
}

void carStop(){                 //  Motor Stop
  digitalWrite(speedPin_M2,0);
  digitalWrite(directionPin_M1,LOW);
  digitalWrite(speedPin_M1,0);
  digitalWrite(directionPin_M2,LOW);
}

void carBack(int leftSpeed,int rightSpeed){         //Move backward
  analogWrite (speedPin_M2,leftSpeed);              //PWM Speed Control
  digitalWrite(directionPin_M1,HIGH);
  analogWrite (speedPin_M1,rightSpeed);
  digitalWrite(directionPin_M2,HIGH);
}

void carAdvance(int leftSpeed,int rightSpeed){       //Move forward
  analogWrite (speedPin_M2,leftSpeed);
  digitalWrite(directionPin_M1,LOW);
  analogWrite (speedPin_M1,rightSpeed);
  digitalWrite(directionPin_M2,LOW);
}

void carTurnLeft(int leftSpeed,int rightSpeed){      //Turn Left
  analogWrite (speedPin_M2,leftSpeed);
  digitalWrite(directionPin_M1,LOW);
  analogWrite (speedPin_M1,rightSpeed);
  digitalWrite(directionPin_M2,HIGH);
}
void carTurnRight(int leftSpeed,int rightSpeed){      //Turn Right
  analogWrite (speedPin_M2,leftSpeed);
  digitalWrite(directionPin_M1,HIGH);
  analogWrite (speedPin_M1,rightSpeed);
  digitalWrite(directionPin_M2,LOW);
}
Note that the voltage and polarity should be carefully checked when installing the battery. Some batteries may look small, but they have much higher voltages, or they are not protected. If a short circuit occurs, they could catch fire.
As for how to prevent the robot from going out of the canvas, we have two options. One is to use a keyboard control program where the users themselves control the robot’s course of action, which naturally prevents it from walking out of the canvas. The problem with this solution is that the USB cable needs to be kept plugged in all the time, and we need a long enough cable. The other is to use ultrasonic sensors to add an obstacle avoidance function to it, and stand in front of it when it is about to go out of the canvas. But the ultrasonic sensor in the kit is not sensitive, so in the end we chose the keyboard control program.
/*
 # Edited by:  Matt
 # Date:       2015.09.06
 # Version:    1.1
 # Product:    Cherokey 4WD Mobile Platform
 # SKU:        ROB0102/ROB0117

 # Description:
 # Drive 2 motors with this Cherokey 4WD Mobile Platform
 # Connect D4,D5,D6,D7,GND to UNO digital 4,5,6,7,GND

*/
//Motor Definitions
int E1 = 5;     //M1 Speed Control
int E2 = 6;     //M2 Speed Control
int M1 = 4;     //M1 Direction Control
int M2 = 7;     //M2 Direction Control

//DIRECTIONS

//STOP
void stop(void)
{
  digitalWrite(E1, 0);
  digitalWrite(M1, LOW);
  digitalWrite(E2, 0);
  digitalWrite(M2, LOW);
}

//ADVANCE
void advance(char a, char b)
{
  analogWrite (E1, a);
  digitalWrite(M1, HIGH);
  analogWrite (E2, b);
  digitalWrite(M2, HIGH);
}

//MOVE BACKWARDS
void back_off (char a, char b)
{
  analogWrite (E1, a);
  digitalWrite(M1, LOW);
  analogWrite (E2, b);
  digitalWrite(M2, LOW);
}


//TURN LEFT
void turn_L (char a, char b)
{
  analogWrite (E1, a);
  digitalWrite(M1, LOW);
  analogWrite (E2, b);
  digitalWrite(M2, HIGH);
}

//TURN RIGHT
void turn_R (char a, char b)
{
  analogWrite (E1, a);
  digitalWrite(M1, HIGH);
  analogWrite (E2, b);
  digitalWrite(M2, LOW);
}

void setup(void) {
  int i;
  for (i = 4; i <= 7; i++)
    pinMode(i, OUTPUT);
  Serial.begin(9600);      //Set Baud Rate
  Serial.println("hello. w = forward, d = turn right, a = turn left, s = backward, x = stop, z = hello world"); //Display instructions in the serial monitor
  digitalWrite(E1, LOW);
  digitalWrite(E2, LOW);
}

void loop(void) {
  if (Serial.available()) {
    char val = Serial.read();
    if (val != -1)
    {
      switch (val)
      {
        case 'w'://Move Forward
          Serial.println("going forward");
          advance (255, 255);  //move forward at max speed
          delay (1000);
          stop();
          break;
        case 's'://Move Backward
          Serial.println("going backward");
          back_off (255, 255);  //move backwards at max speed
          delay (1000);
          stop();
          break;
        case 'a'://Turn Left
          Serial.println("turning left");
          turn_L (255, 255);
          delay (1000);
          stop();
          break;
        case 'd'://Turn Right
          Serial.println("turning right");
          turn_R (255, 255);
          delay (1000);
          stop();
          break;
        case 'z':
          Serial.println("hello world!");
          break;
        case 'x':
          Serial.println("stopping");
          stop();
          break;
      }
    }
    else stop();
  }
}
After uploading the code the robot did not walk in the direction w = forward, d = turn right, a = turn left, s = backward. However, we simply modified the code to look like the following and the robot was able to go in the correct direction.
        case 'a'://Move Forward
          Serial.println("going forward");
          advance (255, 255);  //move forward at max speed
          delay (1000);
          stop();
          break;
        case 'd'://Move Backward
          Serial.println("going backward");
          back_off (255, 255);  //move backwards at max speed
          delay (1000);
          stop();
          break;
        case 'w'://Turn Left
          Serial.println("turning left");
          turn_L (255, 255);
          delay (1000);
          stop();
          break;
        case 's'://Turn Right
          Serial.println("turning right");
          turn_R (255, 255);
          delay (1000);
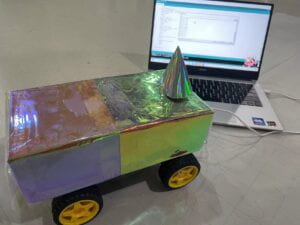
Finally, we made a shell for the robot out of cardboard, fixed the paintbrush, and decorated it with laser paper. Now, control this simple painting robot to paint by pressing the WASD keyboard!