FINAL PROJECT | STEP4: Final Blog
The Eye of Surveillance
Annika Wen
Instructor: Professor Rudi
Introduction Video
(Be sure to check it out! I recorded this in a pure black room and edited it.)
PART1: CONCEPTION AND DESIGN
The goal of this project is to create a thought-provoking view of surveillance in our society, leaving the participants with an unsettling awareness of its intrusive nature in our lives.
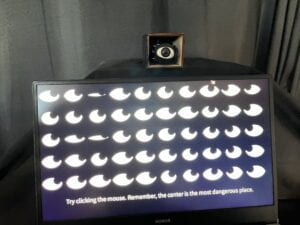

The black screen lights up and the background music plays, starting with three opening phrases “Hey.” “What are you doing?” “Someone is watching you.” A whole screen of blinking and trembling black and white eyes then appears on Processing, creating an eerie atmosphere of being watched. The participant can then move the mouse and the eyes in the background will track – that is, keep staring at – the mouse’s position. Clicking the mouse will make the eye in reality pop. The mechanism of interaction is that when the mouse is moved to the middle area, the mechanical eyeball will rotate and stop rotating when it is moved back to the edge area. Symbolically, if you do something out of the ordinary and become the target of surveillance, the “eye” in reality will remind you that “you are being watched”. And when you hide in a corner and think you are in a safe position, the “eyes” in the virtual world are still watching you.
Some students suggested that the surveillance was covert. So I set the eyes to close when the mouse is moved to the position of the eyes. But if you look closely there is still a slit left for a peep.
PART2: FABRICATION AND PRODUCTION
I was looking for information on related projects online and found a lot of tutorial resources for building a 3D-printed Arduino animatronic eye mechanism. Most of them are for two eyes and require complex equipment and techniques. After evaluating that it would be too difficult to complete the two-eye model independently with my existing fabrication skills and materials before the end of the semester (turns out I was right, as I ran into students who study robotics trying to assemble the two-eyes mechanism I saw, but the product they showed at the IMA show didn’t work well), I decided to purchase John Strope’s Animatronic Eyeball DIY Kit and assembled only one eye.
The circuit was successfully assembled according to the kit. The original circuit was one button to control the eye blinking and one button to control the eye turning.
Then I 3D-printed the eye holder, eyelids, fixture, frame, pivot, and a mounting tool for bending metal wires.
I used Ultimaker due to the high level of detail in the parts.
Here I made the mistake of not choosing a higher intensity to save time. Andy told me that the x-axis and y-axis directions of 3D printing are very stable, but the z-axis direction is easy to break, which is the weakness of 3D printing. I learned a lesson from this. Next time I 3D print I will make sure to assess the strength I need beforehand.
After 3D printing, I borrowed the required four servo motors, put the parts together, and had a new problem when I tried to upload the code. Under normal circumstances, the two servo motors controlling the eyelids should turn slightly in the direction of the eyeballs and then return to their original position, and the two servo motors controlling the rotation of the eyeballs should each turn four times in a regular manner. But when I pressed the button, only the servo motor in my own Arduino kit worked properly, and the rest of the motors started to rotate wildly.
Rudi told me this was because some of the servo motors in the equipment room were the wrong type (although they looked the same) and there was no way to control the rotation. After borrowing five more motors from the equipment room and testing each one, I finally had the four correct servo motors I needed.
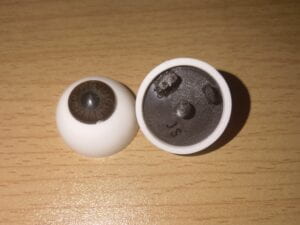
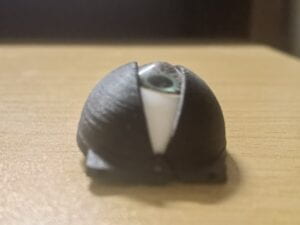
The eyeball case I purchased arrived (deliberately choosing the black and red pupil). I managed to glue on the back part that is used to connect the motor. But the eyeball is not a perfect hemisphere, the eyelids could not be fully closed, so I had to change the direction of rotation of the motor to turn the “blink” into a “pop” action.
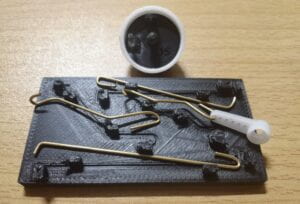
Next comes the most painful part of the eyeball assembly process – bending the wire into the right shape to connect the motor to the eyeball and eyelids. Bending into the shape of the template provided by John was actually not that difficult (although the fragile z-axis broke several times), but the shape did not actually match and needed to be adjusted. I was really frustrated when I couldn’t get the two metals that control the rotation of the eye to snap in after trying all night and even considered giving up. Then after adjusting my mood and trying again, I finally got it together (almost cried😭).
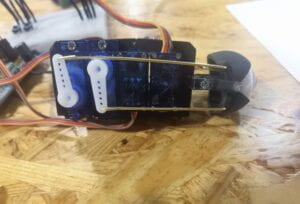
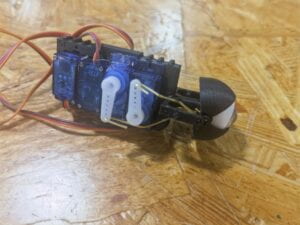
The assembled look.
The good times didn’t last long. The 3D printed parts kept breaking, and when Pato and I tried to modify the code to separate the controls the night before the class presentation, the servo motors spun wildly and broke the 3D printed parts in pieces. It took me a long time to put them back together. But the 3D printed parts used to hook the wire that spins left and right could not be glued back together because they had been glued too many times. I had to discard the left and right movements and keep only the top and bottom movements. The upper and lower eyelids, screw and pivot were also glued together and broken off.
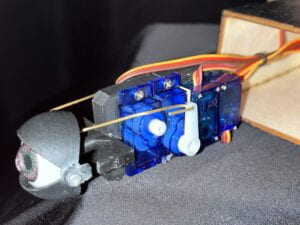
It was really the darkest night, and the class presentation was coming up the next day. I finally calmed down and got it tuned to a working but unstable state.
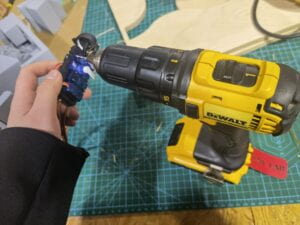
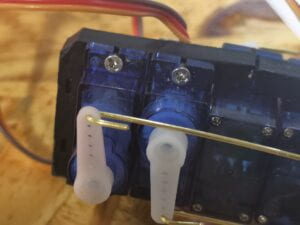
To enhance the stability, I use screws to fix it. But the hole in the frame was too small and I had to use a drill to make the hole bigger. This is another thing that requires patience and care. But when finished, the motor and frame structure became very stable.
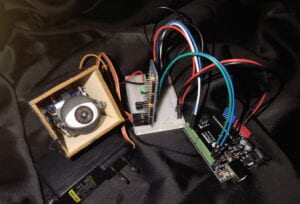
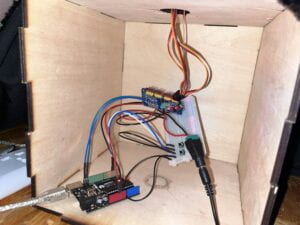
I also 3D printed a small box to hide the servo motors and painted it black to fit the dark theme.
About the Processing part, as you can see in the essay, I have a lot of ideas. The eye was too small to fit the smallest camera, the eye-tracking device was expensive, processing the image and achieving eye tracking was too complicated. So the idea of adding a real-time surveillance image or having the eye follow the participant’s gaze had to be discarded. Finally, I created a whole screen of eyes tracking the mouse position by referring to the “Eye” code on OpenProcessing.
The interactive part is sending values from Processing to Arduino that I haven’t practiced before. At first, I wanted to draw some virtual buttons to control the eye rotation, but even Rudi couldn’t figure out the logic of this strange code in a short time. So I had to keep the original mechanism of turning up and down for one cycle every time it ran. Then I realized that adding boxes representing buttons against a background full of eyes would be awkward. So I saw the “eye” as a symbol of surveillant and supervisor, with a mechanical operation – i.e. the eye turns when the mouse is moved to the middle. Also, clicking the mouse anywhere on the screen will open the mechanical eyes wide.
All of this, plus a prompting sentence at the bottom of the screen, made up a simple version of what I presented in Tuesday’s class. I’m glad I persevered, overcame obstacles, and made a project that I could present on Tuesday. Although it is simple, it has tentatively expressed the feelings I want to convey to people.
Video of Tuesday’s class presentation
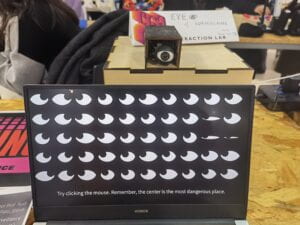
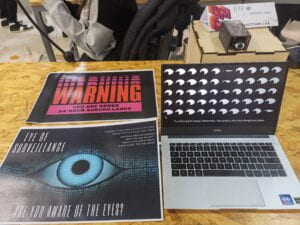
I got up the courage and decided to improve it a bit and then participate in the IMA show on Friday. I only had time to add a few opening phrases and a simple sound interaction where the background music gets louder when the mouse moves to the middle. If I have the time and energy afterward, I will definitely flesh out the project with the story background and more sound interactions I have in mind, even video surveillance images.
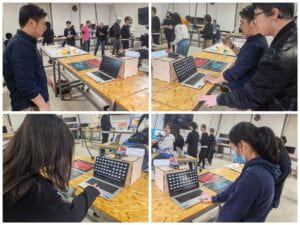
I received a lot of recognition and encouragement during the IMA show. Thanks everyone! 😘
PART3: CONCLUSIONS
There were a lot of regrets in this final project. What is shown in class is only a half-finished version of my idea, and I was too busy to implement all the improvement ideas before the IMA show. But in the end, I accepted the imperfection and gradually saw more and more of its shining points. I followed my heart and made a “Make you Think” installation and didn’t get lost when everyone was making games or utility items. This was also approved by Eric. After the class presentation, Eric told me not to doubt that I shouldn’t do the artwork, I did a great job and it was meaningful. I was apprehensive about explaining to everyone at the IMA show because my project would take about 30 seconds to complete and was not as fun compared to the games around me. But many students appreciated it, and even the professor of the game design course said, “Your project is cool!” (I was fortunate to see a picture of my project in his Wechat Moments afterward).
With the frustration of 3D printed parts and pivots constantly breaking, I had forgotten that the eyeball was the most invested part of my entire project and deserved attention. As it turns out, everyone saw how technical it was. Eric said the most competitive part of my project was this eyeball and it should not be abandoned. Well, I will remember to adjust a higher intensity next time I 3D print.
As for the parts that can be improved, first of all, I have a lot of ideas myself. For example, adding some story background, like Rudi said, “Why do we have to move the mouse? Are we looking for something? “It is difficult to rewrite the code to control the rotation of the eye in a specific direction in a short time, so I would like to add some sound interactions, such as some sound effects when the mouse moves to the middle. Some students mentioned that the whole scene layout does not show the “surveillance” feeling very much (especially the little yellow duck mouse is too eye-catching), so I plan to borrow a screen, black mouse and Bluetooth speakers, to shoot the documentation video in a pure black room. But the equipment room later stopped lending equipment, so I had to use the computer to record. Eric even mentioned Daniel Rozin’s Penguins Mirror project that we had seen in class, saying that I could make many eyes, responding to a person’s presence via a camera and physical computing or custom software. That’s a lot of work since just one eye has taken a huge amount of my effort.
Finally, I would like to sincerely thank Rudi for his teaching and help throughout the semester. I was almost in despair on the last day of this project when he gave me a new eyeball kit, which didn’t come in handy in the end, but it was appreciated. If I have time I will definitely work on a big eyeball on my own based on the parts it provides. I’m glad I took Rudi’s interaction lab class.
Thanks to Prof. Andy and Steve for their help in the fabrication lab. Although assembling the eyeball made me crash, the fabrication lab made me calm. (Seriously😶)
Thanks to learning assistant Pato for helping me with the code. I’m really sorry for making you work overtime!
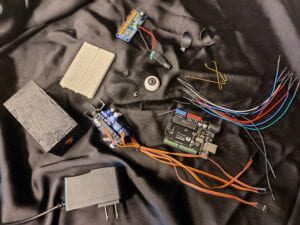
Time of sad disassembly as always
PART4: TECHNOLOGICAL DOCUMENTATION

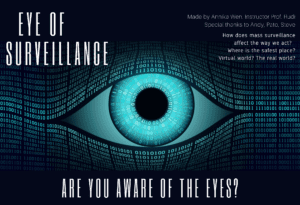
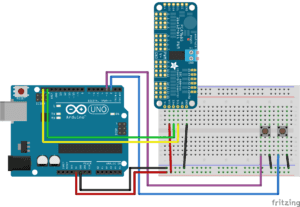
Since the Arduino code is so long that WordPress crashes every time I upload, I can only attach the file of the Arduino code here.
The code for processing is as follows. Referred to the eye code on OpenProcessing.
import processing.sound.*;
Eye eye;
Eye eye2;
float nodeAmount = 50;

float lastX;
float lastY;
int mode = 0;

ArrayList<Eye> eyes = new ArrayList<Eye>();


import processing.serial.*;

int NUM_OF_VALUES_FROM_PROCESSING = 3;  /** YOU MUST CHANGE THIS ACCORDING TO YOUR PROJECT **/
int processing_values[] = new int[NUM_OF_VALUES_FROM_PROCESSING]; /** this array stores values you might want to send to Arduino **/

Serial myPort;
String myString;

int PORT_INDEX = 0;
int counter = 0;
//boolean canAdd = true;

int textX;
int textY;

SoundFile sound;
void setup() {

  //size(1270, 700);

  fullScreen();
  background(0);
  for (int i = 0; i < 10; i++) {
    for (int j = 0; j < 5; j++) {
      Eye instance = new Eye(random(50, 70),
        random(30, 50),
        - width/2 + 70 + i*150, -height/2 + 70 + j*140);
      eyes.add(instance);
    }
  }
  setupSerial();

  sound = new SoundFile(this, "ghost cry.mp3");
  // play the sound on loop
  sound.loop();

  textX = width/10;
  textY = height - 80;
}

int recordedTime1;
boolean toRecord1 = true;
boolean toAdd1 = true;

int recordedTime2;
boolean toRecord2 = true;
boolean toAdd2 = true;

int recordedTime3;
boolean toRecord3 = true;
boolean toAdd3 = true;

String textToDisplay;
int mouseofX;
void draw() {
  mouseofX = int(map(mouseX, 0, width, 0, 3));
  if (mouseofX == 1) {
    sound.amp(1.0);
  } else {
    sound.amp(0.5);
  }

  if (mode ==0) {
    background(0);
    textSize(80);
    fill(255);
    textToDisplay = "Hey.";
    text(textToDisplay, width/4, height/2);
    if (toRecord1) {
      toRecord1 = false;
      recordedTime1 = millis();
    }
    if (millis() - recordedTime1 > 3000 && toAdd1) {
      toAdd1 = false;
      mode += 1;
    }
  }
  if (mode == 1) {
    background(0);
    textSize(80);
    fill(255);
    textToDisplay = "What are you doing?";
    text(textToDisplay, width/8, height/2);

    if (toRecord2) {
      toRecord2 = false;
      recordedTime2 = millis();
    }
    if (millis() - recordedTime2 > 3000  && toAdd2) {
      toAdd2 = false;
      mode +=1;
    }
  }
  if (mode == 2) {
    background(0);
    textSize(80);
    fill(255);
    textToDisplay = "Someone is watching you.";
    text(textToDisplay, width/8, height/2);

    if (toRecord3) {
      toRecord3 = false;
      recordedTime3 = millis();
    }
    if (millis() - recordedTime3 > 3000  && toAdd3) {
      toAdd3 = false;
      mode +=1;
    }
  }
  if (mode == 3) {
    background(0);
    textSize(40);
    fill(255);
    text("Try clicking the mouse. Remember, the center is the most dangerous place.", textX, textY);
    for (int i = 0; i < eyes.size(); i++) {
      eyes.get(i).display();
    }
    processing_values[0] = counter;
    processing_values[1] = int(map(mouseX, 0, width, 0, 3));
    processing_values[2] = int(map(mouseY, 0, height, 0, 2));


    if (frameCount % 4 == 0) {
      textX += random(-1, 2);
      textY += random(-1, 2);
    }
  }
  // if (mode == endAmount){
  //   mode = 0;
  //}
  sendSerialData();
  //println(counter);
}


void mousePressed() {
  //if (canAdd) {
  counter = 1;
  //canAdd = false;
  //}
}

void mouseReleased() {
  //canAdd = true;
  counter = 0;
}

public class Eye {


  float originalNodeAmount;

  float yPosOffset;
  float xPosOffset;

  //upper eyelid
  float xPos1;
  float yPos1;

  float xNode1;
  float yNode1;

  float xNode2;
  float yNode2;

  float xPos2;
  float yPos2;

  //lower eyelid

  float _xNode1;
  float _yNode1;

  float _xNode2;
  float _yNode2;

  float eyeState = 0;
  float eyeScale = 0;
  float blinkSpeed = 4;
  float blinkMaxTime = 10;
  float timer;

  //pupil
  float XPosEllipse;
  float yPosEllipse;
  float eyeMovementX;
  float eyeMovementY;
  boolean closingEye = false;

  public Eye(float scale, float nodeAmount, float xMovement, float yMovement) {


    xPos1 = (width/2 - scale) + xMovement; //posicion 1 en x
    yPos1 = (height/2) + yMovement; //posicion 1 en y

    xNode1 =  (width/2 - nodeAmount) + xMovement; // nodo 1 en x
    yNode1 =  (height/2 - nodeAmount) + yMovement; //nodo 1 en y

    _yNode1 =  (height/2 + nodeAmount) + yMovement;

    xNode2 = (width/2 + nodeAmount) + xMovement; // nodo 2 en x
    yNode2 = (height/2 -nodeAmount) + yMovement; //nodo 2 en y

    _yNode2 = (height/2 + nodeAmount) + yMovement;

    xPos2 = (width/2 + scale) + xMovement; //posicion 2 en x
    yPos2 = (height/2) + yMovement; // posicion 2 en y

    originalNodeAmount = nodeAmount;
    yPosOffset = yMovement;
    xPosOffset = xMovement;
    eyeScale = scale;

    XPosEllipse = xPos1 + (xPos2 - xPos1)/2;
    yPosEllipse = yPos1 + (yPos2 - yPos1)/2;
  }


  void display() {

    eyeMovementX = random(0, 3);

    if (timer < blinkMaxTime) {
      timer ++;
    } else {
      blinkMaxTime = random(100, 300);
      Blink();
      timer = 0;
    }

    stroke(0);
    fill(255);
    //up
    bezier(xPos1, yPos1, xNode1, yNode1, xNode2, yNode2, xPos2, yPos2);
    //low
    bezier(xPos1, yPos1 -1, xNode1, _yNode1, xNode2, _yNode2, xPos2, yPos2 -1);

    fill(0);
    ellipse( XPosEllipse +eyeMovementX, yPosEllipse+eyeMovementY, 50, 50);

    //vibrate when come into range
    if (mouseX > xPos1 && mouseX < xPos2 && mouseY > yPos1 - nodeAmount    && mouseY < yPos1 + nodeAmount) {
      CloseEye();
    } else {
      eyeMovementX = 0;
      closingEye = false;
    }

    //follow the mouse with the eyes

    if (mouseX > XPosEllipse && XPosEllipse + 35 < xPos2 ) {
      XPosEllipse += 10;
    }
    if (mouseX < XPosEllipse && XPosEllipse - 35 > xPos1) {
      XPosEllipse -= 10;
    }
    if (mouseY > yPosEllipse && yPosEllipse + 35 < yPos1 + nodeAmount) {
      yPosEllipse += 10;
    }
    if (mouseY < yPosEllipse && yPosEllipse - 35 > yPos1 - nodeAmount) {
      yPosEllipse -= 10;
    }

    //close the eye
    if (eyeState == -1) {
      if (yNode1 < ((height/2) + yPosOffset)) {
        yNode1 += blinkSpeed;
      }
      if (yNode2 < ((height/2) + yPosOffset)) {
        yNode2 += blinkSpeed;
      }
      if (_yNode1 > ((height/2) + yPosOffset)) {
        _yNode1 -= blinkSpeed;
      }
      if (_yNode2 > ((height/2) + yPosOffset)) {
        _yNode2 -= blinkSpeed;
      }
      if (yNode1 >= ((height/2) + yPosOffset) && yNode2 >= ((height/2) + yPosOffset) && _yNode1 <= ((height/2) + yPosOffset) && _yNode2 <= ((height/2) + yPosOffset)) {
        eyeState = 1;
      }
    }

    //open the eye
    if (eyeState == 1) {
      if (yNode1 > ((height/2 -nodeAmount) + yPosOffset)) {
        yNode1 -= blinkSpeed;
      }
      if (yNode2 > ((height/2 -nodeAmount) + yPosOffset)) {
        yNode2 -= blinkSpeed;
      }
      if (_yNode1 < ((height/2 +nodeAmount) + yPosOffset)) {
        _yNode1 += blinkSpeed;
      }
      if (_yNode2 < ((height/2 +nodeAmount) + yPosOffset)) {
        _yNode2 += blinkSpeed;
      }
      if (yNode1 <= ((height/2 - nodeAmount) + yPosOffset) && yNode2 <= ((height/2 - nodeAmount) + yPosOffset) && _yNode1 >= ((height/2 +nodeAmount) + yPosOffset) && _yNode2 >= ((height/2 +nodeAmount) + yPosOffset) && !closingEye) {
        eyeState = 0;
      }
    }
  }

  void CloseEye() {
    eyeState = -1;
    closingEye = true;
  }

  void Blink() {

    eyeState = -1;
  }
}


void setupSerial() {
  printArray(Serial.list());
  myPort = new Serial(this, Serial.list()[PORT_INDEX], 9600);

  myPort.clear();
  myString = myPort.readStringUntil( 10 );  // 10 = '\n'  Linefeed in ASCII
  myString = null;
}

void sendSerialData() {
  String data = "";
  for (int i=0; i<processing_values.length; i++) {
    data += processing_values[i];
    //if i is less than the index number of the last element in the values array
    if (i < processing_values.length-1) {
      data += ","; // add splitter character "," between each values element
    }
    //if it is the last element in the values array
    else {
      data += "\n"; // add the end of data character linefeed "\n"
    }
  }
  //write to Arduino
  myPort.write(data);
  print(data); // this prints to the console the values going to arduino
}
Background Music 鬼哭 – Claustrophobia – 单曲 – 网易云音乐 (163.com)