Tag Archives: fall 2019

Manesha – Pattern from “Computer Graphics and Art”

This is the pattern I chose from the  article:

My version: 


The following is the code for it: 


void setup() {
  size(1000, 1000); 
  background(0);
}
float x = 0;
int count = 0;
int deltax = 0;
int deltay = 0;
int run = 0;
int shiftx = 0 ;
int shifty = 0 ;
int startx = 0;
int starty = 0;
int shiftmain = 0;

void horizontalLines(int shiftx, int shifty){ //draw the horizontal lines
  int x = 0;
  float thickness = 0; //for changing the thickness of the strokes
  pushMatrix();
  translate(deltax + shiftx,deltay + shifty); //draws the lines
  for (int i = 0; i< 6; i++){
    strokeWeight(thickness);
     stroke(255);
     line(x,0,x, 50);
     x = x + 10; 
     thickness = thickness + 0.5;
  }
 popMatrix();
}
void verticalLines(int shiftx, int shifty){ //for the vertical lines
  int y = 0;
  float thickness = 0;
   pushMatrix();
   translate(deltax + shiftx,deltay + shifty);
  for (int i = 0; i< 6; i++){ //draw the lines
     stroke(255);
     strokeWeight(thickness); //the stroke thickness
     line(0,y,50, y);
     y = y + 10; 
     thickness = thickness + 0.5;
  }
  popMatrix();
}
void pattern(int shiftx, int shifty){ //this function picks one either horizontal or vertical lines and prints them. 
   int pick = int(random(1,5));
   if (pick == 1){  horizontalLines(0, 0);}
   else if (pick ==2){  horizontalLines(0, 0);}
   else if (pick ==3){  verticalLines(0, 0);}
   else if (pick ==4){  verticalLines(0, 0);}
   else { println("Error: Not an option");}
   deltax = deltax + shiftx;
   deltay = deltay +shifty;
 
}

void deltaset(int x, int y){ //this is used to reset where each row starts
  deltax = x;
  deltay = y;
}


void draw() {

  if (run < 400){ // to stop the program from printing outside of the canvas
  pattern( 50, 0);
  
  if (run%20 == 0 && run !=0){
    deltaset(0, 50*(int(run/20))); //moves to the next row
    pattern( 50, 0);
  }
  
  println(run);
  run = run + 1; //keeps count of the number of prints
  }
  
}

Project Week 7: Self Portrait

Concept

I am not made up of me. I am made up of the intersection of every entity I have encountered. A self-portrait, then, should not look like me, but should be the amalgamation of all of the faces of all those who have influenced me. I created a self portrait using faces of several of those people who have been most influential in the development of my identity. 

The code and self-portrait can be accessed here.

Process

I found available head shots of the people online, edited them in Photoshop to all be the same size, and divided them into quarters. Each set of quarters is then cycled through in its appropriate location on-screen.

Carlos – Intro to IM Midterm Documentation

Concept

            My midterm project was, quite literally, a face that gets angry whenever anyone gets close to it. I call it “grumpy cardboard man”.

Circuit Schematic + video

Intro to IM Midterm Documentation

Program

https://github.com/Carlos-A-Paez-G/Intro-to-IM/blob/764388dc9e95c8dc3c8f1ffef47e8d98d2190396/Midterm%20Documentation

Behavior

            The face made out of cardboard expresses its anger via its eyes, its eyebrows, and a speaker. By using a distance sensor that doubles up as the nose of the face, the program can tell when something is near the front of the face. While there is nothing within a certain distance (referred to as “comfortable” in the code) the eyebrows remain parallel to the surface the face is on.

Once it detects something within a certain distance (less than “comfortable”), the face “activates”. This means that the eyebrows start to move and red LED’s inside its eyes begin to turn on. The eyebrows tilt more the closer one gets to the face, and the LED’s become brighter as well (though this change in brightness is very hard to perceive). Because of the inaccuracy of the distance sensor, the eyebrows will often start twitching back and forth as the servo motors are given different values for positions. This is a good example of an “it’s not a bug, it’s a feature” moment, as the twitching can feel kind of violent and erratic, and thus enhances the idea that the “grumpy cardboard man” is indeed uncomfortable.

If the distance sensor detects something being really close (below a value referred to as “rude” in the code) then the LED’s will go on full brightness and the eyebrows on full tilt. The speaker will also be activated at this point, quickly alternating between various low-tone pitches to simulate a sort of growl.


Problems

            The project actually went quite smoothly. The biggest problem I faced was really my lack of good planning and time management. This was compounded by the fact that the main thing I wanted to tackle during this project was making a piece that I could call “visual art”. I consider myself to have really poor skills in the department of “visual arts” and so starting this project I would constantly be concerned that I would be struggling with making the thing look pretty. The way to get over this was to eventually just do the thing and to not be too perfectionist about it and to figure out things as they went… only that it took some time for me to get there.

            The biggest problem I ran into, in terms of the technical side, was that with my original code the Servos were not turning in the right direction. I thought that by turning a Servo motor upside-down it would turn in the opposite direction, so I had originally made them both be controlled by the same pin. However, turns out that turning a Servo upside-down by turning through the same axis at which it spins does not change the direction of the rotation. So I then had to make the two Servos be controlled by two separate pins. This miscalculation cost me a whole extra week of work though…

            The final thing didn’t really have any problems per-se, but the presentation could have been better. I could have gotten a box to hide the Arduino, and I could have used hot glue to put the servos onto the face instead of tape.

            Actually, I take that back, there is one problem with the final thing that I don’t know how to solve. The speaker is too soft and I don’t know how to make it louder while still keeping the tones at the same growl-like pitch. I guess a solution would be to use the mp3 shield and get an actual loud growl or scream sound to play through the speaker, but there was just not enough time for me to figure out how the shield worked. Otherwise, I do wonder if there is some way to amplify the sound that isn’t getting a bigger speaker. Maybe by building around the speaker so that the sound is focused in the direction of the user (which would only ever be in front of the mouth) would have been a good idea.


Lessons learned

            I just have to do things! As I was mentioning in the previous section, what I really wanted to focus on for this project was the visual aspect of the piece, rather than trying to come up with complicated technical things. Especially for prototypes, I need to stop worrying about the thing looking pretty, as long as it works and gets the idea across it is a good starting point. It also became clear to me that I can easily lean onto my lack of “artistic skills” and make things out of simple, stylized shapes that still has a clear impact. I hope to really use this class to keep working on these visual arts skills and find out what those are for me, especially as they relate to interactivity.

A Brief Rant on the Future of Interaction Design


A Brief Rant on the Future of Interaction Design Response

I had never thought about the development of technology the way that Bret Victor has. When I watch movies where almost everything can be controlled right from your fingertips my first thought is “Wow, that’s so convenient” but I hadn’t thought about the actual enjoyment of the experience. The idea that almost everything that we experience through that interface is visual, the tangible aspect is almost completely disregarded. Interestingly enough, I have experienced something that relates very heavily to a sudden loss of the sense of touch with our “Pictures Under Glass.” Recently I transitioned from the usual pen and paper to an iPad. Don’t get me wrong, I love it, but I also dearly miss the feeling of pen and pencil on paper. So much so that I’ve been looking to buy  a screen protector called “Paper-like” just to regain that scratchy feeling. I think that Bret Victor has a very good point. When the world is at your fingertips, why get up? Not even consider the multitudes of health repercussions this could have, what about our experience of the world? The thought of technology being so convenient that you don’t have to leave your room is a terrifying thought.

Midterm Project

What are the two things you’re most likely to see in a typical dorm room in NYU Abu Dhabi? Plants (alive or dead, it’s anyone’s guess), and fairy lights. 

What’s the problem with plants? They die. What do we like to do? Party. (Keeping it halal of course). With this in mind, I decided to make a plant that helps use with all three of the aforementioned situations- having fairy lights, plants that don’t die, and parties. 

It uses three potentiometers, one for ‘water’, one for ‘light’, and one for party mode. If you turn the water potentiometer, the plant ‘grows’. Turning the light potentiometer makes the leaves and flowers (for which I used LEDs) glow. The party mode potentiometer makes the LEDs blink at varying speeds depending how much you turn the potentiometer.

Water:

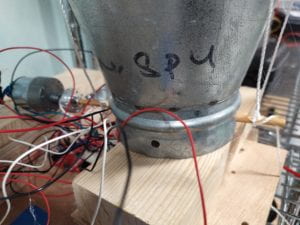
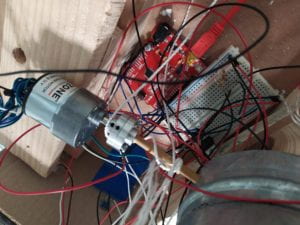
I initially tried using weight sensors for the ‘water’ potentiometer since I wanted to use actual water- the increasing weight of the water in a glass would make the plant grow- but it didn’t work since the sensor wasn’t consistent enough with its readings. So I decided to use a potentiometer instead. I used if statements to create three ‘levels’ so that the plant can grow a little more each time. The potentiometer is connected to a motor (again, I had issues with the motor being too weak so I had to rewire my plant to make it lighter and also use a stronger motor), which turns for a set amount of time every time it’s turned. The motor is connected to a pulley system which pulls the plant up, making it ‘appear’ out of its container, giving the illusion of growth. This was SUPER tricky because I had to figure out the mechanics of it while making sure the plant didn’t just tip over to one side as it was lifted- I was partially successful. But hey, plants don’t necessarily grow in exactly vertically lines do they?

Light:

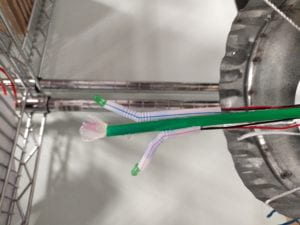
The light potentiometer makes the LEDs light up in turn, from bottom to top, adding to the illusion of growth- I used green for leaves and other colours for flowers- very original, I know. Again, I used if statements to make them light up in sequence. 

PARTY PARTY PARTY:

Yet again, if statements to the rescue- turning the party potentiometer makes the LEDs (the leaves and flowers) blink at different speeds, depending on how crazy you want to get. 

I’ve labelled the potentiometers so people know what they’re controlling, and the little dial type thing I’ve drawn above the knobs (hopefully) conveys that there are three levels to each potentiometer setting. 

So there you have it: disco plant.

int counter = 0;
// the setup routine runs once when you press reset:
void setup() {

// initialize serial communication at 9600 bits per second:
Serial.begin(9600);

pinMode(3, OUTPUT);
pinMode(5, OUTPUT);
pinMode(6, OUTPUT);

pinMode(11, OUTPUT);
}

// the loop routine runs over and over again forever:
void loop() {
// read the input on analog pin 0:
int sV1 = analogRead(A0);
sV1 = map(sV1, 0, 1023, 0, 255); //potentiometer for 'water' makes the plant 'grow'

int sV2 = analogRead(A1);
sV2 = map(sV2, 0, 1023, 0, 255); //potentiometer for 'sunlight'. affects LEDs

int sV3 = analogRead(A2);
sV3 = map(sV3, 0, 1023, 0, 255); //potentiometer for party mode- makes the lights blink

// print out the value you read:
Serial.println(sV2);
delay(1); // delay in between reads for stability

if (sV1 > 0 && sV1 < 85 && counter == 0) {
digitalWrite(11, HIGH); // turn the LED on (HIGH is the voltage level)
delay(2500);
digitalWrite(11, LOW);
delay(500);

counter ++; //ensures that the motor turns only once

}

if (sV1 > 85 && sV1 < 170 && counter == 1) {
digitalWrite(11, HIGH); // turn the LED on (HIGH is the voltage level)
delay(2500);
digitalWrite(11, LOW);
delay(500);
counter ++;

}

if (sV1 > 170 && sV1 < 255 && counter == 2) {
digitalWrite(11, HIGH); // turn the LED on (HIGH is the voltage level)
delay(1500);
digitalWrite(11, LOW);
delay(500);
counter ++;

}

if (sV2 > 0 && sV2 < 15) {
digitalWrite(3, LOW); // turn the LED on (HIGH is the voltage level)
digitalWrite(5, LOW);
digitalWrite(6, LOW);

}

if (sV2 > 0 && sV2 < 115) {
digitalWrite(3, HIGH); // turn the LED on (HIGH is the voltage level)
digitalWrite(5, LOW);
digitalWrite(6, LOW);

}

if (sV2 > 115 && sV2 < 190) {
// turn the LED on (HIGH is the voltage level)
digitalWrite(5, HIGH);
digitalWrite(6, LOW);
digitalWrite(3, HIGH);

}

if (sV2 > 190 && sV2 < 255) {
// turn the LED on (HIGH is the voltage level)
digitalWrite(5, HIGH);
digitalWrite(6, HIGH);
digitalWrite(3, HIGH);

}

if (sV3 > 10 && sV3 < 85) {
digitalWrite(3, HIGH);// turn the LED on (HIGH is the voltage level)
digitalWrite(5, HIGH);
digitalWrite(6, HIGH);
delay(1000);
digitalWrite(3, LOW);// turn the LED on (HIGH is the voltage level)
digitalWrite(5, LOW);
digitalWrite(6, LOW);
delay(1000);

}

if (sV3 > 85 && sV3 < 175) {
digitalWrite(3, HIGH);// turn the LED on (HIGH is the voltage level)
digitalWrite(5, HIGH);
digitalWrite(6, HIGH);
delay(500);
digitalWrite(3, LOW);// turn the LED on (HIGH is the voltage level)
digitalWrite(5, LOW);
digitalWrite(6, LOW);
delay(500);

}

if (sV3 > 175 && sV3 < 255) {
digitalWrite(3, HIGH);// turn the LED on (HIGH is the voltage level)
digitalWrite(5, HIGH);
digitalWrite(6, HIGH);
delay(250);
digitalWrite(3, LOW);// turn the LED on (HIGH is the voltage level)
digitalWrite(5, LOW);
digitalWrite(6, LOW); //LEDs blinking at varying speeds
delay(250);

}

}


video:

https://drive.google.com/open?id=12GA-RQHJ3nGKpNV4oIUWMX-hbXSYaBqU


Week 7 Readin Assignment

Making Interactive Art: Set the Stage, Then Shut Up and Listen

I think the author had two maşn arguments. The first one is ” Let them decide how they will interpret the parts, and how they will respond” and the second one is “Pay attention to their reactions.” I think he is emphasizing a really good point because interactive media is a mix of technology and ‘art’ we have to treat these two parts according to their needs. Technology requires feedback in order to be improved so we should pay attention what the audience thinks. And ‘art’ is up for interpretation, when you go to a gallery or museum the artist doesn’t explain you what he meant to draw. You interpret the way you want to, and same policy applies for interactive media works.

Physical Computing’s Greatest Hits (and misses)

First of all, It was really impressive to see how many different projects can be made within the field of IM. It kind of scares me that I might not be as creative as other people and not create something nice and good and original which is exactly the author’s point. The reading clearly emphasizes the importance of not being intimated just because things have been done before. A lot of things have been done before but it is up to us how to replicate them and improve them.