Concept
After reading this week’s content, I wanted a cleaner and clearer interaction with this build than with my last one. This build behaves as a visual rhythm board, mimicking the interaction of a sound artist with their mixing table, but with light instead of sound.
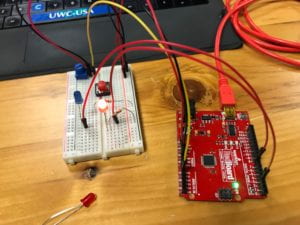
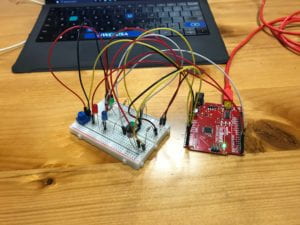
Circuit
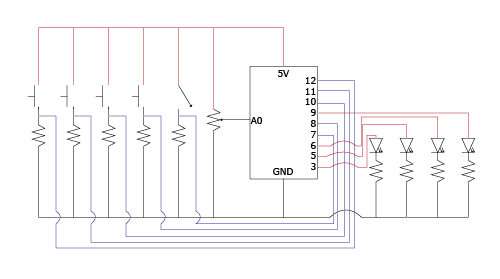
Circuit diagram for visual rhythm board
Code
int red = 9;
int yellow = 6;
int green = 5;
int blue = 3;

int redButton = 12;
int yellowButton = 11;
int greenButton = 10;
int blueButton = 8;

int toggleSwitch = 7;

int potentiometer = A0;


void setup() {
  pinMode(red, OUTPUT);
  pinMode(yellow, OUTPUT);
  pinMode(green, OUTPUT);
  pinMode(blue, OUTPUT);

  pinMode(redButton, INPUT);
  pinMode(yellowButton, INPUT);
  pinMode(greenButton, INPUT);
  pinMode(blueButton, INPUT);
}

void loop() {
  int redButtonState = digitalRead(redButton);
  int yellowButtonState = digitalRead(yellowButton);
  int greenButtonState = digitalRead(greenButton);
  int blueButtonState = digitalRead(blueButton);

  int toggleState = digitalRead(toggleSwitch);

  float potValue = (float) analogRead(potentiometer);
  //set potetiometer to regulate brightness
  float brightness = (float) map(potValue, 0.00, 1023.00, 0.00,
  255.00);
  //set potentiometer to regulate delay
  float blinkDelay = (float) map(brightness, 0.00, 255.00, 1023.00,
  0.00);

  //set toggleState for 0
  if (toggleState == LOW) {
    //tie buttons to LEDs
    if (redButtonState == HIGH)
      analogWrite(red, brightness);
    else (digitalWrite(red, LOW));
    if (yellowButtonState == HIGH)
      analogWrite(yellow, brightness);
    else (digitalWrite(yellow, LOW));
    if (greenButtonState == HIGH)
      analogWrite(green, brightness);
    else(digitalWrite(green, LOW));
    if (blueButtonState == HIGH)
      analogWrite(blue, brightness);
    else(digitalWrite(blue, LOW));

  } //set other toggleState (1)
  else if (toggleState == HIGH) {
    //tie buttons to blink LEDs individually
    if (redButtonState == HIGH) {
      analogWrite(red, brightness);
      delay(blinkDelay);
      digitalWrite(red, LOW);
      delay(blinkDelay);
    } else (digitalWrite(red, LOW));
    if (yellowButtonState == HIGH) {
      analogWrite(yellow, brightness);
      delay(blinkDelay);
      digitalWrite(yellow, LOW);
      delay(blinkDelay);
    } else (digitalWrite(yellow, LOW));
    if (greenButtonState == HIGH) {
      analogWrite(green, brightness);
      delay(blinkDelay);
      digitalWrite(green, LOW);
      delay(blinkDelay);
    } else (digitalWrite(green, LOW));
    if (blueButtonState == HIGH) {
      analogWrite(blue, brightness);
      delay(blinkDelay);
      digitalWrite(blue, LOW);
      delay(blinkDelay);
    } else (digitalWrite(blue, LOW));
  }
}
Behavior
The four LEDs are all controlled with analog and digital sensors. The push buttons provide a digital input indicating whether an LED is on or off. The toggle switch provides an analog input which determines the overall behavior of the LEDs and the potentiometer, another analog input. When the toggle switch is in the zero position, the LEDs turn on as long as a push button is pushed, and the potentiometer regulates the brightness. When the toggle switch is in the one position, the LEDs blink as long as a push button is pushed, and the blink rate and the brightness is regulated by the potentiometer.
Discussion
Within the first few minutes of coding, I could not control my LEDs with the push buttons. I double checked the functionality of everything, ensured all of the code was proper, replaced a 330 ohm resistor with a 10k resistor, and still nothing happened. To troubleshoot, I opened a new code page and reduced my circuit to one push button with one LED. After a bit of frustration, I just started moving the variables around into different parts of the program and testing. When I placed
int redButtonState = digitalRead(redButton)
into the loop, it worked. I remembered the bit about global variables in the previous class and realized that Arduino was not continuously checking the pin for the red push button. As a global variable, this integer was checked once and, thus, was defined as whatever state the pin for the red push button was in when the program started. Once I dropped it in loop, the state of the pin was checked repeatedly. As a result, when the push button was pressed or released, the Arduino could read the change.
Besides these initial issues, there were not many problems. However, one extension I’ve been thinking about would be independently modulating the states of each LED. That is, I press the red button when the toggle switch is in the zero position, and the red LED comes on at the brightness setting from the potentiometer. Then, holding the red button, I press the blue button, which comes on, at first, in the same state and brightness as the red LED. However, if I turn the potentiometer, it’s brightness changes independently, and if I switch the toggle state to the one position, then the blue LED begins to blink while the red LED remains constantly on (both corresponding buttons are still pressed), and the potentiometer will also regulate the speed. I think the easiest way to do this might be to set a zero state, either on or off, for all of the LED’s, and then create conditionals where the pressing of the corresponding button does not activate the LED, but activates the potentiometer and the toggle switch for the corresponding LED. Another option might be to experiment with the BlinkWithoutDelay code, but I am unsure at the moment how this would look.