 CODE: https://github.com/yk1932/Intro-to-IM-Midterm/blob/master/portrait.pde
Author Archives: Yeji Kwon
Post 10: Response to “Physical Computing’s Greatest Hits (and misses)”
Reading this post made me reassured. One of the biggest challenges I had with the midterm project, which I addressed in the previous blog post, was the struggle to come up with something “original”. This is a struggle that I encountered countless times whenever I was given a free topic project. In projects such as these, I have the the tendency to equate good creation to one that is original, one that has never done before. However, every time I approached a project in this mindset, I always found myself stuck in the ideation process, struggling. After wasting a significant amount of time, I always ultimately come back to something that has been done. This leads to less time for the production process and this often makes me regretful as new ideas come while in the process of making, and I no longer have the time to pursue those little ideas, that make my project original.
I plan to go into my final project with the mindset promoted in this text. To significantly decrease the time spent in ideation and distribute more time towards the production, I will pick a theme, regardless of whether it has been done before, and brainstorm within that theme.
The text mentions that “Despite their perennial recurrence, they offer surprises each time they come up.”. From my previous experiences, the surprises always come when I actually start making the product as this is the stage where I actually start molding the project in the direction I would like it to go.
From the list given in the post, I am particularly inspired by the usage of dolls as it makes me nostalgic about my childhood. An object with facial features or human qualities instantly gives emotional connection to the user, which could be an easy way to enhance the interactivity of the product.
Post 9: Response to “Making Interactive Art: Set the Stage, Then Shut Up and Listen”
The text emphasizes the importance of giving freedom to the audience to make an item truly interactive. From a creator’s perspective, it is much easier to be given the chance to explain their work and instruct the users the exact methods to interact with their creation. However, from the user’s perspective, that removes all the joy out of the experience, making the interaction more of an order than an exchange provoked by spontaneity.
Throughout reading the text, I thought about the different ways in which I could make an object speak for itself without textual instructions. The product must visually speak to the audience. For instance, the first object that the user must interact with could be a contrasting color from the background to catch their attention or it could contain a surface that is tempting to touch (shiny instead of rough). I can use universal symbols such as arrows, facial expressions, etc to deliver information in a more visual way.
As the process of coordinating each element of the product is one that happens in one creator’s mind, it is essential, as the text mentions, to listen. The text makes me realize the importance of the act of “listening” where the creator simply watches, in a passive manner, the interaction between their product and the user. It inspires me to dedicate a significant amount of time into testing the final product with multiple users to watch their feedback and fix the areas that create confusion and inconsistencies.
Post 8: Midterm
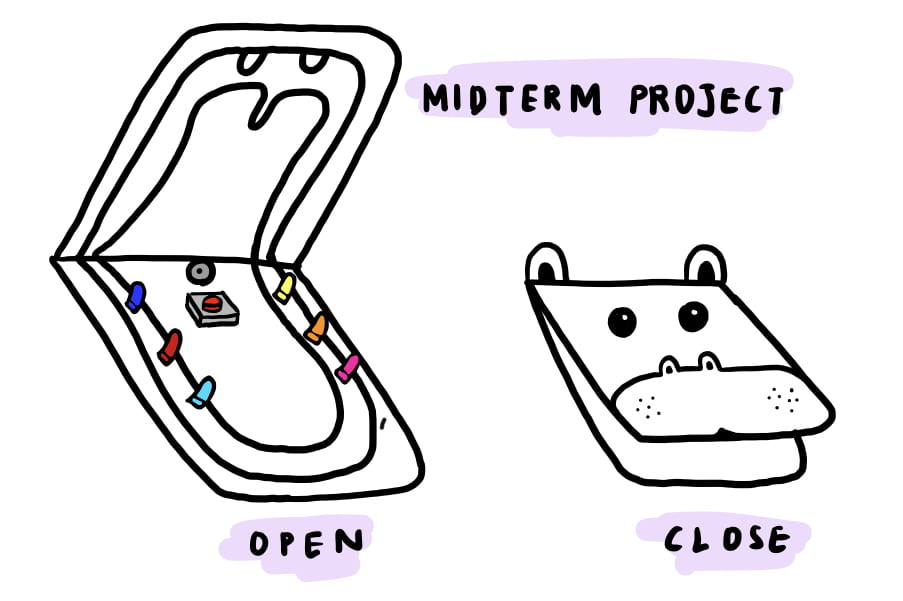
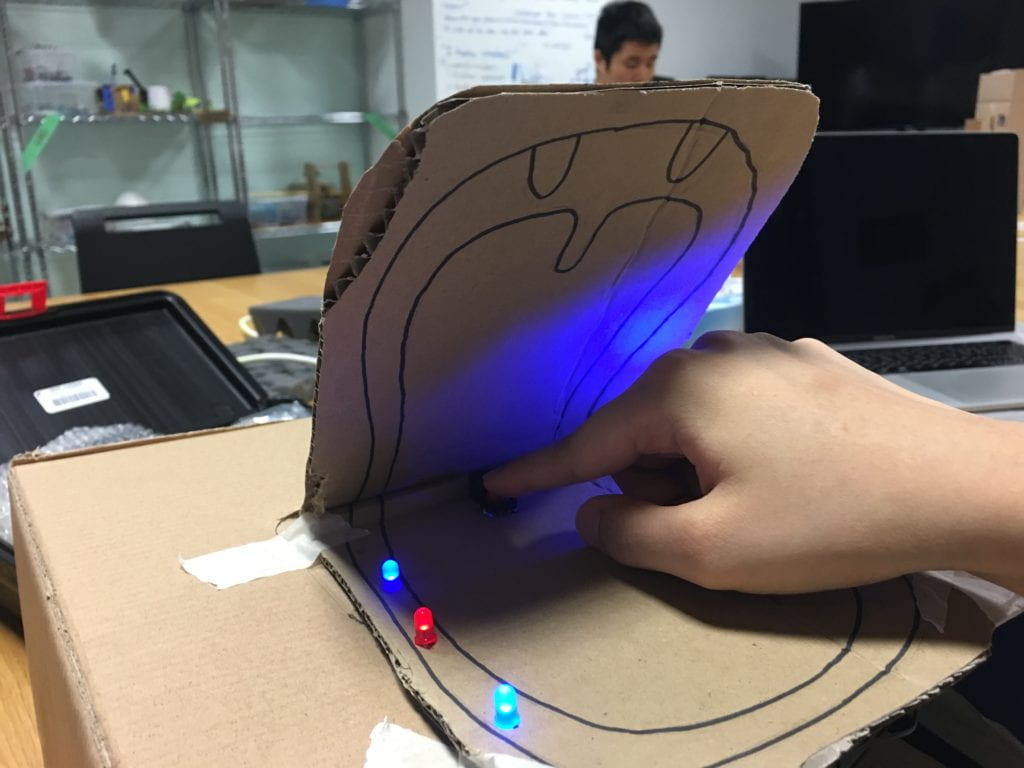
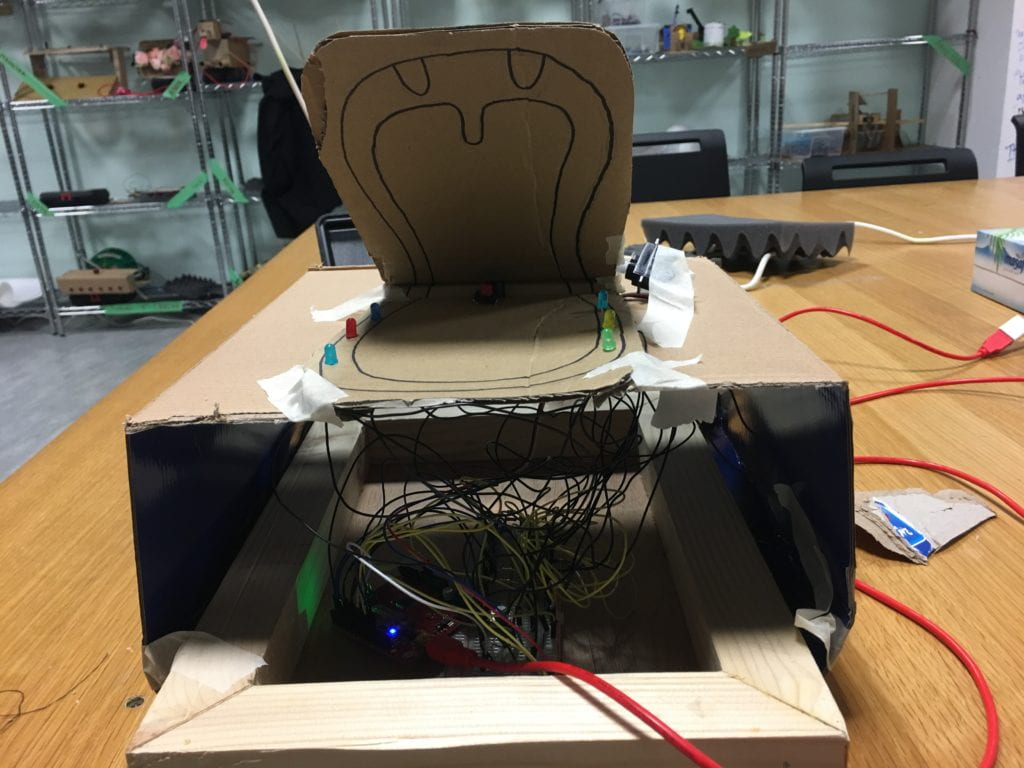
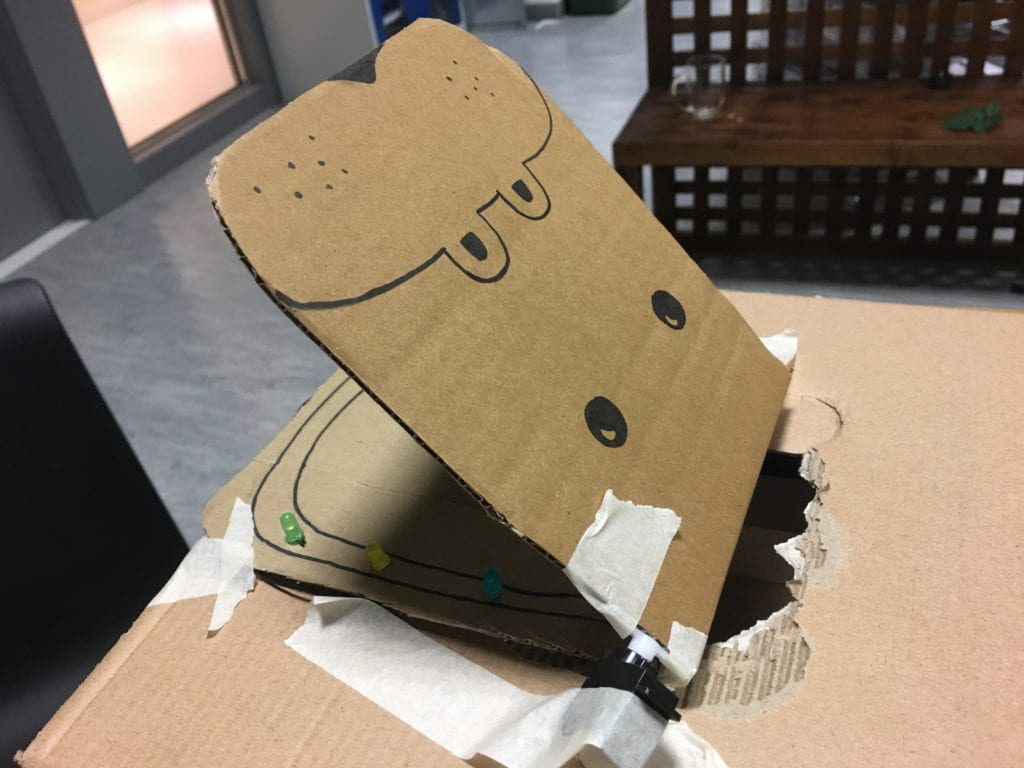
For my midterm project, I have decided to recreate a toy which I enjoyed playing as a child. The toy is in the shape of a crocodile with a mouth open at default. The players alternate and click the teeth and the mouth closes when one specific tooth is clicked. The tooth is randomly selected for each round and the person who gets ‘bitten’ loses the game. 
Inspired by this, I chose to create a game similar to this concept but instead of the multiple teeth, I have one button and the closing of the mouth is not determined by the number of teeth, but rather an analog input, the total duration of the time of the button being clicked. The players can choose to click the button for how long as they want, just as long as the mouth does not close when it is their turn.
Here are the functions you could expect from the game:
- When the middle button is clicked, the 8 LEDS (that look like teeth on the lower part of the mouth) light up to indicate to the player that the button is being clicked.
- When the button is pressed, the counter, which is initially defined as 0, starts counting up. When the player finishes their turn, they un-press the button and this stops the counter at the position left. The value of the counter is stored.
- The next player presses the button for the duration that they want. The counter increases from the last value stored.
- Step 2 – 3 repeats until one of the players press until the pre-defined max counter value.
- When the counter value reaches the max value, a game over melody is activated along with the servo (connected to the crocodile mouth) closing on to the player’s hand. The mouth opens up for the next game.
- The players must click the second button which resets the counter, making it ready for the players to restart the game.
Video
Input Sensors
- Two buttons (one for the reset, and one for the game)
Output Sensors used
- Speaker (for sound effects)
- servos (for the movement of the mouth)
- leds (for indicating the press of the buttons)
Code:
The arduino program can be accessed through my github.
https://github.com/yk1932/Intro-to-IM-Midterm
Evaluation of the project:
The most challenging part of the project was the idea selection. The initial ideas that I had were very ambitious and time consuming for the time and resources we were given. I think the ideation process took the longest time. This was not surprising however, as this is normally the case with projects such as these. This made me realize that I have to allocate more time towards coming up with ideas as I underestimated the time it would take.
I think another aspect which I found challenging was my tendency to care more about the looks / aesthetics of my product. As a visual person, I think about the designs of a product first prior to the function. After the perfect design is established, I work on perfecting the function. It is never purely about the functionality for me as I give a lot of importance on the experience of using the product. This also inspires me to me more efficient with my time management for my final product to allow myself the time to perfect my design and be satisfied with the visuals of my end product.
Post 7: Musical Instrument (Manesha + Yeji)
Concept:
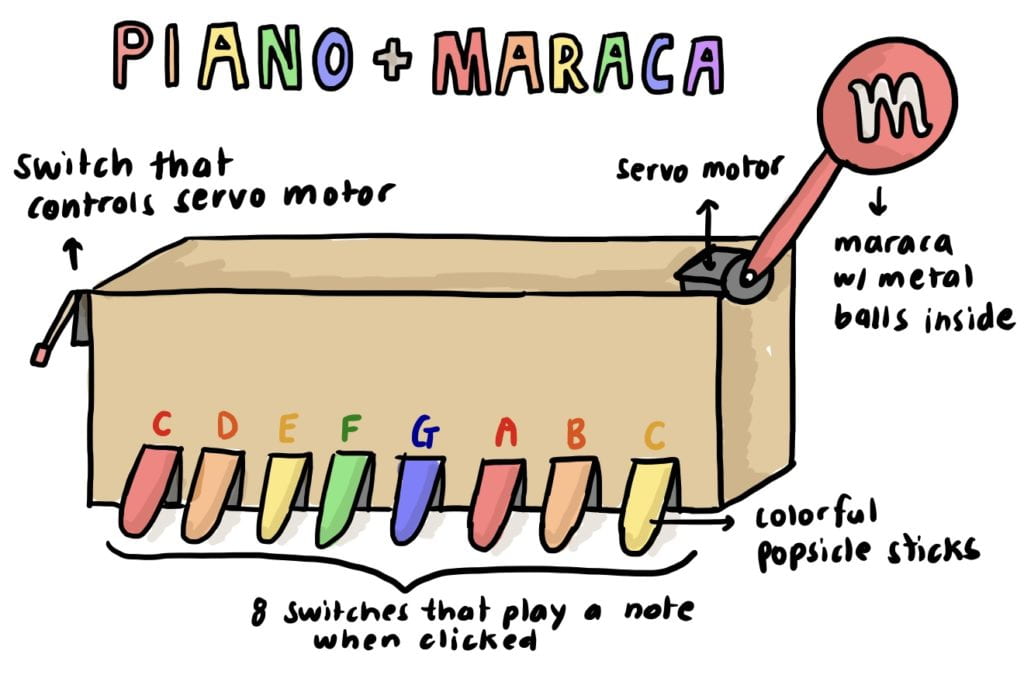
The initial concept of our instrument was to include a button which, when clicked, played a pre-programmed melody and another button which enabled the servo motor attached to a maraca – made from a metal m&m container with metal balls inside. However, we thought it would be more interactive if we included multiple switches that played the octaves of the piano when pressed, allowing the user to create their own melodies and another switch which moved the motor when clicked. Additionally, the switch that we have used to reproduce a key of the piano is a push-switch, meaning when not pressed, it reverts to its original position.
Behavior:
The system that we create satisfies the requirements of the assignment as…
- Uses Tone: The eight keyboards are connected to eight inputs which, when pressed, play a tone at different keys. For example, pressing the first red switch would play the C note, programmed as tone(buzzer,262). The keys are attached to a wooden block using glue gun that can be easily removed after the project or reuse.
- Uses Servos: The servos was used for the maraca. The movement of the maraca, which is connected to the motor, can be controlled using the switch.
The behavior of the instrument can be seen in the video where we are playing “twinkle twinkle little star”:
Problems:
One potential issue is the inability for the instrument to use both the maraca and the key boards simultaneously. This is due to the delay function that is present under tone and the nature of the loop function that can only run one thing at the same time. This is also the reason why the buzzer can not play two tones at once. A potential solution to this could be connected the servo motor to another computer’s arduino program so that the tone function and servos function can be used at the same time as there are two loops that are running at once.
Circuit Schematic:
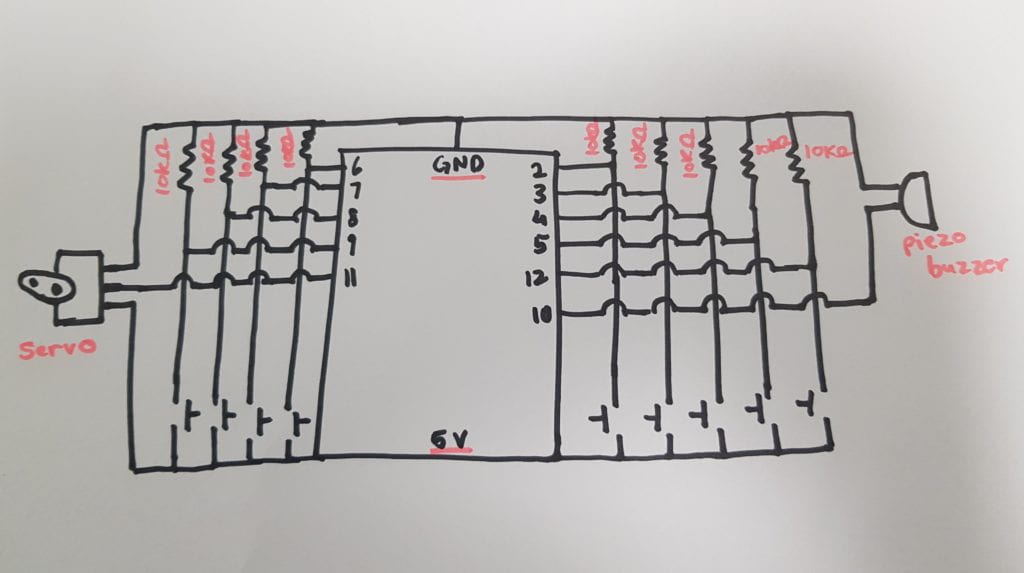
Program (code):
//INPUTS (BUTTONS)
#include <Servo.h>

int do1 = 2;
int re = 3;
int mi = 4;
int fa = 5;
int sol = 6;
int la = 7;
int si = 8;
int do2 = 9;
int value;
int pushButton = 12;
Servo myservo;
//OUTPUTS
int buzzer = 10;

//VALUES
void setup() {
// put your setup code here, to run once:
pinMode(pushButton, INPUT);
myservo.attach(11);
}

void loop() {
value = digitalRead(pushButton);
// put your main code here, to run repeatedly:
Serial.println(value);
//Read button state
if (value){
myservo.write(0);
delay (5);
myservo.write(20);
delay(5) ;
}

int do1_state = digitalRead(do1);
int re_state = digitalRead(re);
int mi_state = digitalRead(mi);
int fa_state = digitalRead(fa);
int sol_state = digitalRead(sol);
int la_state = digitalRead(la);
int si_state = digitalRead(si);
int do2_state = digitalRead(do2);

if (do1_state == 1) {
Serial.println(do1_state);
tone(buzzer, 262);
delay(300);
noTone(buzzer);
}

else if (re_state == 1) {
tone(buzzer, 294);
delay(300);
noTone(buzzer);
}

else if (mi_state == 1) {
tone(buzzer, 330);
delay(300);
noTone(buzzer);
}

else if (fa_state == 1) {
tone(buzzer, 349);
delay(300);
noTone(buzzer);
}

else if (sol_state == 1) {
tone(buzzer, 392);
delay(300);
noTone(buzzer);
}

else if (la_state == 1) {
tone(buzzer, 440);
delay(300);
noTone(buzzer);
}

else if (si_state == 1) {
tone(buzzer, 494);
delay(300);
noTone(buzzer);
}

else if (do2_state == 1) {
tone(buzzer, 524);
delay(300);
noTone(buzzer);
}
}
Post 6: Rant on Future of Interaction Design
Response to The Future of Interaction Design
In “A brief Rant on the future of interaction design”, Bret, former Human-Interface inventor of Apple, critiques commonly used designs of future interfaces that simply is not visionary. He describes the problem behind the over-dependence of future interfaces on the screen, which he calls the “Pictures Under Glass”. Bret addresses the necessity of users to sacrifice all tactile richness when using a screen and emphasizes the necessity for it to be a transitional technology that must be moved on from.
While reading this text, there were many connections between this text with another assigned text I am reading for the course “Communications and Technology”. The most recent reading from Dusek’s “Philosophy of Technology” introduces two conflicting ideas of the relationship between technology and culture – technological determinism, which claims “that technology causes or determines the structure of the rest of society and culture.” and cultural determinism, which claims “that society has effects on the direction of our acceptance and rejection of technology”. It was clear from this reading that Bret is a firm believe of cultural determinism. This is especially evident when he discusses choice – “the most important thing about the future is that it’s a choice”. Here, he fully credits society and culture as the leading force of technology, not the other way around.
This reading also reminded me of an experiment that I was involved in the summer term. I was asked to interact with a screen which had a tactile response to it. Specifically I was able to feel the vibrations of the zipper displayed on the screen when my fingers ran across it. My head was covered with a cap that picked up signals from my brain which were recorded. It was interesting that the technology of tactile response on screens which Bret emphasized greatly in this text was in the process of making.
Bret followed up with another post addressing the response he got. One line that was interesting was “a tool for adults should take full advantage of the adult capabilities of both mind and body”. It showed that his target audience, at the time he wrote the post and when he worked in Apple, was the adult audience and he somehow expected the younger audience to adapt. It provided an insight into the target audience companies prioritizes when creating new technologies.
Post 5: Reading Response to Crawford and Norman
Reading 1: The Art of interactive Design (Chris Crawford)
First of all, Crawford’s first chapter of his book “The Art of Interactive Design” was a pure pleasure to read. His use of first person narrative clearly indicated that the content was his subjective opinion and the format allowed a more humorous and engaging approach. Crawford’s argument was strengthened through his use of “bad” examples of objects that over and misuse the word “interactive”. He poses the issue and the necessity to define the word “interactive”. I deeply related to his thought progression on definitions of terms, especially those that encompass a broad spectrum of things. I have had previous experiences in art classes where the teacher asked the students to define art. There was no clear conclusion made from the discussion but the process of conversing about such a wide topic brought about interesting themes that would have not been discussed otherwise. Hence, it isn’t the final definition that is significant, but rather the process of exploring the possible components that define a certain term. His use of conversation as the main human act of interaction was very interesting as it made me think that all “talk” is not interactive if two subjects are not both being attentive through speaking and listening. It made me think about the difference between the two terms “speak” and “respond” as the latter is one that plays a significant role in making a conversation interactive as it requires the person to listen first. It also made me think about the times I conversed with a person and was left not feeling connected. As such, I think an object being regarded as interactive is very similar to the people you feel connected with. Everyone has a subjective standard for whom they connect with just as the child found the Nintendo fridge interactive while the adult failed to do so.
Reading 2: The Design of Everyday Things (Don Norman)
Reading Norman’s critique of poorly designed objects was an entertaining experience. The way in which he presented the argument was engaging through his use of conversations, diagrams, and pictures. I deeply resonated with his example with the doors as for one of my previous blog posts, I chose to write about the door that is situated in my residence building and the inefficiencies of it. It also made me think about all the doors that I have encountered in my life, from rotating doors, automatic doors, etc, leading to a thought of what factors made a door efficient. I some what agree with the human-centered design philosophy mentioned in the reading as the potential solution to such poor designs. However, I felt like the term “human” was a bit general as it does not fully specify the different demographics that must be considered when designing a product.
Post 4 : Digital and Analog Sensors
For this assignment, I created a program that could run two different functions according to the type of sensor used.
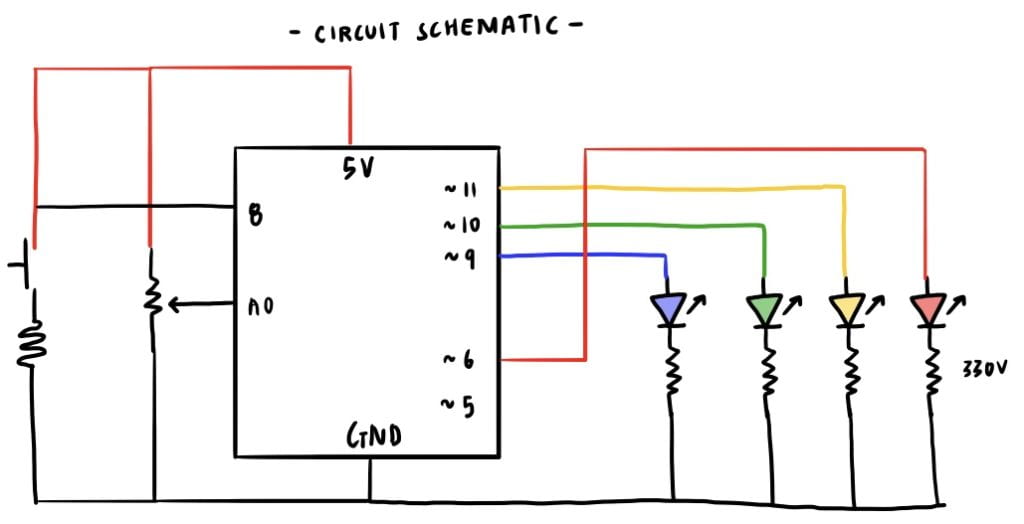
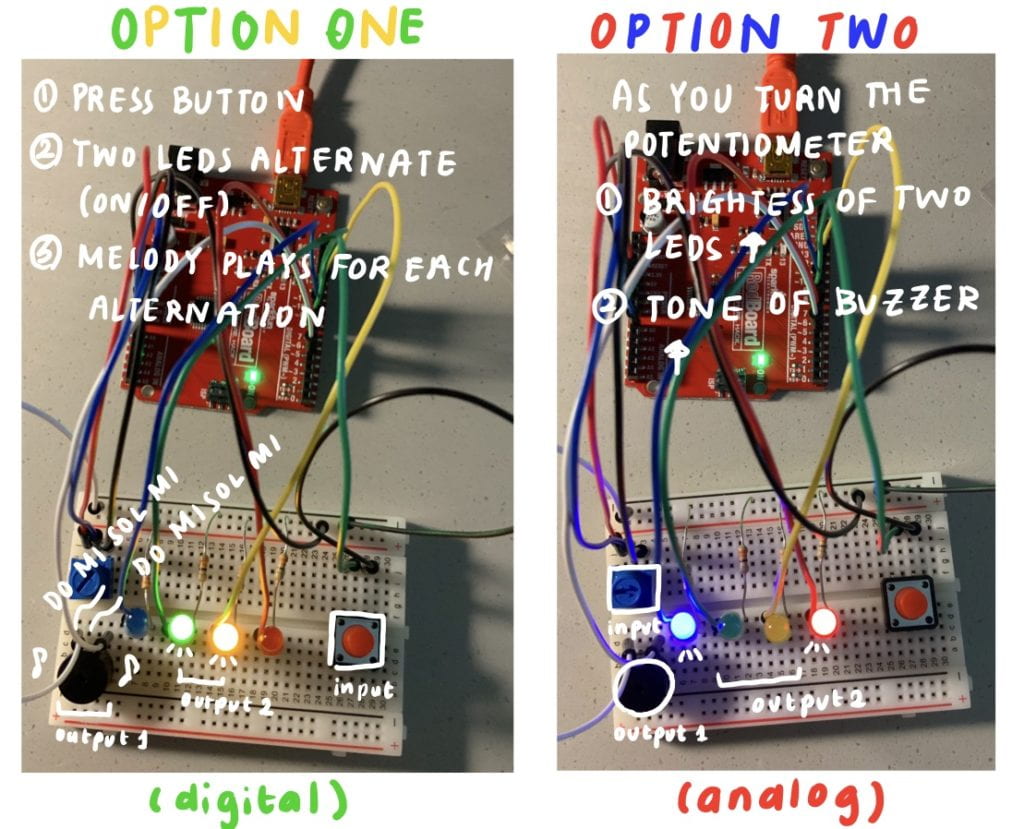 The first option was using the digital button as the input. When the button is pressed, the green and yellow LEDs alternate with different tones from the buzzer. This was achieved through the use of the delay function with the duration of 300ms. The melody continues to loop as long as the button is pressed.
One challenge I had with the button was that when it was not pressed, the serial print values of the button was unstable, showing alternating values of 0s and 1s. This led to the LED being slightly on although the button was not pressed. To solve this issue, instead of using “pinMode(button,INPUT)”, I found a solution online that suggested me to use “pinMode(button,INPUT_PULLUP)”.
This is the video showing the running program for option 1 using the digital button. (Turn on the volume to hear the melody!)
Option 1 – Digital Button / Melody
The second option was using the analog potentiometer as the input. When the potentiometer was turned from low to max, the 8 sounds (do, re, mi, fa, sol, la, ti, do) was played for each designated interval. I divided the sounds through 125 (ex. tone(buzzer,125) , tone(buzzer,250),etc). I came to this number through diving 1023 (max number of potentiometer) by 8. Also, the potentiometer was used to control the brightness of the blue and red LEDs.
This is the video for option 2. (Turn on the volume to hear the sound)
The circuit schematic of the project is as below:
The code written on the Arduino software is
//INPUTS
int pot = A0;
int button = 8;
int buzzer = 5;//OUTPUTS
int led_blue = 9; //blue
int led_red = 6; //red
int led_yellow = 11; // yellow
int led_green = 10; //green//VALUES
int pot_value = 0; // value read from the pot
int button_state = LOW;//SETUP
void setup() {
Serial.begin(9600); //initialize serial communications at 9600 bpspinMode(button, INPUT_PULLUP); //button digital input
pinMode(led_blue, OUTPUT); //controlled with analog sensor
pinMode(led_green, OUTPUT); //controlled with digital sensor
pinMode(led_yellow, OUTPUT);
pinMode(led_red, OUTPUT);
}//LOOP
void loop() {//ANALOG
//read the analog in value
pot_value = analogRead(pot);//print the values in serial monitor
//Serial.println(pot_value);//LED (RED AND BLUE)
//adjust brightness of led according to analog input of potentiometer
analogWrite(led_blue, pot_value / 4);
analogWrite(led_red, pot_value / 4);//BUZZER
if (pot_value < 25) {
noTone(buzzer);
}//do
else if (pot_value < 125) {
tone(buzzer, 262);
}//re
else if (pot_value < 250) {
tone(buzzer, 294);
}//mi
else if (pot_value < 375) {
tone(buzzer, 330);
}//fa
else if (pot_value < 500) {
tone(buzzer, 349);
}//sol
else if (pot_value < 625) {
tone(buzzer, 392);
}//la
else if (pot_value < 750) {
tone(buzzer, 440);
}//ti
else if (pot_value < 875) {
tone(buzzer, 494);
}//do
else if (pot_value < 1100) {
tone(buzzer, 524);
}//read switch state
button_state = digitalRead(button);if (button_state == 0) {
//DO
tone(buzzer,262);
digitalWrite(led_green, HIGH);
delay(300);//MI
tone(buzzer,330);
digitalWrite(led_yellow, HIGH);
delay(300);//SOL
tone(buzzer,392);
digitalWrite(led_green, LOW);
delay(300);//MI
tone(buzzer,330);
digitalWrite(led_yellow, LOW);
delay(300);}
else {
digitalWrite(led_green, LOW);
digitalWrite(led_yellow, LOW);}
}
Post 3: Colorful LED Music Player
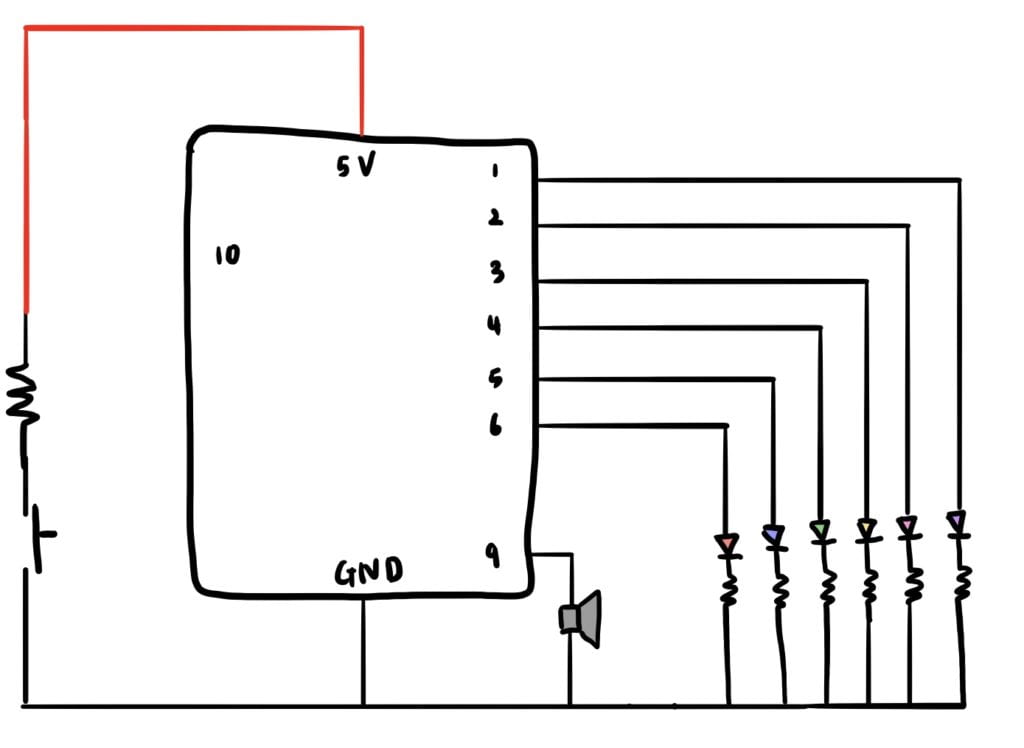
For this project, I decided to make a machine which played the notes of the piano. To do so, I used a buzzer and searched for the frequencies of do re mi fa sol la si do.
do : 262, re: 294, mi: 330, fa: 349, sol: 392, la: 440, si: 494, do: 524
I also made the LED’s turn on and off according to the sound by adding a delay of 300. To initialize the code, I made sure to clarify the pinMode for each output including all the LEDs and buzzers. When executed, the arduino plays the notes in a loop as the statements / instructions are defined in void loop().
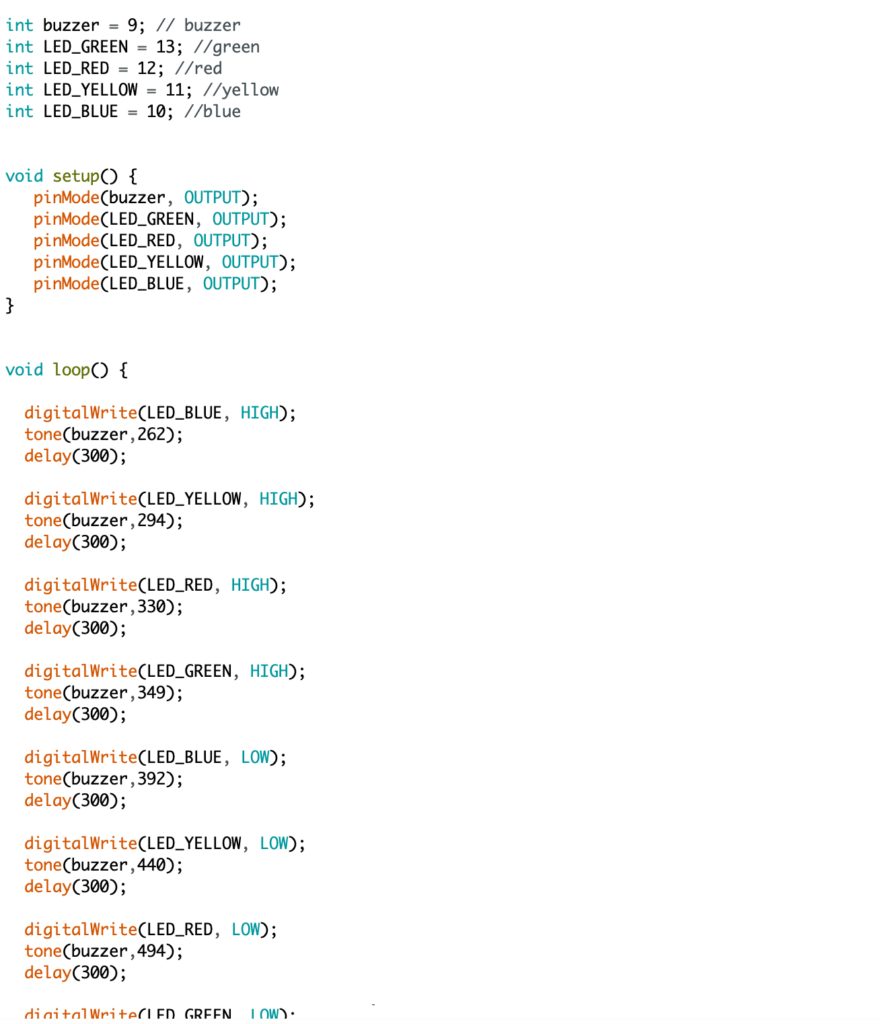
In terms of the hardware, I made sure to connect all the LEDs to 330V resistors as 10K resistors will cause a burn out. I connected the resistors on the vertical sides with one wire connecting to the ground. The LED’s were wired to digital inputs from 8 to 13 and this was defined in the code as well. 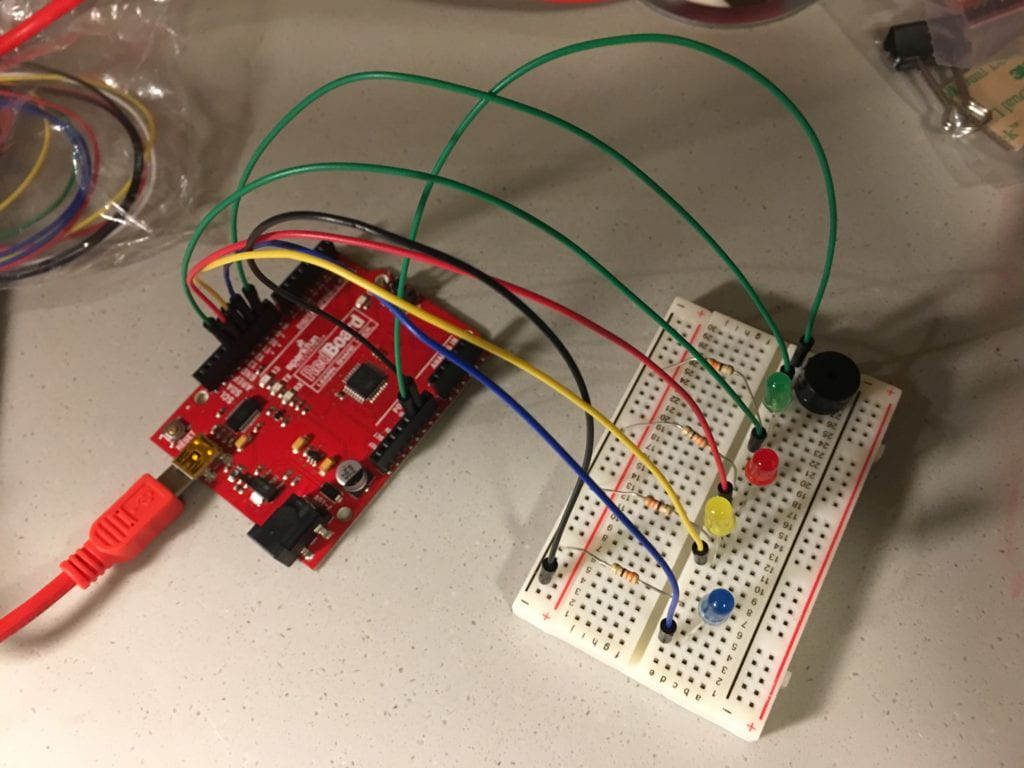
Post 2: Handless Switch
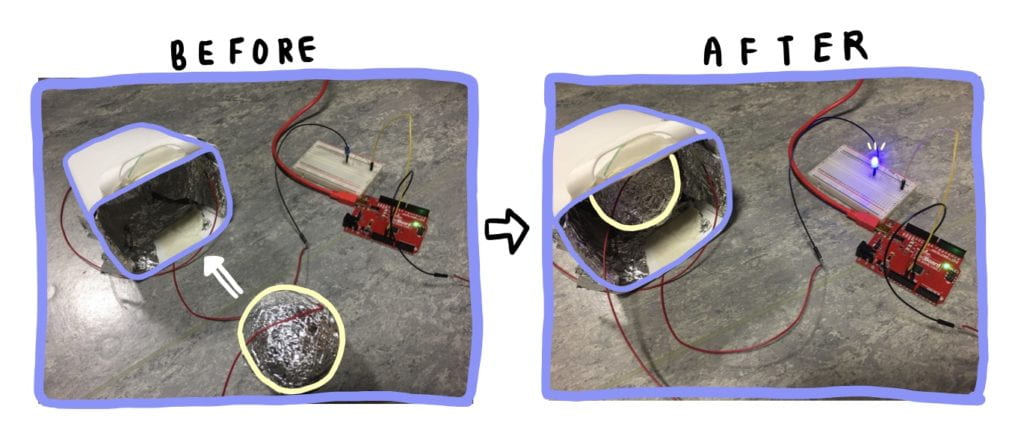
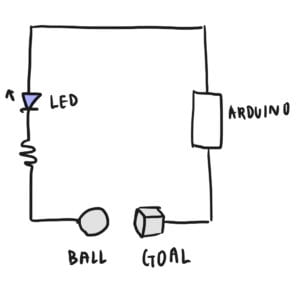
For my Handless Switch, I chose to recreate a simplified version of football where the user must score a goal, using their feet, in order to light the bulb. In order to make the goal and ball conduct charge, I covered the two items in aluminum foil, which is known to be a conductor of electricity.
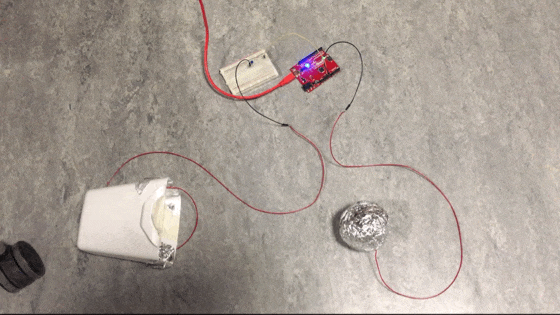
Due to not having much experience with circuits in general, it was hard to visualize the process only using my brain. Therefore, it was helpful to draw a diagram planning the connections in advance before making the actual product as shown below.
