Concept
When I was brainstorming about this project, I was considering some of my favorite things and the first thing that popped into my head was that I missed my 4 dogs back home. I have 2 Dachshunds, a Husky and a Golden Retriever. With this thought in mind, I tried to come up with a project that would remind me of my dogs back home. Unsurprisingly, I came up with a dog. I knew that had neither the time or the skills to make the dog very complicated so I tried to isolate certain characteristics of the dog that I missed the most, my old Dachshund with an attitude and an unhealthy obsession to chicken, Dapple. Every time I would come home she would start barking happily and start wagging her tail. When I pet her she would start to make a high pitched whining sound and wag her tail even faster. The project I will build will emulate the behavior of my dog and hopefully, make someone smile.

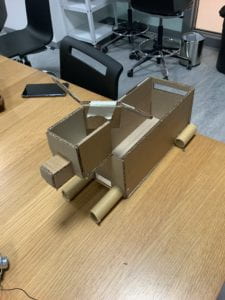
Dapple is on the left
Behavior
My cardboard Dapple will have two settings: sensing the presence of something in front of it, and sense when she is being petted. When Dapple senses the presence of something in front of her she will “wake up.” She will wag her tail, play a low tone periodically and “blink” or flash the LEDs. When she senses the presence of someone in front of her and she gets “pet” on the head (light sensor), her tail will wag faster and she will close her eyes in pure bliss (LEDs turn off).
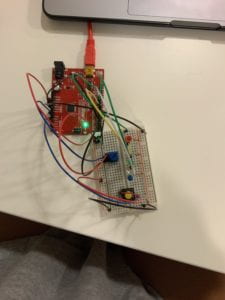
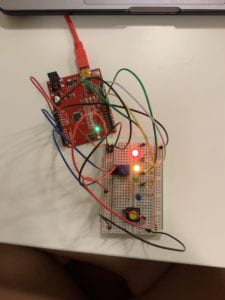
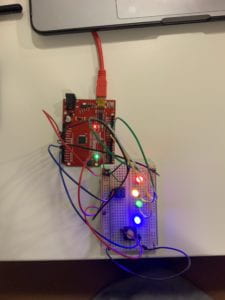
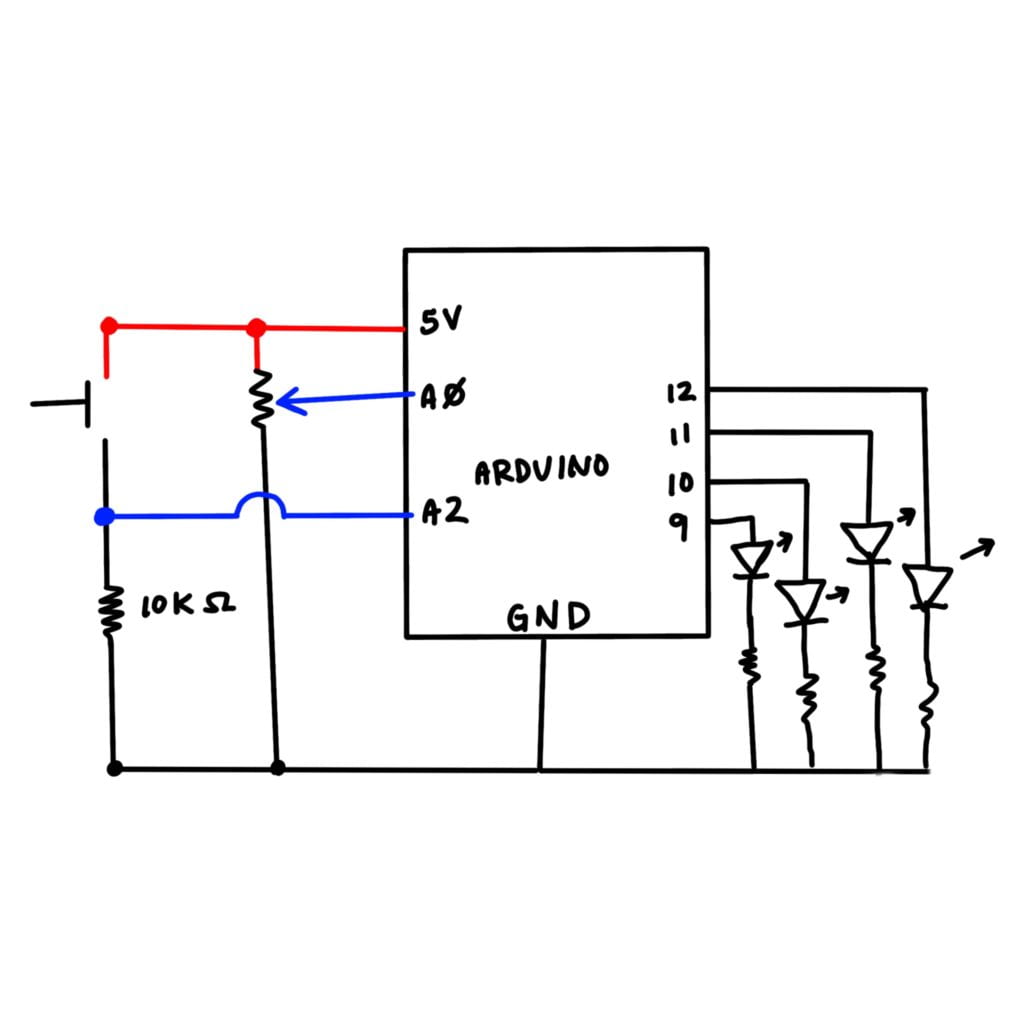
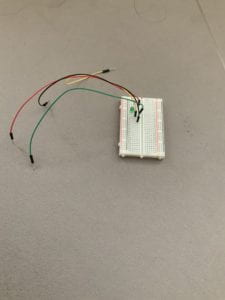
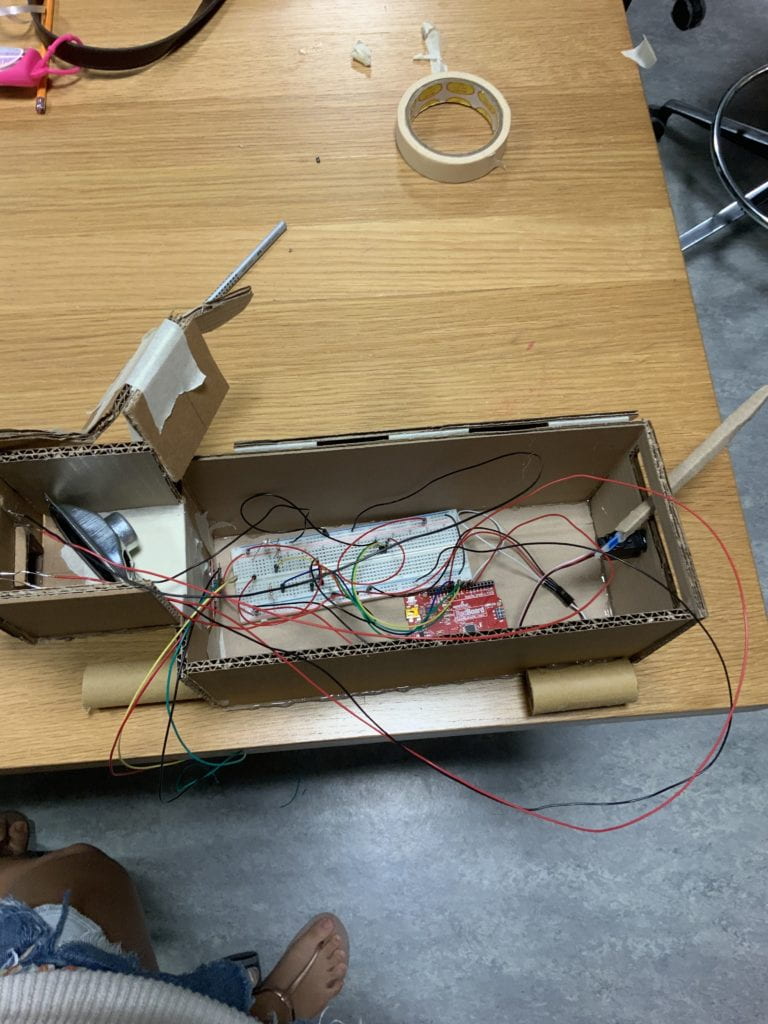
Circuit and Schematic
The entire circuit fits into a cardboard container that represents Dapple’s body. The speaker and light sensor are placed in the head of the figure, the breadboard and the Arduino sit in the middle of the body. The servo is attached to the end of the figure with a hole cut for the tail to wag and the distance sensor is in front of the figure.
Schematic
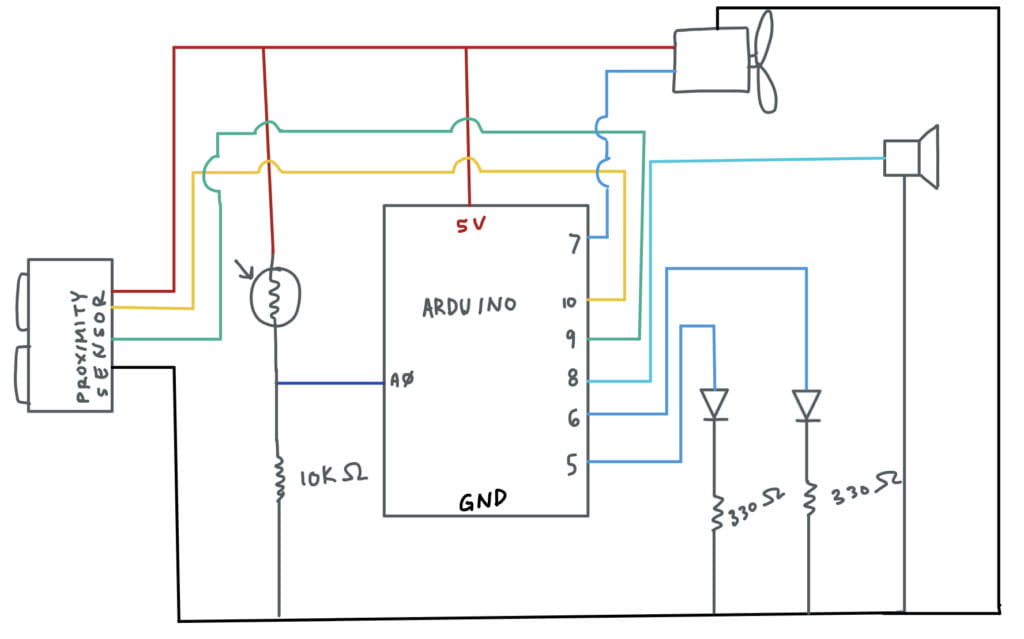
Inputs and Outputs
| Amount |
Item |
| 1 |
light sensor |
| 1 |
distance sensor |
| 1 |
servo |
| 2 |
LEDs |
| 1 |
Speaker |
Discussion
Hardware
The biggest issue with the hardware of the project is that I used stranded wire to solder wires onto the 6-pin female header and as a result, the exposed wires sometimes bumped into each other. It was a similar case on the breadboard. I had to make sure I cut the wires down so that none of the stranded wire would be exposed. The creation of the container itself wasn’t as complicated as I only made use of glue gun, tape and cardboard.
I think I should’ve made the container bigger though because it was quite difficult to maneuver some of the wires around because of the cramped space. I also ran into some issues with pin 11. For some reason, my LED wouldn’t light when it was connected to that pin but worked when I connected to pin 6.
Software
My biggest issue with this code is that I didn’t know how to make the servo move faster when it sensed the light sensor. This was because the servo sweep code made use of classes, which I wasn’t as familiar with. Fortunately, with some help from Adham, I was able to increase the speed of sweep. Learning the code for the sweep function and trying to understand it to the best of my extent took most of my time when it came to this project.
Distance sensor
Servo sweep without delay
Code
Main Code
#include "pitches.h"
#include "sweeper.h"

const int trigPin = 9;
const int echoPin = 10;
const int LEDYELLOW = 5;
const int LEDYELLOW2 = 6;

const int lightsensor = A0;


int ledState = LOW;
unsigned long previousMillis = 0;
const long interval = 1000;

long duration;
int distanceCm, distanceInch;
Sweeper sweeper1(15);


void setup() {
  sweeper1.Attach(7);
  Serial.begin (9600);
  pinMode(trigPin, OUTPUT);
  pinMode(echoPin, INPUT);
  pinMode(LEDYELLOW, OUTPUT);
  pinMode(LEDYELLOW2, OUTPUT);// used to test the distance sensor and see if the LED will turn on
  pinMode(lightsensor, INPUT);
}


void loop() {


  int Lsensor = analogRead(lightsensor);
  Serial.println(Lsensor);

  digitalWrite(trigPin, LOW);
  delayMicroseconds(2);

  digitalWrite(trigPin, HIGH);
  delayMicroseconds(10);
  digitalWrite(trigPin, LOW);

  duration = pulseIn(echoPin, HIGH);
  distanceCm = duration * 0.034 / 2;
  distanceInch = duration * 0.0133 / 2;

  //used to check the distance and see if the sensor is working

  Serial.print("Distance: ");
  Serial.print(distanceInch);
  Serial.println(" inch");


  //tests if light will turn on if something approaches it
  if (distanceInch < 30) {
    if (Lsensor < 800) { //increase increment (wagging of tail), stop blink sweeper1.Increase(); sweeper1.Update(); unsigned long currentMillis = millis(); if (currentMillis - previousMillis >= interval) {
        // save the last time you blinked the LED
        previousMillis = currentMillis;

        // if the LED is off turn it on and vice-versa:

        if (ledState == LOW) {
          ledState = HIGH;
          tone(8, NOTE_C7, 8);
        } else {
          ledState = LOW;
          noTone(8);
        }
      }
    } else { //reset sweeper speed (wagging of tail slows), blink light again, play lower note
      sweeper1.Update();
      unsigned long currentMillis = millis();
      if (currentMillis - previousMillis >= interval) {
        // save the last time you blinked the LED
        previousMillis = currentMillis;

        // if the LED is off turn it on and vice-versa:

        if (ledState == LOW) {
          ledState = HIGH;
          tone(8, NOTE_C6, 8);
        } else {
          ledState = LOW;
          noTone(8);
        }

        // set the LED with the ledState of the variable:
        digitalWrite(LEDYELLOW, ledState);
        digitalWrite(LEDYELLOW2, ledState);
      }
    }
  } else {
    digitalWrite(LEDYELLOW, LOW);
    digitalWrite(LEDYELLOW2, LOW);
    noTone(8);

  }
}
Pitches Library
/*************************************************
 * Public Constants
 *************************************************/

#define NOTE_B0  31
#define NOTE_C1  33
#define NOTE_CS1 35
#define NOTE_D1  37
#define NOTE_DS1 39
#define NOTE_E1  41
#define NOTE_F1  44
#define NOTE_FS1 46
#define NOTE_G1  49
#define NOTE_GS1 52
#define NOTE_A1  55
#define NOTE_AS1 58
#define NOTE_B1  62
#define NOTE_C2  65
#define NOTE_CS2 69
#define NOTE_D2  73
#define NOTE_DS2 78
#define NOTE_E2  82
#define NOTE_F2  87
#define NOTE_FS2 93
#define NOTE_G2  98
#define NOTE_GS2 104
#define NOTE_A2  110
#define NOTE_AS2 117
#define NOTE_B2  123
#define NOTE_C3  131
#define NOTE_CS3 139
#define NOTE_D3  147
#define NOTE_DS3 156
#define NOTE_E3  165
#define NOTE_F3  175
#define NOTE_FS3 185
#define NOTE_G3  196
#define NOTE_GS3 208
#define NOTE_A3  220
#define NOTE_AS3 233
#define NOTE_B3  247
#define NOTE_C4  262
#define NOTE_CS4 277
#define NOTE_D4  294
#define NOTE_DS4 311
#define NOTE_E4  330
#define NOTE_F4  349
#define NOTE_FS4 370
#define NOTE_G4  392
#define NOTE_GS4 415
#define NOTE_A4  440
#define NOTE_AS4 466
#define NOTE_B4  494
#define NOTE_C5  523
#define NOTE_CS5 554
#define NOTE_D5  587
#define NOTE_DS5 622
#define NOTE_E5  659
#define NOTE_F5  698
#define NOTE_FS5 740
#define NOTE_G5  784
#define NOTE_GS5 831
#define NOTE_A5  880
#define NOTE_AS5 932
#define NOTE_B5  988
#define NOTE_C6  1047
#define NOTE_CS6 1109
#define NOTE_D6  1175
#define NOTE_DS6 1245
#define NOTE_E6  1319
#define NOTE_F6  1397
#define NOTE_FS6 1480
#define NOTE_G6  1568
#define NOTE_GS6 1661
#define NOTE_A6  1760
#define NOTE_AS6 1865
#define NOTE_B6  1976
#define NOTE_C7  2093
#define NOTE_CS7 2217
#define NOTE_D7  2349
#define NOTE_DS7 2489
#define NOTE_E7  2637
#define NOTE_F7  2794
#define NOTE_FS7 2960
#define NOTE_G7  3136
#define NOTE_GS7 3322
#define NOTE_A7  3520
#define NOTE_AS7 3729
#define NOTE_B7  3951
#define NOTE_C8  4186
#define NOTE_CS8 4435
#define NOTE_D8  4699
#define NOTE_DS8 4978
Servo Sweep Class Library
#include


class Sweeper {

    Servo servo;              // the servo
    int pos;              // current servo position
    int increment;        // increment to move for each interval
    int  updateInterval;      // interval between updates
    unsigned long lastUpdate; // last update of position

  public:
    Sweeper(int interval)
    {
      updateInterval = interval;
      increment = 5;
    }

    void Attach(int pin)
    {
      servo.attach(pin);
    }

    void Detach()
    {
      servo.detach();
    }

    void Update()
    {
      if ((millis() - lastUpdate) > updateInterval) // time to update
      {
        lastUpdate = millis();
        pos += increment;
        servo.write(pos);
        Serial.println(pos);
        if ((pos >= 150) || (pos <= 3)) // end of sweep { // reverse direction increment = -increment; } } } //Increases increment speed void Increase() { if ((millis() - lastUpdate) > updateInterval) // time to update
      {
        lastUpdate = millis();
        pos += 2*increment;
        servo.write(pos);
        //Serial.println(pos);
        if ((pos >= 150) || (pos <= 30)) // end of sweep
        {
          // reverse direction
          increment = -increment;
        }
      }
    }
};