One of the challenges I came across in the IM courses and assignments so far has been about creativity. Creativity for the assignments has always been one of the challenges I faced because every time I look for ‘inspirations’ on the internet, it just provided me a list of things I couldn’t use since they weren’t ‘original’. And as I read through the list of creative physical computing artworks, I noticed that a lot of ‘successful’ works incorporated at least 2 senses. If increasing the senses allows works to be more interactive and attention-grabbing, would having 5 senses incorporated in the work be as attractive to the users? How do we find the optimum line in which the senses and inputs are used in the interactive work that satisfies and pleases the users?
Making Interactive Art: Set the Stage, Then Shut Up and Listen
This reminded me of another IM elective I took last semester. I had to make a field guide for the campus and we took a long lesson off just to try the field guides on strangers’ perspectives. The big take away message from this was to never assume people are going to think and act like you. They are such unpredictable beings that probably the whole idea of creating something to perfectly satisfy the needs and intentions of an object is rather skeptical.
For my midterm, I made a car flicking game where the player had to guess the winning line by flicking their fingers and observing the LEDs that provided clues to how close or far away the winning line was. I also incorporated sound as a feed back; when the player lands on the line, the winning sound plays, and the green LED lights up. However, if I hadn’t explained about my midterm project, people would have had no idea how it worked until they managed to try it several times. Therefore, this reading about the article reminded me of the importance of feedback; how it’s crucial for the work to hold some kind of logistic clues and hints to lead the user to successfully use it.
I also really liked the idea of how interactive work isn’t ‘like a finished painting or sculpture’, and that it’s a continuous work which is built up by the users’ responses and feedback.
The player has to ‘flick’ their fingers to move the toy car forward. If the car stops at the ‘winning line’ the player wins. The point of this game is for the user to guess where the line is by looking at the LEDs.
Behavior:
The start of the game is initiated by the tune. The distance between the toy car and the sensor is measured using the distance sensor. When the player successfully lands the toy car on the winning line of the lane, the winning tune plays, indicating that the player has won the game. If they fail to do so, they can play again; the green LED lights up on the winning line, yellow LED lights up when the toy car gets close to the line and red LED lights up when it is far away from the line. So the LEDs act as a feedback and hints depending on the distance the toy car is away from the distance sensor. When they flick the car too hard and gets too close to the sensor, a tune plays to warn them.
Schematic
Program
#include "pitches.h"


int red = 7;
int yellow = 5;
int green = 4;

int counter = 0;
int currentState = 0;
int previousState = 0;

int counterNo;
int countNo;

int trigPin = 11;    // Trigger
int echoPin = 12;    // Echo
long duration, cm;
int buzzer = 8;

int melody[] = { //winning melody
  NOTE_C6, NOTE_E6, NOTE_G6, NOTE_C7
};

int start[] = {
  NOTE_E6, 0, NOTE_E6, 0, NOTE_E6, 0, NOTE_C7
};

int lose[] = {
  NOTE_C3, NOTE_C3, NOTE_C3
};

int tempo[] = {
  4, 4, 4, 4, 4, 4, 1
};

int noteDurations[] = {
  4, 4, 4, 2
};

int losetempo[] = {
  4, 4, 1
};


void setup() {


  Serial.begin (9600);
  //Define inputs and outputs
  pinMode(trigPin, OUTPUT);
  pinMode(echoPin, INPUT);
  pinMode(7, OUTPUT);
  pinMode(5, OUTPUT);
  pinMode(4, OUTPUT);

  //playing the starting tune once
  for (int thisNotes = 0; thisNotes < 7; thisNotes++) {
   int noteDuration = 1000 / tempo[thisNotes];
   tone(8, start[thisNotes], noteDuration);
   int pauseBetweenNotes = noteDuration * 1.30; delay(pauseBetweenNotes); } }

void loop() {

//unsigned long storedTime = millis();

digitalWrite(trigPin, LOW);
delayMicroseconds(5);
digitalWrite(trigPin, HIGH);
delayMicroseconds(10);
digitalWrite(trigPin, LOW); // Read the signal from the sensor: a HIGH pulse whose // duration is the time (in microseconds) from the sending // of the ping to the reception of its echo off of an object.

pinMode(echoPin, INPUT);
duration = pulseIn(echoPin, HIGH);

// Convert the time into a distance
cm = (duration / 2) / 29.1; // Divide by 29.1 or multiply by 0.0343 // Divide by 74 or multiply by 0.0135

Serial.println(cm);
Serial.print(" ");
delay(15);


  if ( cm >= 13 && cm <= 20) { //winning line interval

    currentState = 1; //count to keep track of the duration in which the car stops on     the lane within the interval.

    digitalWrite(green, HIGH);
    digitalWrite(red, LOW);
    digitalWrite(yellow, LOW);
    countNo = 0;

 } else if (cm >= 8 && cm < 13 || cm > 20 && cm < 23) { //close interval

    currentState = 0;
    digitalWrite(yellow, HIGH);
    digitalWrite(green, LOW);
    digitalWrite(red, LOW);
    countNo = 0;

  } else if (cm < 7) { //too close to the sensor interval
    countNo = 1;
    digitalWrite(red, HIGH);
    digitalWrite(green, LOW);
    digitalWrite(yellow, LOW);


  } else { //far away from the winning line interval
    //noTone(8);
    currentState = 0;
    digitalWrite(red, HIGH);
    digitalWrite(green, LOW);
    digitalWrite(yellow, LOW);
    countNo = 0;


  }

  if (currentState == 1 && currentState != previousState) {
    //increments to the count for the winning interval
    counter = counter + 1;
  } else {
    counter = 0;

    if (countNo == 1) {
      counterNo++;
    } else {
      counterNo = 0;
    }


    Serial.print("\t");
    Serial.println(counterNo);


  }


  if (counter == 5) {

    //playing the winning tune
    for (int thisNote = 0; thisNote < 4; thisNote++) {
      int noteDuration = 1000 / noteDurations[thisNote];
      tone(8, melody[thisNote], noteDuration);

      int pauseBetweenNotes = noteDuration * 1.30;
      delay(pauseBetweenNotes);
    }
    //tone(buzzer, 330);
  } else {
    noTone(8);
  }
  //warning tune when the car gets too close to the distance sensor
  if (counterNo == 3) {
    for (int thisNote = 0; thisNote < 2; thisNote++) {
      int noteDuration = 1000 / losetempo[thisNote];
      tone(8, lose[thisNote], noteDuration);

      int pauseBetweenNotes = noteDuration * 1.30;
      delay(pauseBetweenNotes);
    }

  } else {
    noTone(8);
  }
  delay(250);
  Serial.print("\t");
  Serial.println(counter);


}
The coding for the distance sensor was taken from:
I initially planned to use two servos with a potentiometer that would control the speed at which the servo motor turns but the force wasn’t strong enough to push the car as far as I wanted. I tried glueing pieces of cardboard on the motor to give it a larger surface area but it still wasn’t enough.
I also wanted to use Millis() to record the duration of the car coming to a complete stop in a given interval, but I couldn’t find a way around it. Instead, I used boolean to set a condition as true when the car landed in the right interval, then setting another condition where the count would increment as soon as the boolean was true.
When I was using the count, I had to make sure where it was because I had trouble making it work after inserting the code in an irrelevant if loop.
Things to improve/ What I could have done better:
Although I had some kind of basic feedback in my project like the different colored LEDs, I think it would have been better if I indicated the start/ restart of the game somehow; I was really inspired by Yeji’s restart button and Bowen’s ‘number of lives’ LEDs. Incorporating these ideas and features would have increased the structure and form of my project.
Although I tried inserting an LCD panel to indicate the exact distances the toy car was away from the winning line, it would have been better if I used it to indicate the start and finish to the game. For example, the LCD could display the time as a stopwatch so the player can have as many trials as they want until the time runs out. Since the LCD panel can display 4 lines of characters, I can use the increment function to increment the scores of the player when their car reaches the winning line.
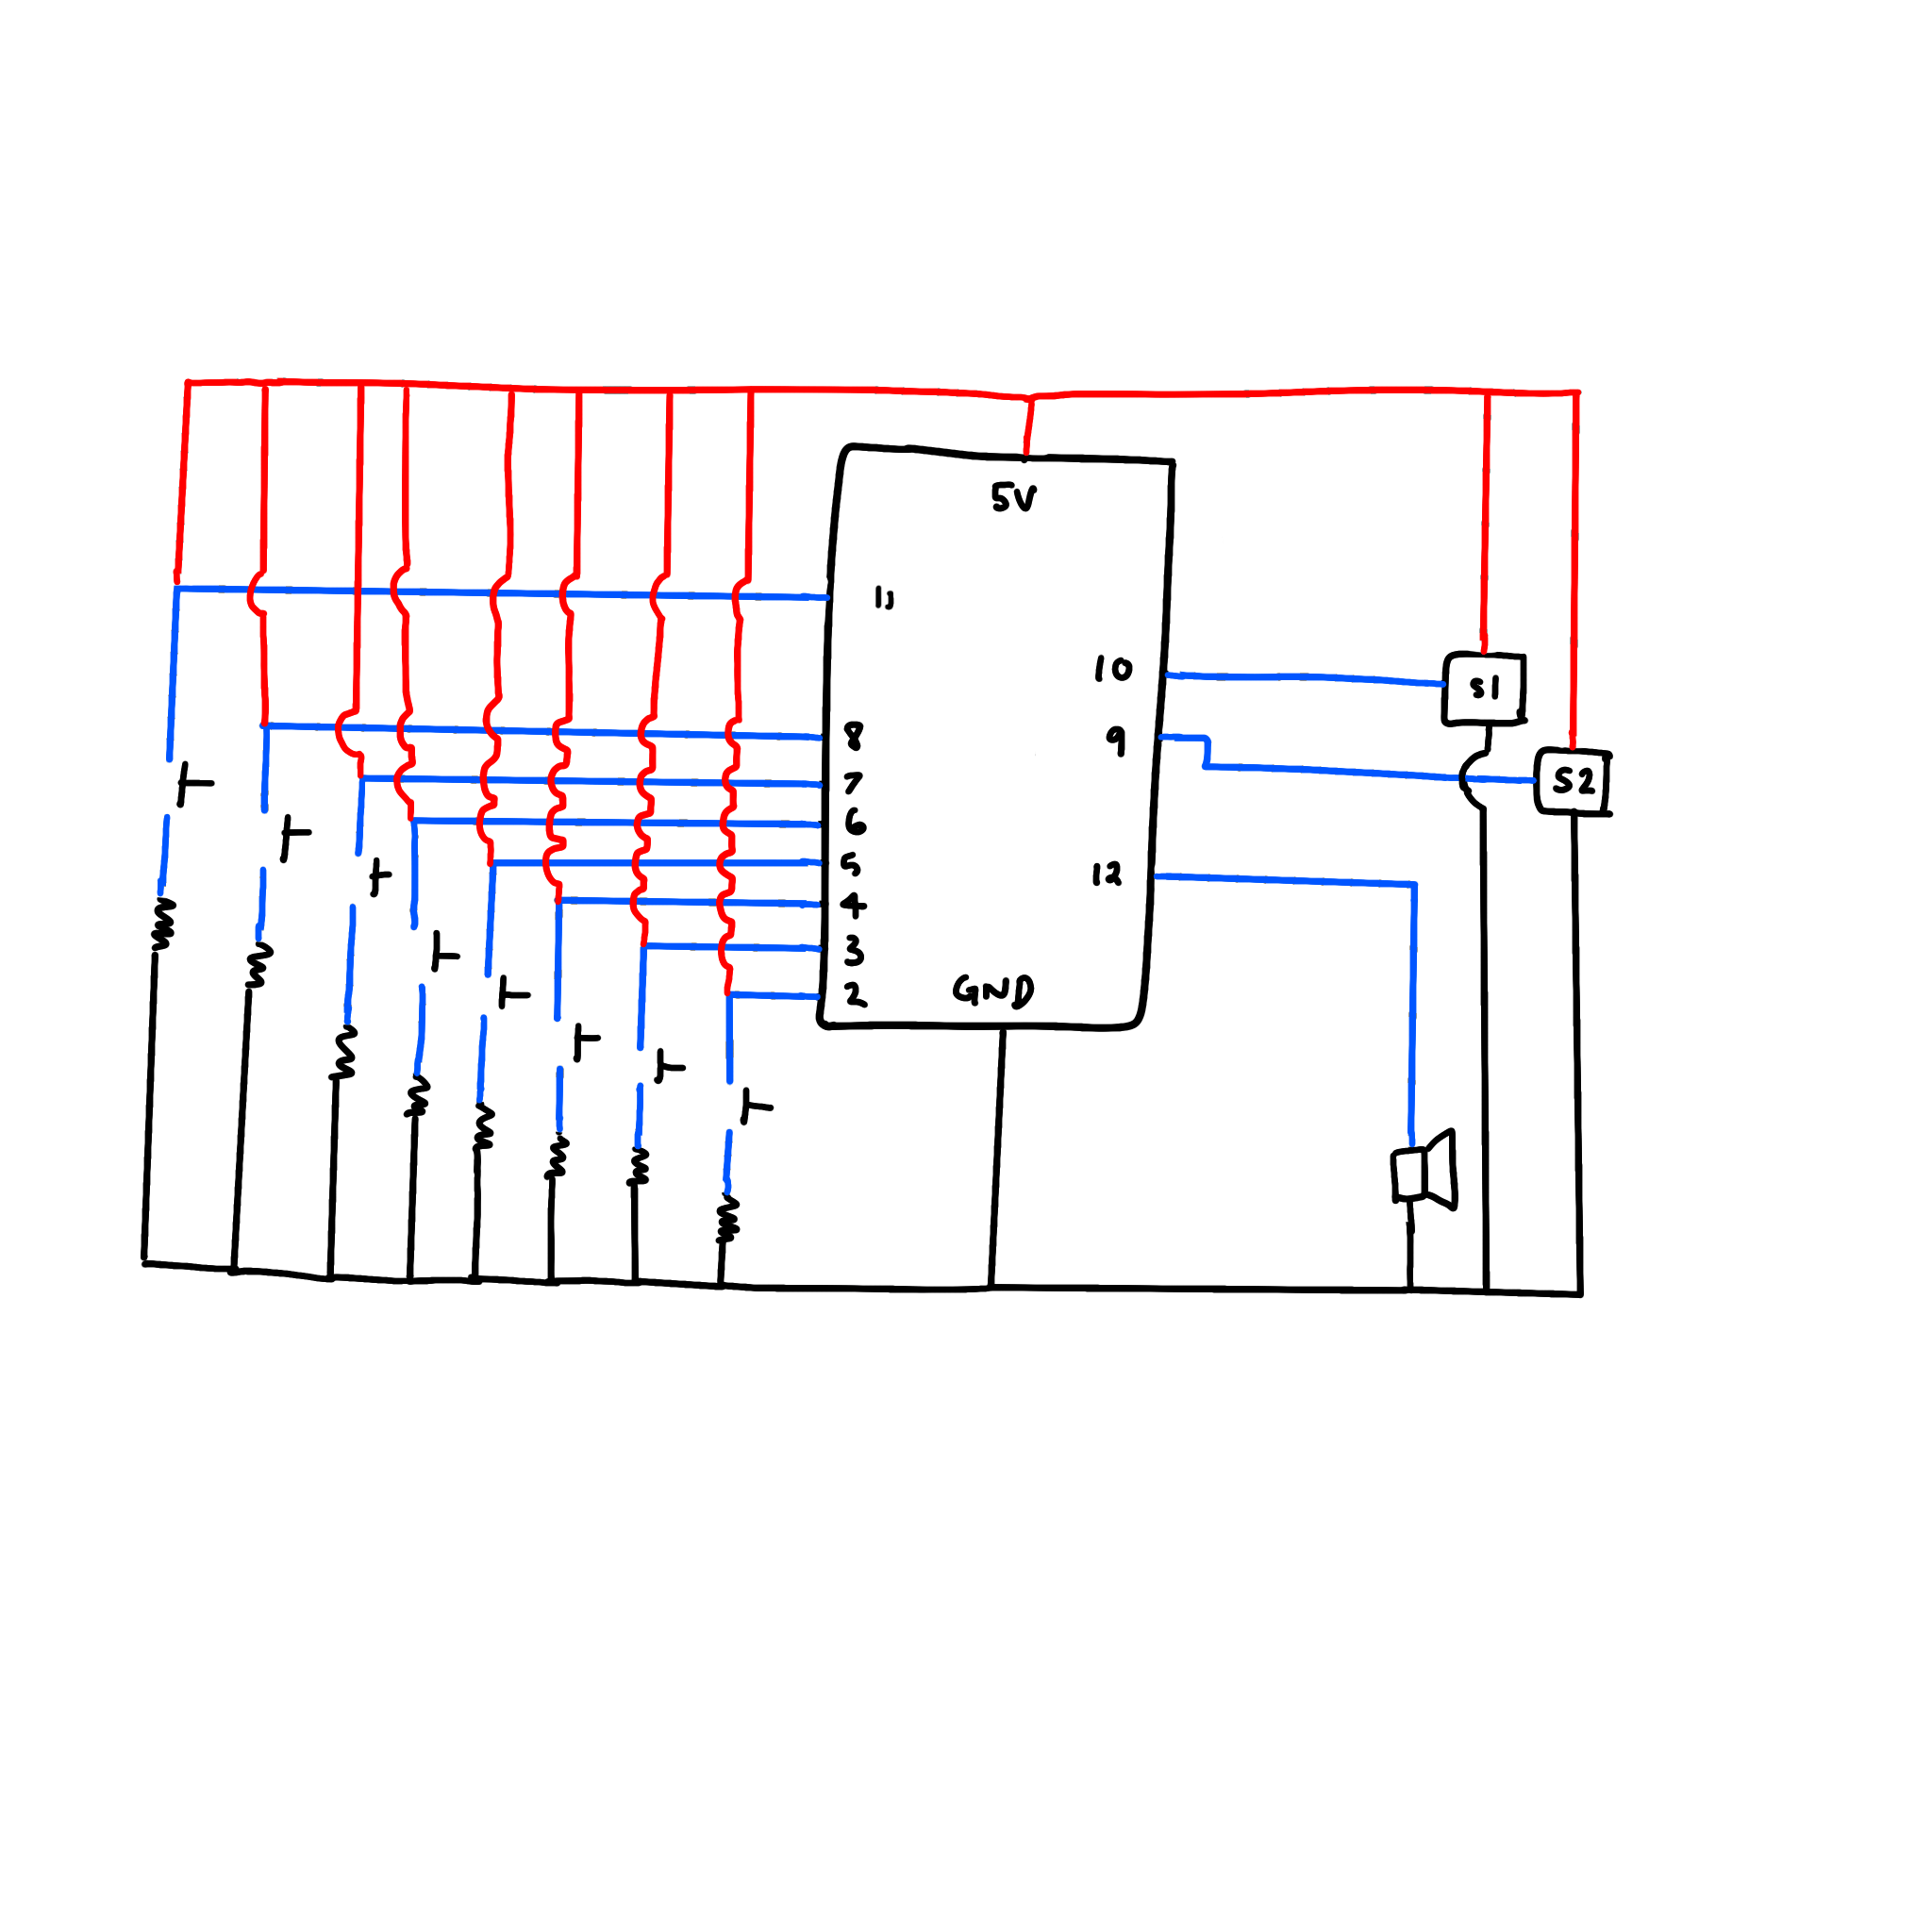
Buttons that play notes in an octave. When certain notes are played in a melody correctly, the next melody corresponding to the previous melody plays automatically until a red switch is pressed to terminate it. The instrument has two melodies stored inside- SuperMario Theme Song and Kesha’s Tik Tok. Two Servo Motors act as drums that add the tempo to the songs.
Behavior:
There are 8 buttons in a row which are 8 notes in an octave. The user can play any melodies using the ‘keyboard’ but to initiate either of the melodies that are stored in the program, the user has to hit certain notes correctly. While the melody plays, the user can click the red switch on the right to terminate the song and go back to playing whatever they want. The melody that plays after the correct notes are hit is then accompanied by the tempo by two servo motors.
Schematic:
Code:
#include "pitches.h"
int buzzer = 12;
int switch1 = 2;
int switch2 = 3;
int switch3 = 4;
int switch4 = 5;
int switch5 = 6;
int switch6 = 7;
int switch7 = 8;
int switch8 = 11;

int index1 = 0;
int index2 = 0;
int current_key = 0; // a variable recording the last pressed but not checked
int reading = false; // a boolean keeping track if a botton is being pressed
int key1[] = {3, 3, 3, 1, 3, 5};
int key2[] = {5, 4, 4, 4, 4};
int notes[] = {
  NOTE_C7, NOTE_D7, NOTE_E7, NOTE_F7,
  NOTE_G7, NOTE_A7, NOTE_B7, NOTE_C8
};
// melody and tempo for the Mario theme song
int melody1[] = {
  NOTE_G6, 0,
  NOTE_C7, 0, 0, NOTE_G6,
  0, 0, NOTE_E6, 0,
  0, NOTE_A6, 0, NOTE_B6,
  0, NOTE_AS6, NOTE_A6, 0,

  NOTE_G6, NOTE_E7, NOTE_G7,
  NOTE_A7, 0, NOTE_F7, NOTE_G7,
  0, NOTE_E7, 0, NOTE_C7,
  NOTE_D7, NOTE_B6, 0, 0,

};

int tempo1[] = {
  12, 12,
  12, 12, 12, 12,
  12, 12, 12, 12,
  12, 12, 12, 12,
  12, 12, 12, 12,

  9, 9, 9,
  12, 12, 12, 12,
  12, 12, 12, 12,
  12, 12, 12, 12,

};
// Melody and Tempo for Tik Tok
//E, D, E, F, G, F, E, E, E, E, D, E, B
int melody2[] = {
  NOTE_F7, NOTE_F7, NOTE_F7, NOTE_F7, NOTE_F7, NOTE_F7, NOTE_F7, 0,
  NOTE_G7, NOTE_F7, 0,
  NOTE_F7, NOTE_F7, NOTE_F7, 0,
  NOTE_F7, NOTE_F7, NOTE_F7, NOTE_F7, NOTE_E7, 0, NOTE_D7, 0,
  NOTE_G7, NOTE_F7, 0,
  NOTE_F7, NOTE_F7, NOTE_F7, 0,
  NOTE_F7, NOTE_F7, NOTE_F7, NOTE_F7, NOTE_F7, NOTE_F7, NOTE_D7,
  NOTE_D7, NOTE_D7, NOTE_D7, NOTE_A7,

};

int tempo2[] = {

  125, 125, 125, 125, 125, 125, 125, 125,
  250, 125, 125,
  125, 125, 125, 125,
  125, 125, 125, 125, 125, 125, 125, 125, 125,
  375, 125, 125,
  125, 125, 125, 125,
  125, 125, 125, 125, 250, 250, 250,
  250, 250, 250, 500
};


#include

Servo Rservo;  // create servo object to control a servo
Servo Lservo;
// twelve servo objects can be created on most boards

int pos = 0;    // variable to store the servo position

void setup() {
  // put your setup code here, to run once:
  Serial.begin(1200);
  Lservo.attach(9);
  Rservo.attach(10);

  pinMode(switch1, INPUT);
  pinMode(switch2, INPUT);
  pinMode(switch3, INPUT);
  pinMode(switch4, INPUT);
  Lservo.write(0);
  Rservo.write(150);
}

void play_tone(int note) {
  tone(buzzer, notes[note - 1]);
}

void loop() {
  // put your main code here, to run repeatedly:
  int switch1State = digitalRead(switch1);
  int switch2State = digitalRead(switch2);
  int switch3State = digitalRead(switch3);
  int switch4State = digitalRead(switch4);
  int switch5State = digitalRead(switch5);
  int switch6State = digitalRead(switch6);
  int switch7State = digitalRead(switch7);
  int switch8State = digitalRead(switch8);
  Lservo.write(30);
  Rservo.write(120);
  if (switch1State == 1) {

    play_tone(1);
    current_key = 1;
    reading = true;


  } else if (switch2State == 1) {

    play_tone(2);
    current_key = 2;
    reading = true;


  } else if (switch3State == 1) {

    play_tone(3);
    current_key = 3;
    reading = true;


  } else if (switch4State == 1) {

    play_tone(4);
    current_key = 4;
    reading = true;


  } else if (switch5State == 1) {

    play_tone(5);
    current_key = 5;
    reading = true;


  } else if (switch6State == 1) {

    play_tone(6);
    current_key = 6;
    reading = true;


  } else if (switch7State == 1) {

    play_tone(7);
    current_key = 7;
    reading = true;


  } else if (switch8State == 1) {

    play_tone(8);
    current_key = 8;
    reading = true;


  } else {
    noTone(buzzer);
    delay(1);
    reading = false;

  }

  if (!reading && current_key != 0) {
    if (current_key == key1[index1]) {
      index1++;

    }
    else {
      index1 = 0;
    }
    if (current_key == key2[index2]) {
      index2++;
    }
    else {
      index2 = 0;
    }
    current_key = 0; //important resetting!
    reading = true;
  }


// if the first 5 keys matches the ones of Mario theme song, the instrument will play the song
  if (index1 > 5) {
    delay(500);
    int side = 0;
    for (int thisNote = 0 ; thisNote < 33; thisNote++) {
      switch1State = digitalRead(switch1);
      switch2State = digitalRead(switch2);
      switch3State = digitalRead(switch3);
      switch4State = digitalRead(switch4);
      switch5State = digitalRead(switch5);
      switch6State = digitalRead(switch6);
      switch7State = digitalRead(switch7);
      switch8State = digitalRead(switch8);

      if (!switch1State && !switch2State && !switch3State && !switch4State && !switch5State && !switch6State && !switch7State && !switch8State) {
        int noteDuration = 1000 / tempo1[thisNote];
        tone(buzzer, melody1[thisNote], noteDuration);
        if (side % 2 == 0) {
//loops for the left servo to “hit” the can
          for (pos = 30; pos <= 50; pos += 1) { Lservo.write(pos); delay(3); } for (pos = 50; pos >= 30; pos -= 1) {
            Lservo.write(pos);
            delay(3);
          }
        }
        else {
//loops for the right servo to “hit” the can
          for (pos = 30; pos <= 50; pos += 1) { Rservo.write(150 - pos); delay(3); } for (pos = 50; pos >= 30; pos -= 1) {
            Rservo.write(150 - pos);
            delay(3);
          }
        }
        side++;


        int pause = noteDuration * 1.8;
        //delay(pause);
      }
      else {
        break;
      }
    }
    index1 = 0;

  }
// Similar for Tik Tok
  if (index2 > 4) {
    delay(500);
    int side = 0;
    for (int thisNote = 0 ; thisNote < 41; thisNote++) {
      switch1State = digitalRead(switch1);
      switch2State = digitalRead(switch2);
      switch3State = digitalRead(switch3);
      switch4State = digitalRead(switch4);
      switch5State = digitalRead(switch5);
      switch6State = digitalRead(switch6);
      switch7State = digitalRead(switch7);
      switch8State = digitalRead(switch8);
      if ((!switch1State && !switch2State && !switch3State && !switch4State && !switch5State && !switch6State && !switch7State && !switch8State)) {
        tone(buzzer, melody2[thisNote], tempo2[thisNote]);
        if (side % 2 == 0) {
          for (pos = 30; pos <= 50; pos += 1) { Lservo.write(pos); delay(3); } for (pos = 50; pos >= 30; pos -= 1) {
            Lservo.write(pos);
            delay(3);
          }
        }
        else {
          for (pos = 30; pos <= 50; pos += 1) { Rservo.write(150 - pos); delay(3); } for (pos = 50; pos >= 30; pos -= 1) {
            Rservo.write(150 - pos);
            delay(3);
          }
        }
        side++;
        int pause = tempo2[thisNote] * 1.2;
        delay(pause);
      }
      else {
        break;
      }
    }
    index2 = 0;

  }

}
Problems:
At first the code didn’t work with Lucy’s laptop and we couldn’t find any error in the code. After switching to Chunxiao’s, the code worked without modifying.
Whenever the push buttons were pressed, multiple signals were sent to the Arduino and it was hard to keep track of which buttons were pressed in a sequence. To solve this, we used boolean variable “reading” to indicate a block of signals initialized by the pressing of a button. We also used a variable “current_key” to store the key last pressed. We made a comparison of the key pressed to the first part of the two music pieces only after “reading” was false ( no longer getting signal from the previous pressing).
At first we forget to set current_key & reading back to default stage. We also didn’t specify that comparison should be made when current_key is not default. These stopped our code to operate as intended.
When implementing the “servo drum”, we thought of using threads which were not supported on Arduino. Instead of that, we added the commands to operate the servos along with the commands to play the tone inside the same loops.
I understand why Bret Victor has a strong stance against using hands to manipulate Pictures Under Glass when our capabilities exceed beyond that nowadays. His rant reminded me of the movie- Wall-E; the way the development of technology focuses extensively on people’s convenience and time-effectiveness, we may be numbing our senses to the point our lives cannot sustain without technology.
Although he pointed out the lack of acknowledgment of our capabilities in our current technological development, I still feel that we are doing a good job. The idea of technology revolving around the idea of convenience not only is extremely efficient and helpful for us, but also for those who have physical difficulties in operating something we can easily do. Touchscreens may be restricting our hands’ meticulous muscle contractions and movements, but they can certainly be useful to others who can’t perform such actions.
However, I do feel that the so-called ‘trend’ in technology may be limiting to potential ideas and creativity; we tend to frame our expectations on existing things around us, and I think this is why we see many products in the market that are just renewed versions of the previous models.
Responses
I also think that the optimum age range of technology has widened, but toddlers and young children’s overexposure to digital screens is also very worrying. Although they may have a head start in operating high-technology at a very young age, it reduces their eye movements which are significant during the stages of their early developments. We may be losing our capabilities one by one as our technology improves. Some technology even allows us to do things beyond our capabilities; this may be useful in the short term, but I feel that we are in a grey area between the boundaries of getting help from the technology and letting it do things for us, and I appreciate that the writer ‘ranted’ about such issue to raise awareness of the problem. Without the awareness, we are very likely to let everything be done for us without even having to move.
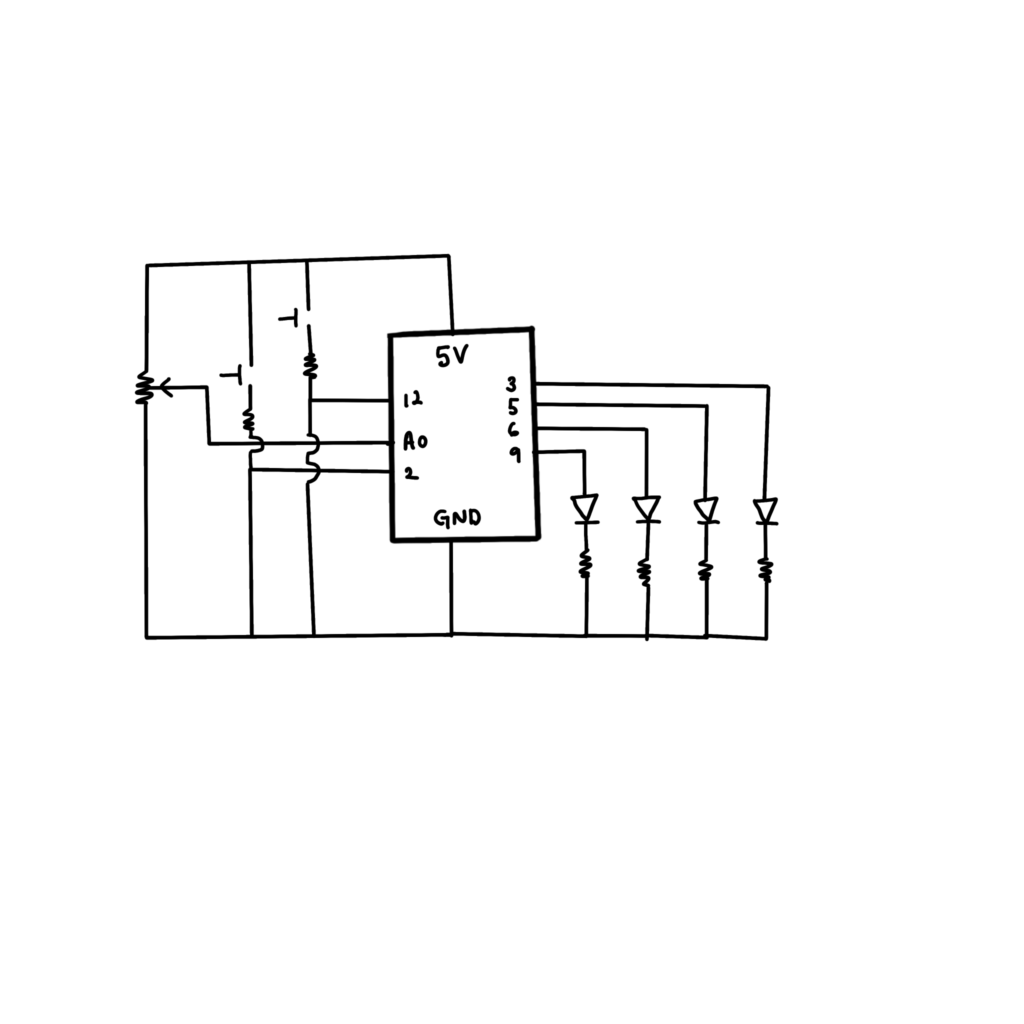
The potentiometer controls the brightness of all 4 LEDs. Different switch initiates different blinking behavior.
Behaviour
Potentiometer controls the brightness of the LEDs. The red switch allows each LED to blink after one another and the green switch allows all 4 LEDs to blink together.
Schematic
Problems
I had no particular problem while setting up the circuit and writing the code but I was quite unsure as to whether setting the LED pins to numbers with the ~ sign next to them would also behave in a digital fashion. It was just a small confusion and uncertainty I had, but setting it up and trying it for myself helped me clear out the concept better.
On a side note, my blog post on the previous assignment talks about a specific problem I had with the delay() function and how I incorporated millis() instead.
Program
int red = 3;
int blue = 5;
int green = 6;
int yellow = 9;

int redSwitch = 2;
int greenSwitch = 12;

int counter = 5;
int brightness = 0;


void setup() {

  Serial.begin(9600);

  pinMode(3, OUTPUT);
  pinMode(5, OUTPUT);
  pinMode(6, OUTPUT);
  pinMode(9, OUTPUT);

  pinMode(2, INPUT);
  pinMode(13, INPUT);

}

void loop() {

  int sensorValue = analogRead(A0);

  Serial.println(sensorValue);
  delay(1);

  //potentiometer controlling the brightness of the LEDs
  analogWrite(3, sensorValue / 4);
  analogWrite(5, sensorValue / 4);
  analogWrite(6, sensorValue / 4);
  analogWrite(9, sensorValue / 4);


  // red switch
  int redState = digitalRead(redSwitch);

  // if statement for the red switch; all 4 LEDs to blink one after the other in 3 sets
  if (redState == 1) {
    for (int counter = 3; counter > 0 ; counter --) {
      digitalWrite(3, HIGH);
      delay(50);
      digitalWrite(3, LOW);
      delay(50);
      digitalWrite(5, HIGH);
      delay(50);
      digitalWrite(5, LOW);
      delay(50);
      digitalWrite(6, HIGH);
      delay(50);
      digitalWrite(6, LOW);
      delay(50);
      digitalWrite(9, HIGH);
      delay(50);
      digitalWrite(9, LOW);
      delay(50);


    }
  }

  //green switch
  int greenState = digitalRead(greenSwitch);


  // if statement for the green switch; when pressed, all 4 LEDs blink 10 times every 50 milliseconds.
  if (greenState == 1) {
    for (int counter = 10; counter > 0 ; counter --) {
      digitalWrite(3, HIGH);
      digitalWrite(5, HIGH);
      digitalWrite(6, HIGH);
      digitalWrite(9, HIGH);
      delay(50);
      digitalWrite(3, LOW);
      digitalWrite(5, LOW);
      digitalWrite(6, LOW);
      digitalWrite(9, LOW);
      delay(50);

    }


  }
}
After reading Crawford’s text about what is defined to be truly ‘interactive’, I realized that my first assignment on writing a blog post about posters was in fact inappropriate in the context of interactivity. I understood the definition of ‘interactivity’ as a form of flow; in order for something or someone to be considered interactive, there must be a flow, whether that be a series of conversations one after the other, or actions. (Or metaphorically speaking, a tennis ball that goes back and forth between players in the court) I also began to appreciate all kinds of designs I took for granted in my everyday life such as the water bottles, tables, windows, blinders and everything that I could ever think of for facilitating my life. I also felt that the definition of ‘interactive’ seemed highly specific. Before reading this, I regarded anything that reacted to my thought, actions or emotions as interactive, but realized that a truly successful interactive design requires the optimum balance of everything, from graphic design to interface design, thinking, listening, reading and speaking.
The Design of Everyday Things
This reminded me of my past experience I had in another IM class called Temporary Expert with Professor Marina Zurkow; whenever I tried to explain how my project would work and how I expect people would be engaging with my project, she always used to remind me how we, as designers, should not never assume the participants will do what is expected of them. Reading this emphasized this once more, that anything I believe is easy enough is in fact never easy enough to the others.
Also, regarding Human-Centered Design, I couldn’t help but to think about the gap the fast developing technology creates between people. Although they say high technology is designed around the idea of Human-Centered Design, who really is the ‘Human’ in ‘Human-Centered Design’? How does the fast growing design accommodate elderlies for example?
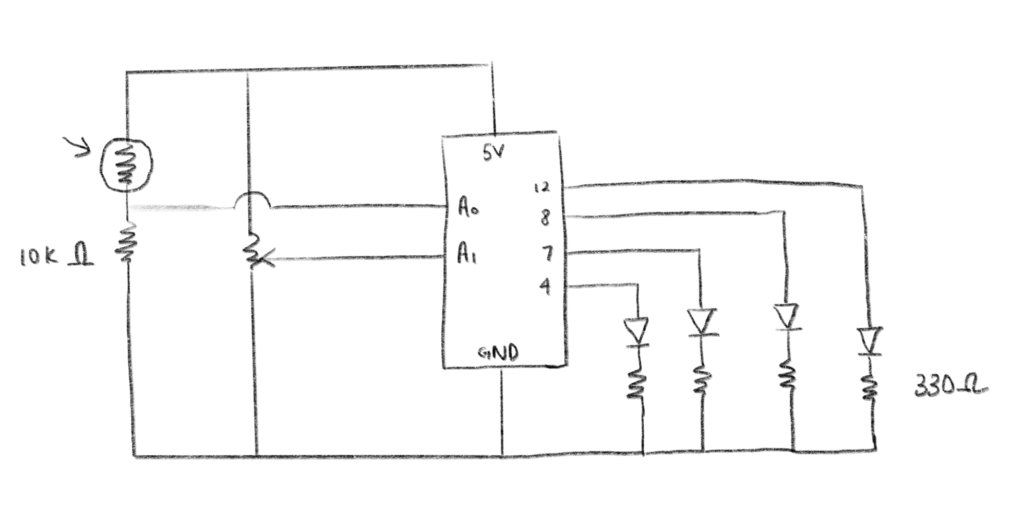
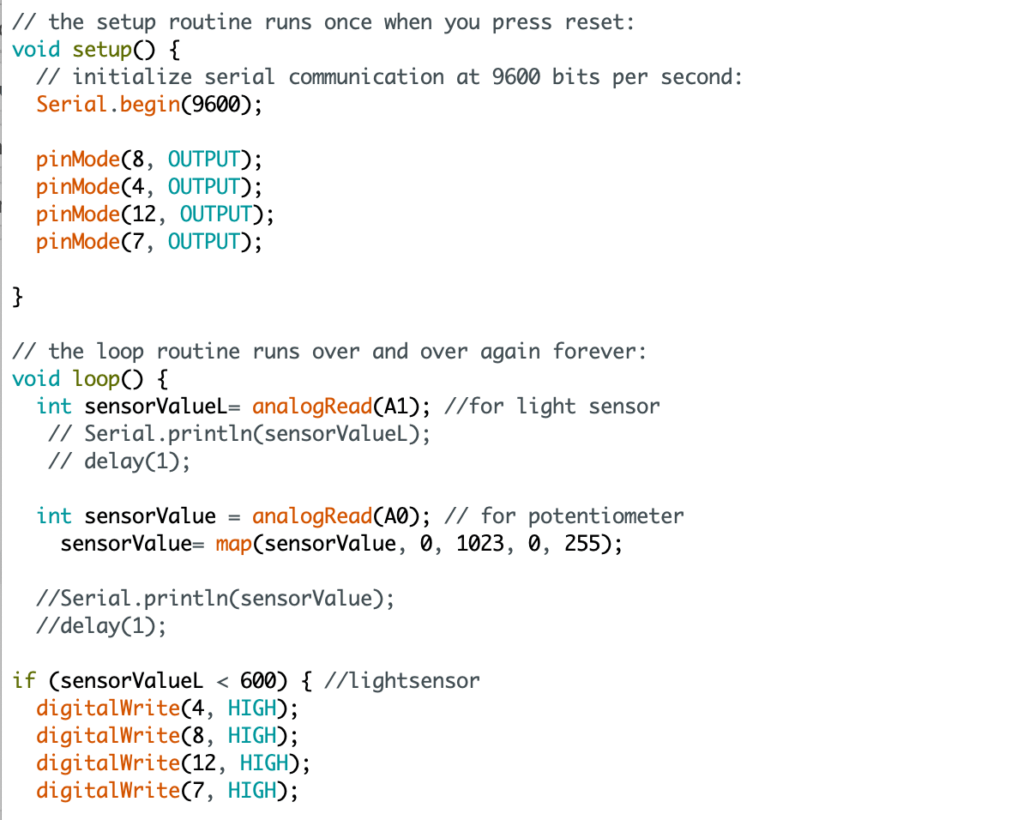
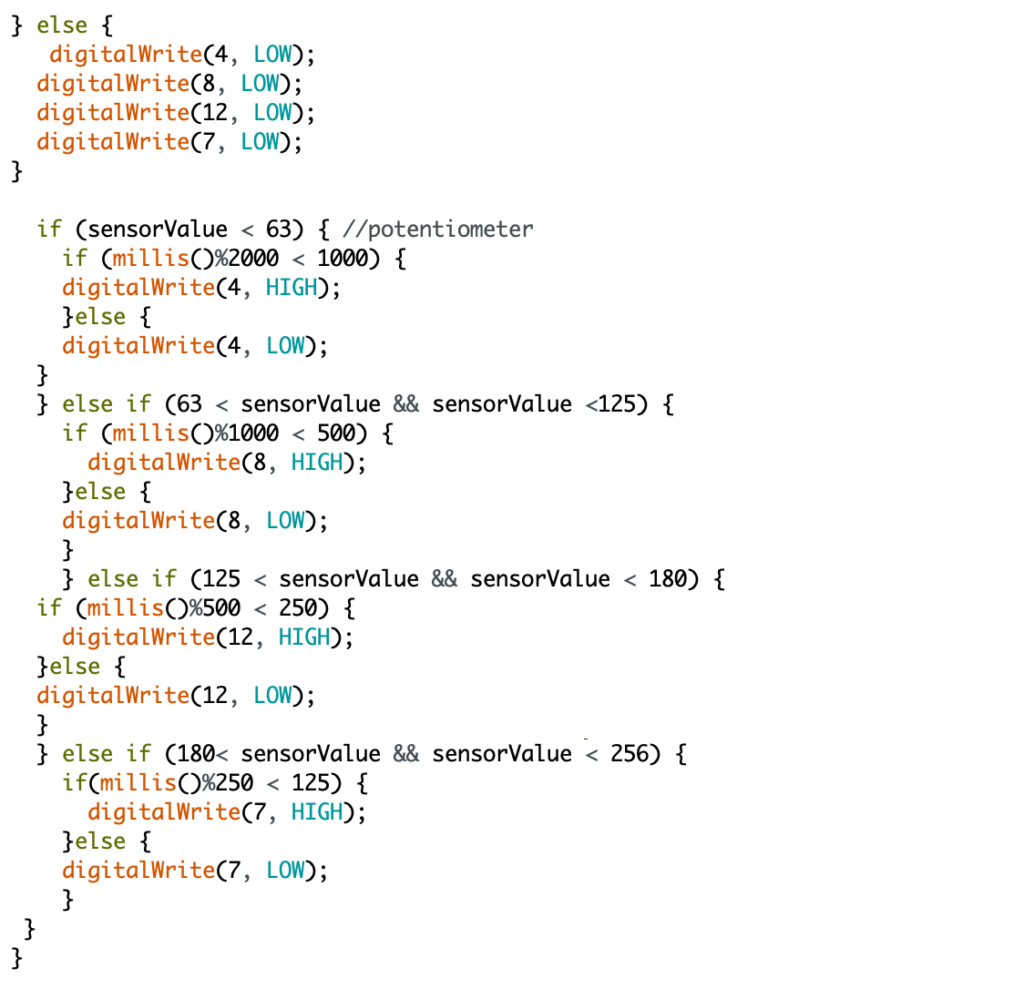
As I twist the potentiometer, the light in the LED moves accordingly from green to blue to yellow to red. At the same time, the rate of the blinking of the LED increases as I twist the potentiometer more and more, until the red LED blinks once every 125 milliseconds. The light sensor reacts to light and switches all 4 LEDs when dark, and switches all LEDs on when bright.
Initially, I incorporated the built-in blinking code we learned in the beginning of the lesson. I adjusted the rate by altering the value inside the delay (). However, as I was monitoring the values through the serial monitor, I noticed that for the green LED, the values were displayed at the rate I set the delay () value to be. This meant that I had to push down the switch for as long as a second, and even if I let go of it immediately, the LED would switch off after another second.
Jack helped me understand why this was the case; the delay() stops the coding system completely, and that was why the switch didn’t switch on and off as synchronized as it could be to my input. Instead, I used millis() as suggested by Jack, which returns the amount of milliseconds that have passed since the program started running. I used % and some numerical values and came up with a if/else statement to replace the delay() blink code.
I also found out how to use if statement within an if statement. I had a lot of errors that I couldn’t understand, but figured out the importance of the number of brackets and where they were placed. I’m pretty sure there are smarter ways in which the coding can be simplified and crafted but I’m satisfied that it does the job!
I chose posters that are stuck on the walls of the elevators on our campus as an ‘interaction’. According to the dictionary, ‘interactive’ is defined as ‘a program that is designed to involve the user in the exchange of information’. Although posters aren’t necessarily a type of ‘program’, they provide important information to students and staffs on campus through visual design. The viewers, posters and organizers are all in a mutual interactive relationship since organizers receive attendees in an event, and viewers are informed about such events through posters; posters work as an important connection between organizers and viewers in this interaction.
Since the main purpose of these posters are to inform the students about upcoming events and their locations, these information are therefore prioritized and are visually represented on the posters through typography; the titles take up a greater proportion of the posters than the sub-information to highlight its priority. Some of the posters like the ones designed by the CDC have the color- blue, as their main color to set its brand identity (it also sets a subtle and a professional tone) so that the next time a person sees a poster with its main color as blue, s/he immediately knows it’s from the CDC. In contrast, posters organized by Student Groups such as the ‘SLICE OPEN HOUSE’ have a more welcoming and a warmer tone. There are also illustrations which attract people’s attention while there were a few posters which lacked colors and dimensions, meaning people were drawn less to them.The posters therefore allow people in the lift to initiate conversations about the events, and at the same time pose questions to organizers when some of the information is not clear enough.
There are some constraints to using posters as a sole interaction between the organizers and the viewers however; surplus of posters in the elevator will mean that they will less likely be noticed, and since all the posters are stuck on the walls at an eye-level, posters that are placed elsewhere will not be able to be as effectively interactive as the others. Also, the sizes of the posters are also limited since we all acknowledge that the lift isn’t to solely built to serve its purpose as a poster collection, and therefore are responsible for the space they may be taking up; it would be impractical to have an A1 poster just for the sake of getting people’s attention without thinking about other interactions we have in the space.
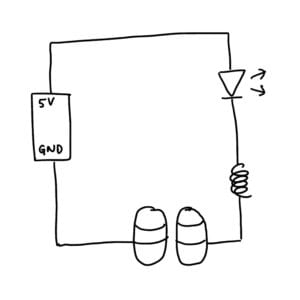
Posture switch
ON
OFF
Schematic diagram of the circuit
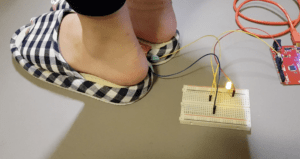
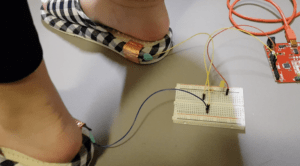
This temporary switch involves a person wearing a pair of slippers; the LED turns on only when the slippers right against each other and off when they are apart.
This idea came from my personal experience of always having bad posture; I would always stand with my weight down on one leg and let the other hang. The habit of me doing so is starting to break the whole balance of the body where my shoulders and pelvis are slightly tilted to one side.
The circuit wouldn’t necessarily ‘fix’ my posture but I would always be informed by the light whenever I’m not standing up properly.
One of the challenges that I faced while working on this was the random connection of the circuit; sometimes it would work and the light would switch on but other times it just didn’t work. To solve this problem, I had to wrap the tip of the wire with a copper tape, then tape it again on the slippers instead of taping the tip of the wire to the side of the slipper straight away.
Initial idea
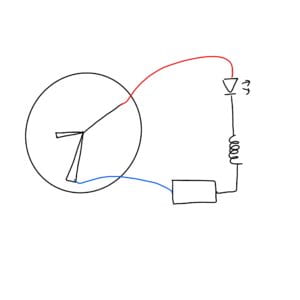
In the beginning, I thought of using a clock as a switch; whenever the second hand passes the minute hand, the light would switch on. But while I was working on this project, I had to question myself the definition of a switch. Do I have to create a switch that can switch on and off by itself or do I need to have control over it.
When I attached the tip of the wire on the second hand with a copper tape, the second hand did not move because the weight of the wire was heavy enough to stop the hand from pivoting.
I couldn’t find a way to solve this problem so I had to come up with a new one, which is the posture switch.