Author Archives: iv465

Week 7 Readin Assignment

Making Interactive Art: Set the Stage, Then Shut Up and Listen

I think the author had two maşn arguments. The first one is ” Let them decide how they will interpret the parts, and how they will respond” and the second one is “Pay attention to their reactions.” I think he is emphasizing a really good point because interactive media is a mix of technology and ‘art’ we have to treat these two parts according to their needs. Technology requires feedback in order to be improved so we should pay attention what the audience thinks. And ‘art’ is up for interpretation, when you go to a gallery or museum the artist doesn’t explain you what he meant to draw. You interpret the way you want to, and same policy applies for interactive media works.

Physical Computing’s Greatest Hits (and misses)

First of all, It was really impressive to see how many different projects can be made within the field of IM. It kind of scares me that I might not be as creative as other people and not create something nice and good and original which is exactly the author’s point. The reading clearly emphasizes the importance of not being intimated just because things have been done before. A lot of things have been done before but it is up to us how to replicate them and improve them.

Week 6: Midterm Project

Concept:

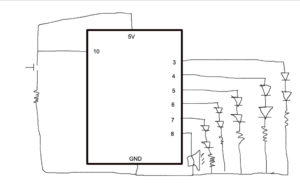
The concept is to do a Christmas themed plant because it is almost the season! I originally wanted to it with a tiny Christmas tree but I couldn’t find one so I made it with an ordinary plant. Basically, when you press the button it plays the Christmas cheer and the lights blink according to the rhythm of the song and when the button is not pressed the light keeps on blinking in their default tempo.

Behavior:

The lights blink in their own tempo when nothing is touched. When you press on the button the lights start blinking in a different tempo and music plays. When the music stops, LEDs go back to blinking in their original rhythm.

Project:

IMG_5690klh

Code:

int speakerPin = 8;


int length = 26;
char notes[] = "eeeeeeegcdefffgfeeeeddedg";
int beats[] = { 1, 1, 2, 1, 1, 2, 1, 1, 1, 1, 4, 1, 1, 1, 1, 1, 1, 1, 1, 1, 1, 1, 1, 1, 2, 2 };
int tempo = 250;

void playTone(int tone, int duration) {
  for (long i = 0; i < duration * 1000L; i += tone * 2) {
    digitalWrite(speakerPin, HIGH);
    digitalWrite(3, HIGH);
    digitalWrite(4, HIGH);
    digitalWrite(5, HIGH);
    digitalWrite(6, HIGH);
    digitalWrite(7, HIGH);
    digitalWrite(9, HIGH);
    delayMicroseconds(tone);
    digitalWrite(speakerPin, LOW);
    digitalWrite(3, LOW);
    digitalWrite(4, LOW);
    digitalWrite(5, LOW);
    digitalWrite(6, LOW);
    digitalWrite(7, LOW);
    digitalWrite(9, LOW);

    delayMicroseconds(tone);
  }
}

void playNote(char note, int duration) {
  char names[] = { 'c', 'd', 'e', 'f', 's', 'g', 'a', 'v', 'b', 'C', 'D', 'E' };
  int tones[] = { 1915, 1700, 1519, 1432, 1352, 1275, 1136, 1073, 1014, 956, 852, 758 };

  // play the tone corresponding to the note name
  for (int i = 0; i < 8; i++) {
    if (names[i] == note) {
      playTone(tones[i], duration);
    }
  }
}

void setup() {
  pinMode(speakerPin, OUTPUT);
  pinMode(3, OUTPUT);
  pinMode(4, OUTPUT);
  pinMode(5, OUTPUT);
  pinMode(6, OUTPUT);
  pinMode(7, OUTPUT);
  pinMode(9, OUTPUT);
  pinMode(10, INPUT_PULLUP);

}

void loop() {
  int sensorVal = digitalRead(10);
  Serial.println(sensorVal);
  if (sensorVal == LOW) {
    for (int i = 0; i < length; i++) {
      if (notes[i] == ' ') {
        delay(beats[i] * tempo); // rest
      } else {
        playNote(notes[i], beats[i] * tempo);
      }

      // pause between notes
      delay(tempo / 2);
    }
  } else {
    digitalWrite(13, HIGH);
  }

  digitalWrite(3, HIGH);
  delay(200);
  digitalWrite(4, HIGH);
  delay(200);
  digitalWrite(5, HIGH);
  delay(200);
  digitalWrite(6, HIGH);
  delay(200);
  digitalWrite(7, HIGH);
  delay(200);
  digitalWrite(9, HIGH);
  delay(200);
  digitalWrite(9, LOW);
  delay(200);
  digitalWrite(7, LOW);
  delay(200);
  digitalWrite(6, LOW);
  delay(200);
  digitalWrite(5, LOW);
  delay(200);
  digitalWrite(4, LOW);
  delay(200);
  digitalWrite(3, LOW);
  delay(200);

}

Schematic:
Problems:

I had some problems when I was coding. I couldn’t get the lights to blink differently when nothing happens vs. button is pressed. I got help from a friend and he fixed the problem by fixing if and else statements. 

I wanted to use an SD card to play the music essentially but it couldn’t download the library to my computer so I had to change plans last minute. I ended up getting the music notes online because I don’t know how to play the song with notes.

Another silly mistake I did was I placed the buzzer’s legs on the same row instead of the same column so I couldn’t get it to work for a day. Then, figured it out.

Soldering part was not easy, I felt like the job I did was not pretty. I used to much solder to keep its place. In the end, it worked but I think a prettier job could have been made with more practice.

Lessons Learned:

I should have used the different button and not the button from the Arduino kit. Also, before putting it into the box I had everything ready and planned so I didn’t have any problems or difficulties while wiring it. But, if I had to change anything it would have been hard so next time I do a project, I’m going to try design something more easily manipulated.

Week 4 – Assignment Quim and Ilayda

Concept:

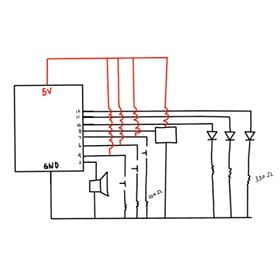
For this week’s project, we tried to make a musical instrument using a servo motor and tone. We imagined our project to be something like a keyboard to play music but instead, it would have buttons to make sounds. The servo motor would work as the ‘metronome’ or the ‘beat’. So while the beat is playing constantly in the background, you can create music according to the beat with the buttons.


Schematic:

Program:


https://github.com/ilaydaveziroglu/week4

#include 
#include "pitches.h"


Servo myservo;

int pos = 0;

void setup() {
  Serial.begin(9600);
  pinMode (12, OUTPUT);

  pinMode (11, OUTPUT);

  pinMode (10, OUTPUT);


  myservo.attach(9);
  pinMode(4, INPUT);
}

void loop() {
  int yellowbutton = digitalRead(4);
  int bluebutton = digitalRead(6);
  int greenbutton = digitalRead(7);
  Serial.println(yellowbutton);


  for (pos = 0; pos = 0; pos -= 1) {
    myservo.write(pos);
    delay(3);


  }
}

Behaviour:

 IMG_5183

The buttons work as the keyboard, the user can play whatever they want but since there are only three buttons the melodies that can be played is limited. Depending on which button you press, the LEDs light up according to their respective colour. The servo motor works as the ‘beat’, so the user can try to play something matching to the beat or can use that beat as the bass for their song.

Problems:

  1. The first problem we had was whenever we pressed the button, the light would turn off and whenever we released the button the light turn on. Finally, we figured the problem, we accidentally coded LOW, instead of HIGH. But realizing this took some time.
  2. The second major problem we had was the note for the third button. First two notes will play according to the note that we coded but whatever we did the third one kept on making a different sound. In the end, we kept on trying different notes and finally, an octave higher notes worked perfectly.
  3. The Third problem we are facing is the delay. When we press the button there is a delay while lighting the LED up and producing the sound. We still haven’t managed to fix the delay.

Reading assignment week 4

I found the article quite interesting. I always thought that iPads, iPhones or touch screens are the future. And the new devices are more focused on going hands-off rather than using more of our limbs. Like Virtual Reality technology right now. I see his point in the article how we should implement our hands more, but because he didn’t give a solution to it, I’m having a hard time imagining a way how we could implement our hands and it would be more futuristic than the touch screens we have right now. In his second article, it looks like he was a bit offended because no one seemed to make a positive comment to it. I guess also other people had a hard time imagining what could be the solution. Also, even though he is drawing attention to a problem, it is always easier to complain than come up with problems so I guess that’s why he got a lot of criticism. 

Week 3 – Assignment

CONCEPT

For this week’s assignment, we had to get information from at least one analog sensor and at least one digital sensor (switch), and use this information to control at least two LEDs, one in a digital fashion and the other in an analog fashion.

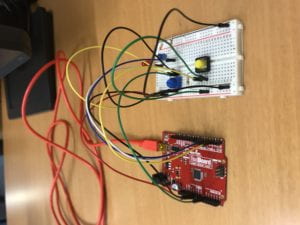
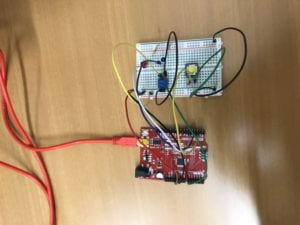
I did a different design than my last assignment. With this design, when you turn the potentiometer you can control how bright the LED will light up. And the switch in my circuit works an input and when you push the button, the LED’s will blink for 10 times back to back.

SCHEMATIC

BEHAVIOR

My potentiometer satisfies the analog sensor part. It controls the LED in an analog way. It is coded as analogRead. My yellow switch satfies the digital sensor part. It is coded as digitalRead, in the loop I had to use analogWrite. I discuss the reason for that in the PROBLEMS section.

PROGRAM

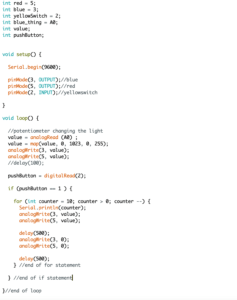
int red = 5;
int blue = 3;
int yellowSwitch = 2;
int blue_thing = A0;
int value;
int pushButton;


void setup() {

  Serial.begin(9600);

  pinMode(3, OUTPUT);//blue
  pinMode(5, OUTPUT);//red
  pinMode(2, INPUT);//yellowswitch

}

void loop() {

  //potentiometer changing the light
  value = analogRead (A0) ;
  value = map(value, 0, 1023, 0, 255);
  analogWrite(3, value);
  analogWrite(5, value);
  //delay(100);

  pushButton = digitalRead(2);

  if (pushButton == 1 ) {

    for (int counter = 10; counter > 0; counter --) {
      Serial.println(counter);
      analogWrite(3, value);
      analogWrite(5, value);

      delay(500);
      analogWrite(3, 0);
      analogWrite(5, 0);

      delay(500);
    } //end of for statement

  } //end of if statement

}//end of loop


PROBLEMS

One problem, I had was I forgot to connect my switch to 5V with a cable. I just connected it to pin 2 but then I was checking on google why it was not working, I realized that I forgot that cable.

Another problem I had when I was coding was I wanted to play with the brightness of my LEDs when they were changing. But I coded as digitalWrite so I was not able to do that. When I changed it to analogWrite, it started working. Also, my delays were too short (50) so I was not able to see the blinking for some reason. When I made it 500 it started working properly.


Reading reponses

I agree with the author that the word ‘Interactive’ is a word which is overused but not well understood. I think recently there are many words that we use commonly because they are in trend but we don’t know the meaning very well. Even when I want to describe ‘Interactive Media’ major, I get stuck trying to explain interactive part. I feels natural to say it but when I need to explain it  in detail, I can’t. When giving a description for ‘interactive’, he mentions that books, films and many other things are not interactive. I believe that he has  a point but during summer a film on Netflix was released, it is called ‘Bandersnatch’. And it is an interactive movie where you get to choose how to proceed. It gives you some freedom to make decisions. Maybe it is not fully interactive on a scale but compared to other movies it is. I don’t think drawing such hard boundaries is the right approach. If we try, we can come up with ideas to make a lot of things more interactive.

I found this reading super relatable in many aspects. It is so true that just for the sake of doing something ‘new’ or ‘original’, we don’t think about how user friendly it is. I remember when I was young, we bought a brand new washing machine. When it finally arrived to the house, I was trying to open the front of the machine and it was extremely weird. I ended up breaking the machine while trying to open it on the first day. My mom was furious, looking back at it now, I realize it was not my fault:) Maybe a little…

My mom studied endustrial desing so while I was growing up these types of chats were part of our daily lives. Like how user friendly a desing is, or how it could be improved. All the things that the chapter was talking about felt quite familiar.

Week 2: Garden Lights

For this project, I designed garden lights with different colors. Before coding it, I completed my circuit. At first, I created a simple circuit with LEDs and resistors to check if all of my LEDs were working or not. Then, I added the potentiometer and the light sensor. I used the potentiometer and the light sensor as an input and different LEDs as outputs.

IMG_4385 4

I put the potentiometer as A0 and the light sensor as A2. My red LED is 5 and  my blue LED 3. How I visioned it to work is that you can turn them on with the potentiometer even if it is day time (when there is light), also I want them to work automatically when it is night time (when there is less light or dark). I think my code work according to my wishes, I tries to keep it simple so it would work the way I want it. When I tried to code something super specific, I couldn’t get the code to work because probably I made tiny mistakes in the process.


IMG_4392 4444


Week 1: Handless Switch – Pinwheel

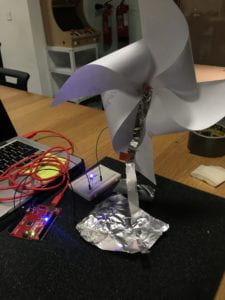
For my handless switch, I decided to do a pinwheel that will work as a switch for my circuit. I designed a circuit that is complete when the pinwheel is in a certain position. Every time when you blow to the pinwheel, it would turn the light off because the circuit would not be complete. After a full spin the pinwheel will come back to its original place the circuit will work again

.

I started this by doing a pinwheel that would conduct electricity. I wrapped a  straw with tin foil and attached one end of the cable to it. On the top part of the pinwheel, I used a pin that conducts electricity to attach the paper part to the straw. I taped a line of tin foil on top a wing of the pinwheel, because i needed something light and something that would conduct electricity. I put another piece of tin foil on to the ground and attached one end of the cable to it. Every single time the pinwheel did a turn the strip of tin foil would touch the tin foil on the ground and by this way, it would complete the circuit.,

IM Pinwheel Video

observations about something interactive

My observation for this weeks interactive thing on campus is the ‘Medical Test Van’ outside of A6. The van contains 5 people from the hospital staff.  found this van really efficient in terms of use and design. First of all, everybody who had to renew their visas saved time by not going all the way to the hospital for these small procedures. In terms of design, the van is simple and not confusing. It has three rooms which are used to take an X-Ray, withdraw blood and a waiting area. The door you use to enter the van opens up to a waiting room where a staff member will get your information into the system and take a picture of you. The waiting room contained enough space for everyone to fit and there was air conditioning which was really important for this weather. As the line moves quickly, you proceed to the other room to get your blood drawn and then to the X-Ray room. During my interaction with all of the staff the system worked smoothly. The only thing for me that didn’t work was that while I was given instructions about the papers, they were  not clear. Because of this unclarity, I ended up throwing away my paper which later turned out to be important for my residency visa.

After I lost my paper, I had to go back to get it re-printed. Because it was on campus, it was convenient to go and I didn’t waste time while going there again. The interaction with the staff was really good too. Instead of criticizing or not being helpful, the guy who registered me, took his time to pull up my file and reprint it. Overall, it was not a typical technological interaction but rather a person to person interaction.