Author Archives: Gauri

Midterm Project

What are the two things you’re most likely to see in a typical dorm room in NYU Abu Dhabi? Plants (alive or dead, it’s anyone’s guess), and fairy lights. 

What’s the problem with plants? They die. What do we like to do? Party. (Keeping it halal of course). With this in mind, I decided to make a plant that helps use with all three of the aforementioned situations- having fairy lights, plants that don’t die, and parties. 

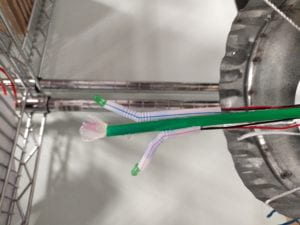
It uses three potentiometers, one for ‘water’, one for ‘light’, and one for party mode. If you turn the water potentiometer, the plant ‘grows’. Turning the light potentiometer makes the leaves and flowers (for which I used LEDs) glow. The party mode potentiometer makes the LEDs blink at varying speeds depending how much you turn the potentiometer.

Water:

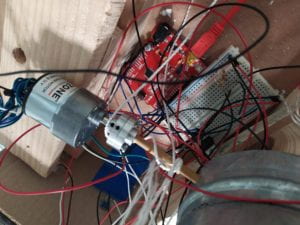
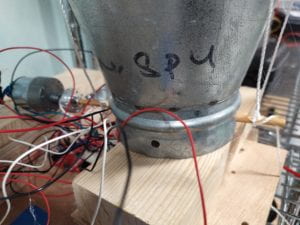
I initially tried using weight sensors for the ‘water’ potentiometer since I wanted to use actual water- the increasing weight of the water in a glass would make the plant grow- but it didn’t work since the sensor wasn’t consistent enough with its readings. So I decided to use a potentiometer instead. I used if statements to create three ‘levels’ so that the plant can grow a little more each time. The potentiometer is connected to a motor (again, I had issues with the motor being too weak so I had to rewire my plant to make it lighter and also use a stronger motor), which turns for a set amount of time every time it’s turned. The motor is connected to a pulley system which pulls the plant up, making it ‘appear’ out of its container, giving the illusion of growth. This was SUPER tricky because I had to figure out the mechanics of it while making sure the plant didn’t just tip over to one side as it was lifted- I was partially successful. But hey, plants don’t necessarily grow in exactly vertically lines do they?

Light:

The light potentiometer makes the LEDs light up in turn, from bottom to top, adding to the illusion of growth- I used green for leaves and other colours for flowers- very original, I know. Again, I used if statements to make them light up in sequence. 

PARTY PARTY PARTY:

Yet again, if statements to the rescue- turning the party potentiometer makes the LEDs (the leaves and flowers) blink at different speeds, depending on how crazy you want to get. 

I’ve labelled the potentiometers so people know what they’re controlling, and the little dial type thing I’ve drawn above the knobs (hopefully) conveys that there are three levels to each potentiometer setting. 

So there you have it: disco plant.

int counter = 0;
// the setup routine runs once when you press reset:
void setup() {

// initialize serial communication at 9600 bits per second:
Serial.begin(9600);

pinMode(3, OUTPUT);
pinMode(5, OUTPUT);
pinMode(6, OUTPUT);

pinMode(11, OUTPUT);
}

// the loop routine runs over and over again forever:
void loop() {
// read the input on analog pin 0:
int sV1 = analogRead(A0);
sV1 = map(sV1, 0, 1023, 0, 255); //potentiometer for 'water' makes the plant 'grow'

int sV2 = analogRead(A1);
sV2 = map(sV2, 0, 1023, 0, 255); //potentiometer for 'sunlight'. affects LEDs

int sV3 = analogRead(A2);
sV3 = map(sV3, 0, 1023, 0, 255); //potentiometer for party mode- makes the lights blink

// print out the value you read:
Serial.println(sV2);
delay(1); // delay in between reads for stability

if (sV1 > 0 && sV1 < 85 && counter == 0) {
digitalWrite(11, HIGH); // turn the LED on (HIGH is the voltage level)
delay(2500);
digitalWrite(11, LOW);
delay(500);

counter ++; //ensures that the motor turns only once

}

if (sV1 > 85 && sV1 < 170 && counter == 1) {
digitalWrite(11, HIGH); // turn the LED on (HIGH is the voltage level)
delay(2500);
digitalWrite(11, LOW);
delay(500);
counter ++;

}

if (sV1 > 170 && sV1 < 255 && counter == 2) {
digitalWrite(11, HIGH); // turn the LED on (HIGH is the voltage level)
delay(1500);
digitalWrite(11, LOW);
delay(500);
counter ++;

}

if (sV2 > 0 && sV2 < 15) {
digitalWrite(3, LOW); // turn the LED on (HIGH is the voltage level)
digitalWrite(5, LOW);
digitalWrite(6, LOW);

}

if (sV2 > 0 && sV2 < 115) {
digitalWrite(3, HIGH); // turn the LED on (HIGH is the voltage level)
digitalWrite(5, LOW);
digitalWrite(6, LOW);

}

if (sV2 > 115 && sV2 < 190) {
// turn the LED on (HIGH is the voltage level)
digitalWrite(5, HIGH);
digitalWrite(6, LOW);
digitalWrite(3, HIGH);

}

if (sV2 > 190 && sV2 < 255) {
// turn the LED on (HIGH is the voltage level)
digitalWrite(5, HIGH);
digitalWrite(6, HIGH);
digitalWrite(3, HIGH);

}

if (sV3 > 10 && sV3 < 85) {
digitalWrite(3, HIGH);// turn the LED on (HIGH is the voltage level)
digitalWrite(5, HIGH);
digitalWrite(6, HIGH);
delay(1000);
digitalWrite(3, LOW);// turn the LED on (HIGH is the voltage level)
digitalWrite(5, LOW);
digitalWrite(6, LOW);
delay(1000);

}

if (sV3 > 85 && sV3 < 175) {
digitalWrite(3, HIGH);// turn the LED on (HIGH is the voltage level)
digitalWrite(5, HIGH);
digitalWrite(6, HIGH);
delay(500);
digitalWrite(3, LOW);// turn the LED on (HIGH is the voltage level)
digitalWrite(5, LOW);
digitalWrite(6, LOW);
delay(500);

}

if (sV3 > 175 && sV3 < 255) {
digitalWrite(3, HIGH);// turn the LED on (HIGH is the voltage level)
digitalWrite(5, HIGH);
digitalWrite(6, HIGH);
delay(250);
digitalWrite(3, LOW);// turn the LED on (HIGH is the voltage level)
digitalWrite(5, LOW);
digitalWrite(6, LOW); //LEDs blinking at varying speeds
delay(250);

}

}


video:

https://drive.google.com/open?id=12GA-RQHJ3nGKpNV4oIUWMX-hbXSYaBqU


Week 7 Response: Physical Computing’s Greatest Hits (and misses) & Making Interactive Art: Set the Stage, Then Shut Up and Listen

In Physical Computing’s Greatest Hits (and misses), Igoe talks about recurring themes in Physical Computing projects. Interestingly, he does not seem to discourage recycling and rethinking these ideas, rather urges us not to discard them as unoriginal. He acknowledges that we see these kinds of ideas a lot- but I really like the fact that he also reminds us that there’s a lot of room for originality within these concepts which we can explore. His analysis of the respective interactivity of specific examples of physical computing projects, such as the musical instruments- ‘theremin-like instruments’ , was particularly insightful since he talks about “meaningful gestures” which made me think about interactivity more actively rather than simply cause and effect. Overall, it made me a lot more optimistic about interactive projects in general- yay. 

Making Interactive Art: Set the Stage, Then Shut Up and Listen served as a good distinguisher between ‘traditional’ art and interactive art- you never know how your project will be used, and that’s the point. Igoe stresses the importance of user experience and agency, telling artists not to be control freaks and let the viewers (or users?) do their thing- which I think is part of the point of interactive art to begin with. This reminded me of one of our previous readings about user experience and feedback, suggesting a symbiotic relationship between viewer (user?) and the artwork (project?). I loved his analogy about an interactive artwork being more like a performance than a finished piece of work, especially because it would be slightly different every time it was interacted with. This guy knows what he’s talking about. 

Response- A Brief Rant on the Future of Interaction Design

Bret Victor makes the claim that the current future of Interaction Design is far too narrow minded in its approach to, well, the future. He says that the sorts of technology being invented these days relies too heavily on visual cues as opposed to tactile ones. 

I agree. I have an uncle who is blind, and, as an occupational hazard of the condition, see him struggle with everyday technology. It makes me shudder to think that we’re slowly progressing towards a self induced blindness of a different kind- finger blindness. At least my uncle’s sense of touch and spatial awareness are heightened- we, on the other hand, get no such trade offs, unless you prefer being able to swipe at a screen than manual dexterity. 

I’m not sure how well this relates to the topic at hand, but I remember visiting the Van Gogh Museum in Amsterdam. One of Van Gogh’s paintings of sunflowers had been recreated, but not in terms of colour at all, in terms of texture. We could actually feel the painting, the brushstrokes, and this added a whole new dimension to our understanding of the painting. I think this is one of the few examples in which we see a shift from the usual skew towards the visual. Ironic that it happened in a gallery of visual art, but theer you go. I think that is Victor’s point, however, that it isn’t ONLY about visual cues or ONLY about tactile ones, but both, or rather, any that are suuited to the situation, and Pixels Under Glass is a tragically reductionist solution. 

Assignment Week 3

For this assignment, I wanted to try doing something and then reverse it. I know it makes no sense, bear with me. Basically what I ended up with was a set of LEDs that blink at varying speeds, controlled by both a potentiometer and a pushbutton. When we code LEDs to blink in turn, we’re essentially telling them to turn on and then off in order. This occurs because the initial state of the LED is off, so we have to tell it to turn on. I wanted to try doing the opposite as well- turning the LEDs off in turn, producing the blinking effect, but the exact opposite of what they were doing earlier. 

I connected three LEDs, a potentiometer and a pushbutton to arduino, and used if statements to control the rate of the LEDs blinking using analogRead for the potentiometer. So far so good.

For the opposite effect, however, I had some problems. I first tried initialising the LEDs as on, so blinking would turn them off, but that was controlled by the code, not the button, and could not be changed at will. After hours of failed experiments, trying out something called debounce which I still don’t understand, I discovered that the solution was painfully simple. I just had to add another if statement saying that if the pushbutton was pressed, the LEDs should all turn on. This does not override the analogWrite commands because it’s not in the setup, it’s in the loop. So that was fun. In the very possible case that this whole explanation has made no sense whatsoever, here’s a video of it working.  

https://drive.google.com/open?id=10ylWfyPjg3pR8IWjSOkl0dOWw8za96mR


The design of Everyday things, The art of Interactive Design

Chapter 1 of The design of Everyday Things was quite interesting because it mentioned the (occasionally conflicting) relationship between aesthetics and function; specifically his ideas about affordance. I think we often forget the fact that regardless of how we design something to be used, what matters is how the user acrually uses it. Which brings us to the importance of feedback- a designer can never be detached from their target audience. Effective design is therefore more a process than a product, with constant communication between user and designer. I never thought of it that way, considering design to be more of a static object than a mechanism working off of constant feedback- which is what I found most interesting about the text.

The Art of Interactive Design was, in my opinion, very astute in its endeavour to talk about interactivity by first acknowledging the fluidity of the term. However, after reading the text, I think I might have more questions than answers; for example, in playing a game, we’re supposedly interacting with the other players, not the game itself, right? But in a game such as, say, Dungeons and Dragons, in which the moves are decided by dice, can we say the game is interacting with us? (Unless my understanding of the game is entirely wrong). Maybe this just rates low on the interactivity scale? Either way, though I’m still confused, the whole idea of interactivity being relative and non binary was interesting because it better explains interactivity as a concept while, as I mentioned earlier, acknowledging that the term is fluid.

Week 3 Assignment: Arduino + LEDs

For this assignment I decided to use four LEDs controlled by a potentiometer to make them light up. 

The LEDs are connected to analog outputs, and turning the potentiometer makes them light up and blink in turn. I used if and else statements to set the conditions of each LED lighting up- I had to make sure the others were off when one was on, since I didn’t want them lit up all together. 

I used the map function to convert the sensorValue to a range of 0-255 for convenience. as the potentiometer turns, if the sensorValue is, say, less than 50, the blue LED will light up and blink. As we turn it further, between 50 and 100, another LED will do the same, as the blue one is turned off. 

I had a lot of fun with this project, but I’m new to code so I found it a bit challenging as well.

MFA? FML! (Interactions on campus)

As the title suggests, this is definitely not one of the more wholesome and positive posts about the fun and productive interactions on the NYUAD campus. This is a rant. Feel free to join me in my hatred.

Whether you’re a science major or an SRPP one, whether you love your frappe-latte-grande-ccinos or don’t drink coffee at all, one thing pretty much any student on campus can agree on is that we all hate the Multi factor authorization. Sure, we understand WHY it’s necessary, but that doesn’t mean we have to like it. And God forbid you ever get a new phone, you’ll have to agonize over setting it up all over again. 

Like I had to. Since I don’t have the duo app on my phone just yet, I have to receive a phone call or two just about every day, welcoming me to NYU duo. Now I know the lady’s voice is automated, but sometimes I’m quite sure I can hear her satisfaction as she wastes two minutes of my time, telling me to press any key to confirm. 

In conclusion, MFA is one of the necessary (but evil) interactions we’re all familiar with on campus; I suppose the only comfort is that everyone has to do it and everyone hates it- misery loves company.