Author Archives: Carlos

Carlos – Intro to IM Midterm Documentation

Concept

            My midterm project was, quite literally, a face that gets angry whenever anyone gets close to it. I call it “grumpy cardboard man”.

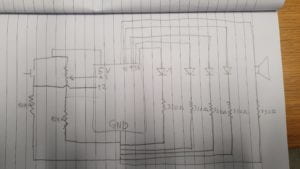
Circuit Schematic + video

Intro to IM Midterm Documentation

Program

https://github.com/Carlos-A-Paez-G/Intro-to-IM/blob/764388dc9e95c8dc3c8f1ffef47e8d98d2190396/Midterm%20Documentation

Behavior

            The face made out of cardboard expresses its anger via its eyes, its eyebrows, and a speaker. By using a distance sensor that doubles up as the nose of the face, the program can tell when something is near the front of the face. While there is nothing within a certain distance (referred to as “comfortable” in the code) the eyebrows remain parallel to the surface the face is on.

Once it detects something within a certain distance (less than “comfortable”), the face “activates”. This means that the eyebrows start to move and red LED’s inside its eyes begin to turn on. The eyebrows tilt more the closer one gets to the face, and the LED’s become brighter as well (though this change in brightness is very hard to perceive). Because of the inaccuracy of the distance sensor, the eyebrows will often start twitching back and forth as the servo motors are given different values for positions. This is a good example of an “it’s not a bug, it’s a feature” moment, as the twitching can feel kind of violent and erratic, and thus enhances the idea that the “grumpy cardboard man” is indeed uncomfortable.

If the distance sensor detects something being really close (below a value referred to as “rude” in the code) then the LED’s will go on full brightness and the eyebrows on full tilt. The speaker will also be activated at this point, quickly alternating between various low-tone pitches to simulate a sort of growl.


Problems

            The project actually went quite smoothly. The biggest problem I faced was really my lack of good planning and time management. This was compounded by the fact that the main thing I wanted to tackle during this project was making a piece that I could call “visual art”. I consider myself to have really poor skills in the department of “visual arts” and so starting this project I would constantly be concerned that I would be struggling with making the thing look pretty. The way to get over this was to eventually just do the thing and to not be too perfectionist about it and to figure out things as they went… only that it took some time for me to get there.

            The biggest problem I ran into, in terms of the technical side, was that with my original code the Servos were not turning in the right direction. I thought that by turning a Servo motor upside-down it would turn in the opposite direction, so I had originally made them both be controlled by the same pin. However, turns out that turning a Servo upside-down by turning through the same axis at which it spins does not change the direction of the rotation. So I then had to make the two Servos be controlled by two separate pins. This miscalculation cost me a whole extra week of work though…

            The final thing didn’t really have any problems per-se, but the presentation could have been better. I could have gotten a box to hide the Arduino, and I could have used hot glue to put the servos onto the face instead of tape.

            Actually, I take that back, there is one problem with the final thing that I don’t know how to solve. The speaker is too soft and I don’t know how to make it louder while still keeping the tones at the same growl-like pitch. I guess a solution would be to use the mp3 shield and get an actual loud growl or scream sound to play through the speaker, but there was just not enough time for me to figure out how the shield worked. Otherwise, I do wonder if there is some way to amplify the sound that isn’t getting a bigger speaker. Maybe by building around the speaker so that the sound is focused in the direction of the user (which would only ever be in front of the mouth) would have been a good idea.


Lessons learned

            I just have to do things! As I was mentioning in the previous section, what I really wanted to focus on for this project was the visual aspect of the piece, rather than trying to come up with complicated technical things. Especially for prototypes, I need to stop worrying about the thing looking pretty, as long as it works and gets the idea across it is a good starting point. It also became clear to me that I can easily lean onto my lack of “artistic skills” and make things out of simple, stylized shapes that still has a clear impact. I hope to really use this class to keep working on these visual arts skills and find out what those are for me, especially as they relate to interactivity.

Carlos – Reading Critical Responses

The Art of Interactive Design – Chris Crawford

                Crawford’s conversation about interactivity being a new paradigm is very true even in today’s world. We are no longer in a world where it is the main paradigm to sit by and let others do as they wish. Finding out ways to interact with each other, and creating tools that streamline that interaction is more important than ever. Defining interactivity as the process of listening, thinking and speaking allows us to break down what are the important elements in the interfaces we create for human interaction. Better interfaces can allow for more streamlined communication between people as well as better interaction in general. Crawford ultimately bases his philosophy on basic human decency – a decency that is often hard to maintain. But if this philosophy permeated our world, maybe it will in turn start to permeate us? Could this be the road to a world full of understanding?


The Design of Everyday Things – Don Norman

                I think Norman is right in his general argument – designers should place a focus on the human experience and design should be explicitly understandable. However, I wonder how much of this is work that has to be put in by the people who will use these designs. Is it justified to make a very complicated tool that is hard to use, with the knowledge that once the user has understood how to use it it will become one of the most powerful tools in their arsenal? Can we expect designs to get more and more complicated as time goes on and people get better at understanding certain conventions? What does it take to establish a new convention in design? I suspect that introducing a new, difficult system to a person’s daily life is not an easy task, so then how do we allow our current designs to evolve beyond the capabilities of the common people?

LED Pulse 2.0 (Carlos)

Since we went over my code in class, I now knew how to fix it so that the lights would only pulse once per button press. So in order to not waste those 40 minutes that I spent looking at my code with the help of an IM major friend with no success, I decided to go back in and try out some new ideas on the same pulsing lights concept.

I already had a digital sensor in the button, so the first thing I did was to add an analogue sensor (the potentiometer). The potentiometer would be used to kind of “charge” the pulse. I made it so that this charge would be defined by how much you turned the knob from one moment to another, rather than the resistance value of the potentiometer. So the more you turned the knob in between button presses, the stronger the pulse would feel. I would nail down what “stronger” in the context of this pulse means a little later…

In order to give feedback on the knob, I added a speaker. The speaker would give a higher pitch tone the more the user “charged” the pulse (i.e. the more the knob was twisted). The speaker then shuts down after the pulse has been delivered, to indicate that holding the button does not do anything. Lastly, I made it so that the speaker would give a slightly higher pitch tone when the button is pressed, so that it feels like some sort of release.

In order to make it feel like the pulse became more powerful the more it was charged, I did several things. The first thing I did was make it so that the lights would light up with less delay in between each other the more the pulse was charged. In order to make this happen, I used the map function to make it so that high values in the “charge” were equal to low values in the delay function. So the higher the charge, the less the delay between lights turning on. Then, I made it so that the lights would stay on longer the more it was charged. This was simply done by adding a delay before switching off the lights, by making the delay time increase with the charge value, by using the map function. Finally, I made it so that the LED’s would turn brighter the higher the charge value was, by using analogue write.

After this analogue write, I suddenly needed to add a digital write! Oh no! So I decided to add like a “panic mode”! If the button is pressed for too long, there would then be a digital write! And then there would be an alarm sound from the speaker! Yay, assignment completed!!


            Problems

The big problem had been the LED continuing to pulse after holding the button because of that semicolon after the ELSE IF statement that we found in class. Once that was fixed, everything was good.

Before I was also using pin 0 as a digital input. This made it so that I would not be able to upload the program from my laptop without unplugging, and I did not realize that was the case until we brought it up in class.

Some problems with the final version:

            Too many cables!! I’m not sure how I can make the potentiometer have less cables surrounding it. At the moment it’s really hard to turn the knob because of all the cables.

            For some reason, if the potentiometer is put at maximum, the speaker will make a really high pitch sound when the button is pressed. I don’t know why. Maybe it’s because of some irregularities in the potentiometer.

            The first pulse ends up being based on the initial level of the potentiometer, rather than how much it’s been turned. This could be fixed by always starting the program with the potentiometer at one of the ends. But I think this could also be fixed by making previousCharge be the resistance of the potentiometer during setup. I will put this in the code and if it works, then we will find out in class!


CODE: 

int button; //reads whether the button is pressed or not
bool pressed; //detects whether the button has been released or not
float charge; //reads the value of the potentiometer
float previousCharge; //records the value of the potentiometer when the button is pressed
float boom = 0; //timer for alarm


void setup() {
  Serial.begin(9600);
  pinMode(6, OUTPUT);
  pinMode(5, OUTPUT);
  pinMode(9, OUTPUT);
  pinMode(10, OUTPUT);
  pinMode(11, OUTPUT);
  pinMode(12, INPUT);
  previousCharge = analogRead(A3);
}

void loop() {

  button = digitalRead(12);
  charge = analogRead(A3);
  //Serial.println(charge);

  //reads how much the knob has been turned
  float chargeDiff = charge - previousCharge;
  chargeDiff = abs(chargeDiff);

  //variable for the pitch of the speaker
  float noise = chargeDiff;


  //the "pulse" that happens when the button is pressed
  if (button == 1 && !pressed) {

    float wait = map(chargeDiff, 0, 1023, 300, 50); //waits more if the chargeDiff is lower
    float brightness = map(chargeDiff, 0, 1023, 25, 255);

    tone(11, noise + 30); //aural feedback

    analogWrite(10, brightness);
    delay(wait);
    analogWrite(9, brightness);
    delay(wait);
    analogWrite(5, brightness);
    delay(wait);
    analogWrite(6, brightness);

    wait = map(chargeDiff, 0, 1023, 100, 1500);
    delay(wait);
    wait = map(chargeDiff, 0, 1023, 300, 50);

    while (noise > 32) {
      tone(11, noise);
      noise -= noise / 50;
      delay(50 / noise);
    }

    //pulse turning off
    noTone(11);
    digitalWrite(6, LOW);
    delay(wait);
    digitalWrite(5, LOW);
    delay(wait);
    digitalWrite(9, LOW);
    delay(wait);
    digitalWrite(10, LOW);

    //recording the current value of the charge, so that the knob needs to be turned again
    previousCharge = charge;
    pressed = true;

    //keeps pulse from repeating
  } else if (button == 0 && pressed) {
    Serial.println("yes");
    pressed = false;
    ////keeps tone from repeating if button is held
    //  } else if (button == 1) {
    //    noTone(11);
    //ensures lights are off if the button is not pressed
  } else if (button == 0) {
    boom = 0; //resets the timer for alarm
    digitalWrite(6, LOW);
    digitalWrite(5, LOW);
    digitalWrite(9, LOW);
    digitalWrite(10, LOW);
    tone(11, noise); //makes the tone that signals the user how much they've turned the knob
  }

  if (button == 1) {
    Serial.println(boom);
    boom++; //sets up a timer that will start the alarm sequence after some time
    if (boom > 2500) { //alarm sequence
      delay(1000);
      digitalWrite(10, HIGH);
      digitalWrite(9, HIGH);
      digitalWrite(5, HIGH);
      digitalWrite(6, HIGH);
      tone(11, 1024);
      delay(1000);
      tone(11, 200);
      digitalWrite(10, LOW);
      digitalWrite(9, LOW);
      digitalWrite(5, LOW);
      digitalWrite(6, LOW);
    }
  }

}

Carlos’s Code – 9/9

int on = 0;
bool wait = true;
//int prevBS = 0;

void setup() {
Serial.begin(9600);
pinMode(3, OUTPUT);
pinMode(5, OUTPUT);
pinMode(9, OUTPUT);
pinMode(10, OUTPUT);
pinMode(11, OUTPUT);
pinMode(0, INPUT);
}

void loop() {
on = digitalRead(0); //reads input on pin0
if (on == LOW ); {
wait = true; //changes the variable so that the loop is allowed to repeat
Serial.print(“wait3 = “);
Serial.println(wait);
}
//Serial.println(on);
if ( on == HIGH && wait == true) { //sends a pulse by turning on and off each light consecutively. Each light turns on a bit before the next one goes off for fluidity
Serial.println(“hi”);
digitalWrite(3, HIGH);
delay(100);
digitalWrite(5, HIGH);
digitalWrite(3, LOW);
delay(100);
digitalWrite(9, HIGH);
digitalWrite(5, LOW);
delay(100);
digitalWrite(10, HIGH);
digitalWrite(9, LOW);
delay(100);
digitalWrite(11, HIGH);
digitalWrite(10, LOW);
delay(100);
digitalWrite(11, LOW);
Serial.print(“wait1 = “);
Serial.println(wait);
wait = false;
//prevBS = on;
}
//
// if (on == 1 && wait == false) {
// wait = false; //changes the variable to ensure that the loop won’t repeat
// //Serial.println(“no”);
// Serial.print(“Wait2 = “);
// Serial.println(wait);
// }
Serial.print(“on = “);
Serial.println(on);


Dear Plastic Water Bottles

Dear plastic water bottle,

If I ever gave an award for most political object on campus, you would be the winner. The material you are made of is unnatural, you damage our planet by merely existing. Yet you always are trying to help in any way possible. You are filled with water, stored, sold, the water is consumed and you are trashed away like you were never there. I think many of us would rather forget you ever existed.

And yet, I see so much more in you. There’s more to you than your contents and your politics. There is your shape. Your material. Your color and your lack of color.

You can serve as a sort of bat. An extension of the human body. A tool for playful clobbering.

You can be shaped and molded. Made to fit places you shouldn’t, made to do things you couldn’t. I will never forget the time I saw 100 of your kind tied together into a Christmas tree for a student dorm.

The sounds you make are surprising. First there is the one my father hates, the sharp noise of your deformation. Then there’s the sounds you make when things are inside you, whether it is water, seeds, rocks, or whatever. But my favorite is the sound you make with wind. It takes some practice, but once you’re rather empty, one can blow wind into you at a certain angle and you will play a specific note! I long for the day an ensemble will play a symphony with your wind.

Many of us hate you, but few of us have failed to love you. You and the many ways you interact with us.

I’m sorry you were born into this world that pushes you away. But know that as time goes on, humans may very well begin to see your value beyond the first use. Your value as a companion. As a friend. …Or as an “interactive.”

Love,

~Carlos

The book switch

You said we would never use the book.

I have now proven you wrong, Michael. 

Bwahahahaha.

Anyway.

It was Sunday midnight. I was tired. My cold had begun to creep in.

In the midst of the turmoil and exhaustion, I went to the IM lab with one mission – to finish my homework.

And so I did.

I retraced the steps taken in class. I made the simple circuit with an LED and a resistor. And then it was time to think of the ideas.

I thought of a few ideas before: simply asking someone else to press the switch (that wouldn’t fly), filling up a cup with salty water and putting in electrodes to complete the switch (too mainstream), putting an aluminium plate on two people and have them hug to complete the switch (my friend mocked me for this idea and then I couldn’t even find the aluminium sheets I needed in an empty midnight IM lab, so I guess this wasn’t it), until I settled for the book switch. 

I then tested the wire tape. It worked.

I then cut it and tried connecting it by making the two wire tape pieces touch. It worked.

Then I stuck them to the book. It worked. I even did it without my hands.

Success.