Author Archives: Bowen Zhu

Responses to Tigoe

Making Interactive Art:
Set the Stage, Then Shut up and Listen

This article lets me realize that, instead of clear verbal interpretation, an interactive artwork, like any other noninteractive forms of art, whether it’s painting, film, or sculpture, conveys its meaning by carefully putting together a set of signifiers that guide viewers to discover the hidden information. As Tigoe suggests, designers are supposed to shut up once the work is presented to the viewers and instead let the viewers themselves to explore deeper into it.

Despite the similarity I realized between interactive artworks and noninteractive ones, Tigoe says that designers should think of an interactive artwork more as a performance than a finished painting or sculpture, which is not a contradiction. Interactive artworks differ from paintings and sculptures in that it has one more step forward—while visual art gives the authors hardly any chance to respond to viewers’ reactions, interactive artworks, as its name suggests, can listen to its viewers and then respond in different ways. And this response, though sometimes can be challenging to generate, is crucial to fostering viewers’ connection to and understanding of the artwork.


Physical Computing’s Greatest Hits (and misses)

Apart from these interesting themes that Tigoe introduces to us, what impresses me the most is Tigoe’s suggestion that people should not give up on ideas that others have already done before. Indeed, at this point it has become really difficult to think of an original project that no one has ever attempted before, and thus it is not necessary to avoid coming up with similar ideas to others’. After all, as Tigoe says, what’s great about currently popular themes is that often they are still left with a lot of room for originality—possibilities of modification and improvement. I guess this is like making scientific discoveries—when the basic foundations are already there, almost all new progress is made based on the established theorems; they are not independent theories, but extensions of other people’s findings. Even Newton sees further by “standing on the shoulders of giants.” Thus this also applies to interactive artworks—designers can contribute to the field by adding their variations to popular themes. A brand new idea is definitely a great feature, but it’s not the only feature that we want to pursue. What designers really need to pay more attention to is how they can rework and recreate those established ideas and transform them into something of their own rather than repetitive works.

Midterm Game Panel—Watch Out for the Weirdo!

Concept

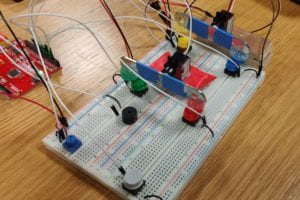
For my midterm project, I made a game panel like this:

When you sit in front of the panel, the distance sensor will detect you and then switch the device from “off” to “standby”—LEDs will light up in turn in clockwise direction. When you’re ready for the game, press any button. After the start melody, the game will start.

In each round of the game, several LEDs will light up and gradually fade. You need to press the buttons that are of the same color but opposite to the lighted LEDs before the they fade away (the time is controlled by the knob in the bottom right corner). Each time you press a correct button, a tone will be played; when you have pressed all the correct buttons, a longer tune will be played.

BUT… beware of a weird color pointed by the pointer behind the panel. The rule of this color would be reversed—instead of pressing the opposite one, you should press the button that directly matches the LED.
And pay attention to the pointer—as it will rotate after each round, the weird color changes every time.

The good news is that you get three chances, indicated on the upper left side. Each time you make a mistake, one of the three red LEDs will blink along with the lights you mistouched or missed, and then go off; meanwhile a tune will be played.

Circuit Schematic

Program

Behavior

The main part of the game consists of 11 LEDS and 8 pushbuttons of four colors. Besides, two potentiometers are used to control the volume and the speed of the game respectively. The distance sensor is used to detect if a player is present so that the device will be turned on. In addition, because the pointer needs to rotate 360°, a continuous rotation servo is used instead of a standard one. With only 20 pins, Arduino Uno can’t connect to all of the above, so I got an Arduino Mega instead.

Problems

  1. Several holes on the board do not match precisely with the size of LEDs, so it was hard to fix them onto the board.

    the board

  2. Too many wires are needed to connect all parts of the device, so it is very messy behind the panel and some of the LEDs and buttons did not work so I had to redo these parts.

    behind the panel

  3. Because the continuous rotation servo cannot rotate to a specific angle, instead I had to control the time and speed at which it rotates, which took great amount of time and is still kind of inaccurate.
  4. The distance sensor is sometimes not accurate either. I guess I could place it on the top of the panel rather than at the bottom so that it won’t detect the table.

Despite these problems, the game is still fun! Watch out for the Weirdo!

The first two mistakes were that I forgot to deal with the weirdos (blue/green) reversely; the last one was timeout. I also changed speed and volume in the middle.

Lessons Learned

I realized that there are so many details that I should pay attention to:

  1. I should have attached larger control knobs to my potentiometers which could lead to better feelings of control.
  2. I could have used the female pin header instead of jumper wires to connect to the distance sensor so that the circuit would be more secure.
  3. If there were panel mounted pushbuttons and solid wires of four colors, I would have used them instead.
  4. To create better game experience, I should also make the panel higher and tilted backwards.

Response to Victor

In his rant on the future of interaction design, Victor appreciates the dexterity of human hands and proposes a perspective on why future interfaces should go beyond the Picture Under Glass interaction paradigm.

According to Victor, hands can do two amazing things: hands feel things, and hands manipulate things. To me, I agree that it’s a pity that our sense of touch is not fully used when we are using an iPad or a laptop. As these electronic devices often generate almost no haptic feedback, sometimes it can be hard to interpret using only our vision. For example, if I press a button to launch a certain task which may take some time to process, then, without any discernible feedback on what is happening on the screen, I can become unsure about whether I have actually triggered the process or not, and thus I may repetitively press the button.

On the other hand, when it comes to hands manipulating things, Victor suggests that we should take full advantage of our dexterity, and so designers should not make things universally easy. When responding to the fact that a child can’t tie his shoelaces but can use the iPad, he seems to say that the more sophisticated the interaction is, the better the design. However, while utilizing our sense of touch can lead to better human-machine communication, I wonder how using more difficult body language can improve the current design. Perhaps difficult interactions can stimulate users and expand their cognitive capabilities, but I guess it’s still not necessary. After all, at least for all the electronic devices I can think of, they can be controlled easily by simply sliding or scrolling. Then why do we have to incorporate more gestures and make the control more complicated? Although we do have dexterous hands, this doesn’t mean that we have to use them all the time. And in some situations, our hands may be occupied and thus unable to perform sophisticated gestures. For example, when one is driving, he may not be able to type a password on his phone. Nevertheless, even though he is focused on the road, he is still able to turn on/off the car’s AC or music by simply pressing a button, provided that there is good feedback from the button (it has to be a non-visual feedback, though, perhaps a haptic one in the future) on whether the system is indeed turned on.

Unfortunately, though they are not hard to use, current UIs often lack this essential feedback to the users, which is crucial to our communication with the device. Therefore, to improve the current interaction process, we could pay more attention on how our hands feel things in order to overcome the “permanent numbness” when controlling by hand. Thus I think the way to futuristic interaction design is to focus on more tangible user interface than complicated interaction gestures.

The Automatic Tune Player — Diya and Bowen

CONCEPT
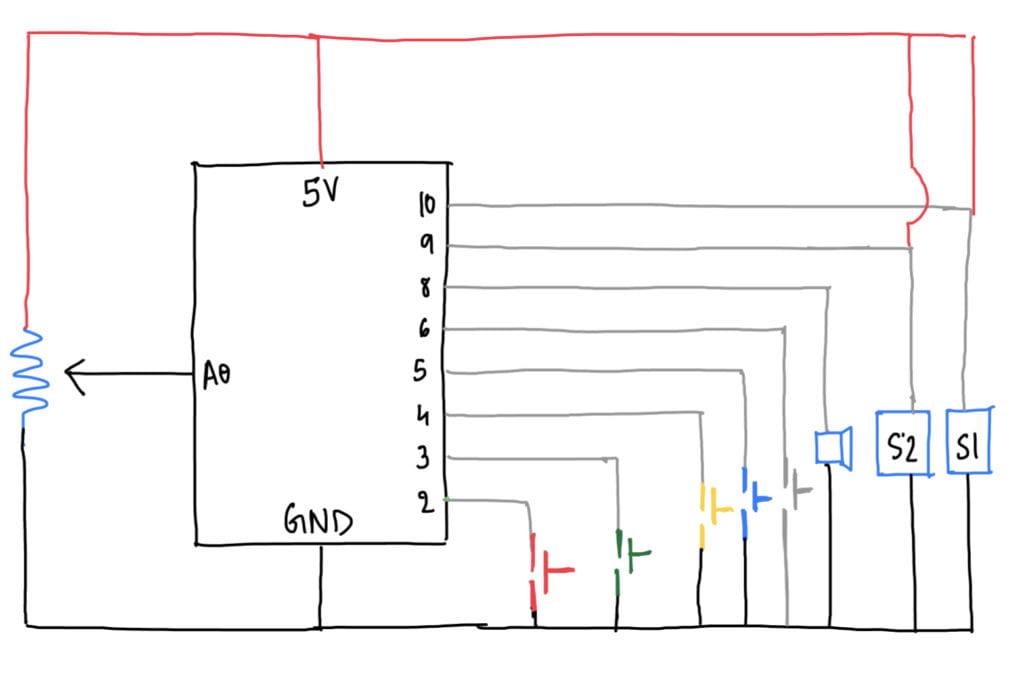
The concept of our instrument is to automatically play a predefined tune (Mary had a little lamb) when the grey button is pressed and also be able to control the speed at which the tune is played. We wanted the Servos to directly play the tune which is why we incorporated them in such a way in the circuit that enabled them to press the switches and play the tune.

SCHEMATIC

PROGRAM

#include <Servo.h>
#include "pitches.h"

Servo servo1;                   //controls red and green
Servo servo2;                   //controls yellow and blue
const int potentiometer = A0;   //controls tempo
const int grey = 6;             //controls power
const int red = 2;              //C3
const int green = 3;            //E3
const int yellow = 4;           //D3
const int blue = 5;             //G3
int melodySize = 27;
int melody[] = {
  green, yellow, red, yellow, green, green, green, yellow, yellow, yellow, green, blue, blue, green, yellow, red, yellow, green, green, green, green, yellow, yellow, green, yellow, red, 0
};
int duration[] = {
  1, 1, 1, 1, 1, 1, 2, 1, 1, 2, 1, 1, 2, 1, 1, 1, 1, 1, 1, 1, 1, 1, 1, 1, 1, 2, 4
};

void setup() {
  Serial.begin(9600);
  servo1.attach(10);
  servo1.write(90);
  servo2.attach(9);
  servo2.write(90);
  delay(10);
  pinMode(red, INPUT_PULLUP);
  pinMode(green, INPUT_PULLUP);
  pinMode(yellow, INPUT_PULLUP);
  pinMode(blue, INPUT_PULLUP);
  pinMode(grey, INPUT_PULLUP);
}

void loop() {
  //press the button to start the melody
  if (!digitalRead(grey)) {
    delay(500);
    for (int i = 0; i < melodySize; i ++) {
      if (!playTone(melody[i], duration[i])) {
        //continue if true, stop if false
        //press the button during the melody to stop
        delay(500);
        break;
      }
    }
  }
  delayAndPlay(100);
  //so that user can play their own music
}

bool playTone(int color, int duration) {
  //move the servo
  if (color == green) {
    servo1.write(30);
  }
  if (color == red) {
    servo1.write(140);
  }
  if (color == yellow) {
    servo2.write(30);
  }
  if (color == blue) {
    servo2.write(140);
  }
  int interval = map(analogRead(potentiometer), 0, 1023, 200, 500);
  bool off = delayAndPlay(interval * duration);
  //restore the position
  servo1.write(90);
  servo2.write(90);     
  //return false if button press is detected
  return (off && delayAndPlay(100 * duration));
}

bool delayAndPlay(long interval) {
  long currentTime = millis();
  for (long i = millis(); i < currentTime + interval; i = millis()) {
    //if button is pressed during the melody, stop immediately
    if (!digitalRead(grey)) {
      return false;
    }
    //make the tone
    if (!digitalRead(red)) {
      tone(8, NOTE_C3, 10);
    }
    if (!digitalRead(green)) {
      tone(8, NOTE_E3, 10);
    }
    if (!digitalRead(yellow)) {
      tone(8, NOTE_D3, 10);
    }
    if (!digitalRead(blue)) {
      tone(8, NOTE_G3, 10);
    }
  }
  return true;
}

BEHAVIOR
We used two servos as our music players. We attached two long arms to each servo and each end of the arm falls on one of the four buttons on our breadboards. Each button corresponds to a different note that is played by the speaker. 

PROBLEMS
1. We needed the servo to hit the respective switches from a higher level than the switch itself. However, it was very hard to find a material that was high enough as well as strong enough to support the movement of the servo. We tried to use different materials like cardboard, wood, styrofoam, plastic boxes, etc. but none of them worked very well except for the wooden block. Even with the wooden block, if it wasn’t in the correct position, the servo would not hit the switch at the correct angle and the note would not be played which would interrupt the flow of the song. 

2. There was a problem with using the pushbutton to stop the tune while it is playing. The programme would run so fast that when the button was pressed to stop the tune, the tune would stop but it would immediately restart the loop. Since the finger had not been removed from the button fast enough, it would start playing again so it sounded like the song would not stop at all and just restart when the button was pressed. The solution for this was to include a delay after the command for stopping the tune. 

Response to Crawford

The term interactive process, as Crawford suggests, is a cyclic process in which two actors alternately listen, think, and speak. As Crawford views interactivity as a continuous variable, I suggest it may be measured more precisely with mathematical formulas, though the measurement would be more ordinal than cardinal. Perhaps, the degree of an interactive process between two actors can be expressed as the multiplication of their respective interactivity. After all, an interactive process can only happen provided that both actors can be interactive to some extent. If either of the two is not interactive at all, such as a movie, the degree of their interation will be zero—less than the interaction between any two with even the tiniest bit of interactivity. Further, there should be a coefficient that represents the compatibility of the two actors: the degree of the interactive process depends not only on how interactive the two actors are respectively but also how well they can get along with each other. Two friends, for example, with the same language and similar interests, are more likely to inspire fervent conversations than two random people. For another example, imagine two laptops placed face-to-face—they themselves are both interactive devices, but what interaction can they spark without a person?

Response to Norman

As Norman ponders on the root of the numerous failures in human-machine interactions, he claims that it is purely the duty of machines and those who design them to understand people, and so it is the machine and its design that are at fault. Now, as Human-Centered Design has gained wide popularity, designers seem to have been imposed much more responsibility compared with users.

True, poorly-designed machines can cause much trouble, but humans are likely to make mistakes even with well-designed machines. Despite the Human-Centered Design, we should also remind ourselves of the importance and the duty of the user side in human-machine interactions. After all, miscommunications can arise even between two people, then who should we cast blame on?

Human-machine interaction is an interdependent process—while machines should definitely cater to people, people have to understand machines as well. As Norman says, “machines have no leeway or common sense”, but humans are good at learning novel things. Certainly, it would be beneficial to make machines more understandable to the users. However, merely using more and more affordances and signifiers does not guarantee the effectiveness of the human-machine communication. As the emergence of new technologies have brought about innovations with more and more functions and increasing complexity, sometimes this can go beyond one’s general knowledge and thus requires people to adapt to the device so as to minimize the inappropriate actions (learning to drive an automobile, for example). Consider a layman sitting in even the most well-designed cockpit of an aircraft, passengers would still panic as he/she lacks the essential knowledge to control the plane. Therefore, to some extent, educating users—helping them with a good conceptual model of the machine—can be more efficient than simply pursuing better designs. With the rapid development of technology, machines will better serve humans, provided that we are willing to adapt to machines as well.

Button Pressing Game

  • Concept

I created a new project for this week—a button pressing game!

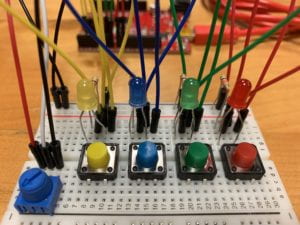
This is what the “user interface” looks like: LEDs and pushbuttons of four colors, along with a potentiometer.

The rule of my game is that, after the game starts, 1-3 LEDs will be lighted during each round of the game. The player is supposed to press all the buttons whose colors are not lighted to advance to the next round. If the player accidentally hits a lighted color or fails to press all the buttons required within the time limit, he will be informed of his mistakes and then return to the pregame state, where all LEDs keep blinking until the player restarts the game.

The tempo of the game as well as the blinking rate of the LEDs can be controlled with the potentiometer. To control the settings, rotate the knob clockwise to accelerate; rotate to the leftmost position to “power off”; press all four buttons together to start, pause, or resume at any time of the game.

  • Circuit schematic

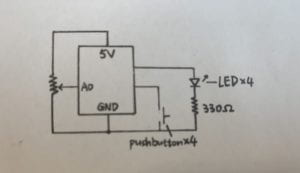
The potentiometer serves as the analog sensor whereas the pushbuttons serve as digital sensors. In the pregame state, all LEDs are controlled in an analog fashion as their brightness increments and decrements periodically at the rate controlled by the potentiometer. On the other hand, once the game starts, LEDs are controlled in a digital fashion as they are set to either HIGH or LOW to blink.

  • Problems and solutions
  1. When I was building my circuit, I realized there was not enough space to arrange the four buttons into a square as each has to straddle the center trench of the breadboard. Then, when I put them in a row, there was still not enough space for all the external resistors. So in the end, I utilized Arduino’s pull-up resistors for all the pushbuttons.
  2. When testing the game, I noticed that Arduino processed my input so quickly that, after I pressed the correct buttons, it often proceeded to the next round before I could remove my fingers from the buttons, which caused me to lose the next round. Therefore, I added some delay time after each round. Likewise, I also added some delay when Arduino detects a wrong button being pressed so as to allow time for the player to press all the intended buttons.

Nightlight with Brightening/Dimming

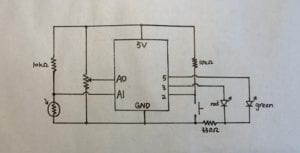
As shown in the schematic diagram, with a photoresistor, potentiometer, pushbutton, and two LEDs, I made a nightlight whose brightness and color can be controlled.

When the photoresistor detects the dark, its resistance increases, leading to higher voltage and larger reading from analog pin 1. Detecting the change in input, Arduino then lights an LED through analog write. When the LED is lighted, its brightness depends on the status of the potentiometer, while the color of the lighted LED depends on the status of the pushbutton—red if unpressed, and green if pressed.

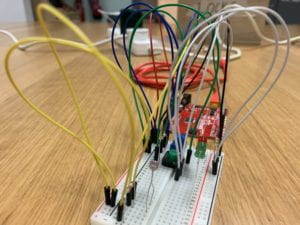
Here is my breadboard—I used yellow wires for photoresistor, blue wires for potentiometer, green wires for pushbutton, and white wires for LEDs. (but still seems messy)

In addition, I added a brightening/dimming feature to the led. When an LED is lighted, it will gradually reach the intended brightness; when it is turned off, it will gradually fade. This is achieved by loops that increment/decrement the brightness, along with multiple conditional statements that determine when brightening/dimming is needed and which color is affected. However, as there are different situations when an LED needs to be on or off, this feature kind of complicates my code.

Here is the result—a nightlight that brightens and fades gradually.

(The duration of the effect can be extended by increasing the parameter in delay() in my code.)

Handless Switch — Blow It Hard!

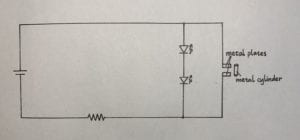
I made a switch that is controlled by blowing. As shown in the schematic diagram, the two metal plates of the switch are connected with opposite sides of the LEDs.

Normally, when the metal cylinder is connected to both of the metal plates, it creates a short circuit between the LEDs and so the LEDs are off. If I blow the metal cylinder away from the metal plates, electricity has to flow through the LEDs and they are on.

To make such a switch, I prepared two L-brackets, two wires with their ends stripped, a piece of cardboard and a piece of paper.

Then tie the wires to the L-brackets and cut the cardboard into rectangles.

Make them into a box…

Cover the box with paper to make it less ugly.

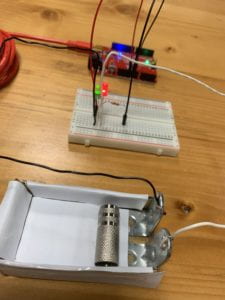
Finally, put the cylinder into the box and connect the switch to the circuit.

Here is the result—Blow it hard!

Interaction – Equipment Center

NYUAD is a place where your needs can always be met.

Take the equipment loan for example—students, faculty, and staff may borrow a variety of materials from the equipment center. The procedure to borrow any item is quite simple, but it is nevertheless an interactive process, as only when we are willing to “cooperate” with the staff can our demands be satisfied.

This is what usually happens: when greeted by the staff, you first tell the staff that you want to borrow certain equipment, as people can come for different services. Meanwhile, you need to present your NYU ID card to show your identity to the staff. Understanding your demands, the staff then go to check if your item is available. If it is available, he/she will then ask you to hand over your ID card for a scan. . . . If this interaction goes on smoothly, the staff will eventually hand you the item along with your ID card. (And also inform you of the loan period and policies regarding your item.)

You can almost always get the equipment within a minute, but the result is dependent upon the interactive process between the two parties—things can go wrong on either side, say, if someone doesn’t have his/her ID card, or if the staff say the equipment is not available.

To handle this interactive process, staff are employed to work at the equipment center. But why not a machine? It’s a decision to make. Perhaps people are better at interacting with people than a machine can do. Nevertheless, when there is no staff on duty or when they are all too busy, it turns out that people can’t get or return their items easily. Hiring more workers seems a simple solution, but meanwhile there is also a constraint—the total funding is limited.