It just hates people. It doesn’t like anyone getting too close to it. It will scream at you as you approach. And if you dare to touch…
I came up with the idea of the antisocial robot because I wanted to use a sensor and associate it with different forms of behaviour, similarly as in the organic world. When we see or touch something, it’s not only one physical or emotional reaction we experience/exhibit, but a bunch of different impulses trigger different reactions. For my robot, these impulses are distance from the robot and touch. If an object is too close, it will react to that object. The form and intensity of the reaction depend on how close the approaching person or object is. I formed a mental map of different cases of how a living thing would react to the presence of something it didn’t like. I think at this point it deserves a name. Let’s call it Rambo.
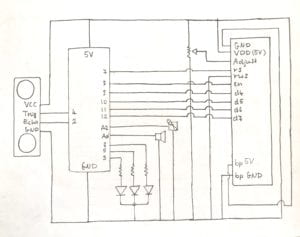
For the input sensor, I used the ultrasonic distance sensor (a straightforward choice) . Depending on the distance, other components, the RGB Led, the buzzer, the liquid crystal display (LCD) and the servo motor exhibited different behaviours – in the technical term, outputs. Think of the distance sensor as Rambo’s eyes, the servo as its arms, the LCD and buzzer as its mouth and the RGB Led as maybe it’s facial expression. Anything that can express disapproval visually.
Rambo’s behaviour can be summed up in 5 cases:
- If you’re within 1m it takes notice of you, it starts beeping but shows a green light so that you know it’s only a little bit bothered. It does write you a grumpy message on the board though: “I see you. Do not come closer.”
- If you’re within 60 cm it thinks you’re getting too close. A yellow light and some higher pitched beeps indicate that it’s not happy. In fact, he says: “Dude, back off.” That should be warning enough.
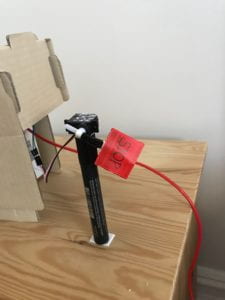
- If you’re not compliant and you come within 30 cm, it will try to annoy you with even higher pitched little screams. It will show you the super-rejective red light, spit a rude “Ooooiiiiiii! LEAVE ME!” at you and even wiggle its little red flag that is attached to his hand (the servo).
- The worst you can do is touch it on its face (the “eyes” of the distance sensor) or come within 4 cm of touching it. This statement works as a pseudo touch sensor, because it’s so close to the sensor it’s almost a boolean case. Rambo will not tolerate being touched. It will scream constantly, swing its red flag at you and show all the light it can make – white light. It will also display “AAAAAARRRRRGHHH” on its message board. Boy, it is real upset.
- In the last case, you keep your respectful distance, and he won’t do anything. Just sit and look like he is not grumpy at all. But just move close enough again and you will see.
Here is Rambo’s circuit schematics:

Here’s the code to determine Rambo’s behaviour using input and output:
/* This sketch uses an ultrasonic distance sensor as the robot's eyes
    to react to an approaching person or object.
    Other elements of the circuit are:
      - servo motor
      - buzzer
      - RGB Led
      - liquid crystal display board (LCD)
      - potentiometer
    The sensor passes the distance value input to several if statements
    and the if statements decide the reaction of the robot to how far
    the intruder is. Another if statement controls the state of the robot
    when nothing is too close to it in the direction of the distance sensor.
*/

/*------------------------- INITIALIZATION ------------------------------*/

// import libraries

#include "pitches.h"
#include
#include

// trig = sender, echo = receiver of ultrasonic sound signal
const int trigPin = 4;
const int echoPin = 2;

// define variables used for calculating distance
long duration;
int distance;

// RGb Led gives light signal to the approacher
// to what extent the robot doesn't like the situation

const int rgb_bluepin = 3;
const int rgb_greenpin = 5;
const int rgb_redpin = 6;

// the message displayed is what the robot is saying
const int rs = 7, en = 8, d4 = 9, d5 = 10, d6 = 11, d7 = 12;

// create lcd object
LiquidCrystal lcd(rs, en, d4, d5, d6, d7);

// this is the arm of the robot
Servo servoArm;
int pos = 0;

// this makes the sound of the robot - beware the deafening screams of disapproval
const int speaker = A0;

/*---------------------- START SETUP --------------------------*/

void setup() {
  // communication used to check the distance input in case something is wrong
  Serial.begin(9600);

  // trig pin emits sound wave and echo pin is used in the pulseIn() function
  // receives sound wave and returns travel time of wave in ms
  pinMode(trigPin, OUTPUT);
  pinMode(echoPin, INPUT);

  pinMode(rgb_bluepin, OUTPUT);
  pinMode(rgb_greenpin, OUTPUT);
  pinMode(rgb_redpin, OUTPUT);

  pinMode(speaker, OUTPUT);

  servoArm.attach(A2);

  // set up the number of columns and rows on the LCD
  lcd.begin(16, 2);


}

/*------------------------ FUNCTIONS ---------------------------*/

// function to output values for different colours
// from online tutorial(howtomechatronics.com)
void setColour(int redValue, int greenValue, int blueValue) {
  analogWrite(rgb_redpin, redValue);
  analogWrite(rgb_greenpin, greenValue);
  analogWrite(rgb_bluepin, blueValue);

}

// function to convert duration in ms to distance in cm
// from Arduino example Ping
long microsecondsToCentimeters(long microseconds) {
  return microseconds / 29 / 2;
}

/*----------------------------- START LOOP ---------------------------------*/

void loop() {

  // this was supposed to define the force sensitive resistor
  // for a pressure reading input on top of the robot's head
  /*initialize FSR (force sensitive resistor) and set as reading input
    const int fsr_Read = analogRead(A5);
    int didTouchAlready = false;*/


  /* Set up the working of the distance sensor */

  // clear trig pin to stabilise reading
  digitalWrite(trigPin, LOW);
  delayMicroseconds(2);

  // set the trig pin on high to send the sound wave signal
  digitalWrite(trigPin, HIGH);
  delayMicroseconds(10);
  digitalWrite(trigPin, LOW);

  // as signal bounces off approaching object and is returned,
  // echo pin reads the time taken for the sound to travel in ms
  duration = pulseIn(echoPin, HIGH);

  distance = microsecondsToCentimeters(duration);

  // print distance on Serial Monitor
  Serial.print(distance);
  Serial.print("cm");
  Serial.println();

  //delay between readings. the bigger (within reason),
  //the less confused the robot is with changing distances
  delay(200);


  /* Write the 5 cases defining the robot's responses to
      changing distance */


  if (60 < distance && distance <= 100) {
    lcd.clear();
    lcd.setCursor(0, 0);
    lcd.print("I see you. Do");
    // move the cursor to the second line
    lcd.setCursor(0, 1);
    lcd.print("not come closer.");

    setColour(0, 255, 0);

    tone(A0, NOTE_D1, 500);
    delay(500);
  }

  else if (30 < distance && distance <= 60) {
    lcd.clear();
    lcd.setCursor(0, 0);
    lcd.print("Dude.");
    // move the cursor to the second line
    lcd.setCursor(0, 1);
    lcd.print("Back off now.");

    setColour(255, 15, 0);

    tone(A0, NOTE_G3, 500);
    delay(500);
  }

  else if (4 < distance && distance <= 30) {
    lcd.clear();
    lcd.setCursor(0, 0);
    lcd.print("Ooooiiii");
    // move the cursor to the second line
    lcd.setCursor(0, 1);
    lcd.print("LEAVE ME!");

    setColour(255, 0, 0);

    tone(A0, NOTE_A7, 500);
    delay(500);

    // small wiggle
    for (pos == 0; pos <= 180; pos += 1) {
      servoArm.write(pos);
      delay(1);
    }
  }

  //when almost touching or actually touching the robot
  else if (distance <= 4) {
    lcd.clear();
    lcd.setCursor(0, 0);
    lcd.print("AAAAAARRRGGHHHHHH");

    setColour(255, 255, 255);
    tone(A0, NOTE_G6);

    digitalWrite(rgb_redpin, HIGH);
    digitalWrite(rgb_greenpin, HIGH);
    digitalWrite(rgb_bluepin, HIGH);
    delay(200);
    digitalWrite(rgb_redpin, LOW);
    digitalWrite(rgb_greenpin, LOW);
    digitalWrite(rgb_bluepin, LOW);
    delay(200);

    // big sweep
    for (pos == 0; pos = 0; pos -= 1) {
      servoArm.write(pos);
      delay(1);
    }

  }

  // this is the case when nothign is too close
  // setting such a case stabilises reactions
  // otherwise, random flashes of light or sound can occur

  else if (distance > 100) {
    lcd.clear();
    noTone(A0);
    analogWrite(rgb_bluepin, LOW);
    analogWrite(rgb_greenpin, LOW);
    analogWrite(rgb_redpin, LOW);
    servoArm.write(pos);
  }


  // case for when the robot is touched on the head
  // reaction same as when touched on the "face"
  // but different messages are displayed depending on whether the
  // robot has been touched or not
  /*else if ((didTouchAlready == false) && (fsr_Read > 0)) {
    lcd.clear();
    lcd.setCursor(0, 0);
    lcd.print("DON'T TOUCH ME");
    lcd.setCursor(0, 1);
    lcd.print("!!!");

    setColour(255, 255, 255);
    tone(A0, NOTE_A7);

    digitalWrite(rgb_redpin, HIGH);
    digitalWrite(rgb_greenpin, HIGH);
    digitalWrite(rgb_bluepin, HIGH);
    delay(200);
    digitalWrite(rgb_redpin, LOW);
    digitalWrite(rgb_greenpin, LOW);
    digitalWrite(rgb_bluepin, LOW);
    delay(200);

    didTouchAlready == true;
    }

    else if (fsr_Read > 0) {
    lcd.clear();
    lcd.setCursor(0, 0);
    lcd.print("Dude why");
    lcd.setCursor(0, 1);
    lcd.print("??????");

    setColour(255, 255, 255);
    tone(A0, NOTE_A7);

    digitalWrite(rgb_redpin, HIGH);
    digitalWrite(rgb_greenpin, HIGH);
    digitalWrite(rgb_bluepin, HIGH);
    delay(200);
    digitalWrite(rgb_redpin, LOW);
    digitalWrite(rgb_greenpin, LOW);
    digitalWrite(rgb_bluepin, LOW);
    delay(200);
    }*/

}
Some elements have been put together using built in examples, for example the ones for the LCD, the others have been written by me.
And here is a video from the first time it was assembled:
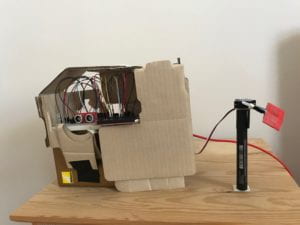
I also built a paper cover around Rambo to make it resemble a body and look more realistic and 3D. Once fully assembled, Rambo looked like this:


The contrast on the LCD board can be adjusted with the potentiometer, if the light in the room is too bright:
The whole interaction:
Rambo doesn’t sense whether you’re approaching or walking away. An improvement could be to include a for loop in the code that iterates as the distance between you and Rambo is increasing. In that way, if you’re walking away, a different message could be printed on the LCD, something like: “Good job. Keep walking away.”
Evaluation of the project
Rambo was successful in what I wanted it to do, and my code created commands and responses well and in an efficient sequence.
There were some steps during the implementation which were problematic, and one of these was finding the RGB values for an orange/yellow colour. It was harder than it might seem because the red Led in the RGB Led was dimmer than the blue and green Leds. It ended up being only 15 green and 255 red, which gave the yellow colour seen on the video.
Connecting the distance sensor was a challenge, as I didn’t really know how to start or write code for it. I learned some basic code and rules of implementation from this website of online Arduino tutorials, which I found very helpful: https://howtomechatronics.com/tutorials/arduino/how-to-use-a-rgb-led-with-arduino/
Stabilising the readings of the distance sensor was also a challenge. Thus, I added a delay of 200 milliseconds after each reading was taken. I found that without a delay at least this large, it was easy to confuse the sensor and there was much more room for errors., for example jumping to the next message on the LCD and suddenly back, changing the Leds too fast, all because the reading of distance changes too fast.
Some parts of the algorithm, for example when to clear the board or where to insert delays. For case 4, I first used the blinkWithoutDelay example but it messed with the Leds and made them blink in the other cases as well, so I abandoned it. The delay() function works better for this example because it is regular for the set interval in the if statement. Sometimes the delays get longer as the function loops, but I tend to like this mistake because it makes Rambo a bit more random and like a real person. In fact, I preferred this kind of behaviour the most:
It is so messy and disorganised, it is much more human than the cleaner responses. However, for the sake of an accurate project I made Rambo a bit more predictable in the end. He has his crankiness nonetheless.
There is also a problem with the distance sensor being smaller than my body. If I walk towards Rambo and I sway, I noticed that the Serial Monitor sometimes reads an unbelievable value – eg. from 65 to 305 – but when I strictly keep walking in a straight line, this problem doesn’t arise.
Because I wanted my code to work well for this project rather than be perfect, I didn’t end up addressing the problem of many if-else if statements. I initially wanted to use switch case statements, however, I couldn’t figure out how to use them for the interval values of the distance sensor. I hope to learn the switch cases soon.
One other big problem I couldn’t address was the implementation of the force sensitive resistor. Because of the box around the circuit and to look realistic and sensible, the FSR should have been placed on top of the box. This was going to be a solution for Rambo only seeing in one direction and not having a real touch sense. Although not a real touch sensor, the FSR would have been acting closely like one, as seen in the long commented parts in the code. If it senses any pressure, Rambo’s reaction would have been slightly different according to whether he has been touched “on top of its head” before or not. I simply couldn’t get this part of the circuit together as seen in this example:
https://learn.adafruit.com/force-sensitive-resistor-fsr/using-an-fsr
I tried attaching long wires to the ends of the sensor but it was so slim that my tape could not hold it in place and the whole arrangement kept coming apart. The 10 ohm resistor was also hard to connect with the FSR and the board because it wasn’t actually pinned into the board – again, the flimsy tape and sensor combo did not help. The FSR, or a touch sensor is something I would like to use in another project later in the semester.

Nice project, and well documented. The comments in your code are very clear and useful. You are using functions well, which we have not yet covered in class. You’re also using the LCD module which we have not covered. Good work.
A couple of small points:
// big sweep
for (pos = 0; pos = 0; pos -= 1) {
There are two problems here: 1) you seem to be testing for the initial condition 2) you’re using = instead of == for testing.