The concept of my mid-term project is a “autonomous” vehicle with obstacle detection.
Picture with descriptions:

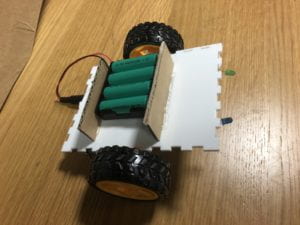
On the surface, it has a battery case holder ( two piece of cardboard glued to the acrylic board), the battery case, two wheels and two LEDs.

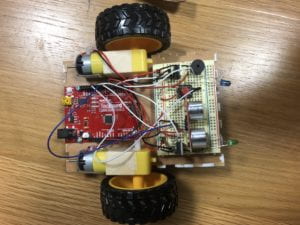
From below, the arduino board is fixed to the acrylic board by 4 nails. The solder-less breadboard is sticked to the front panel. On the breadboard, there is a distance sensor, a buzzer and a push button. The two motors controlling the wheels are glued to the side of the panel.
Behavior and gifs:
The vehicle has 4 modes:
Mode 0 – Power Off; LEDs are dimmed
Mode 1 – Gentle; LEDs are flashing
Mode 2 – autonomous; LEDs are on the whole time
Mode 3 – Ice- cream Van; one of the LEDs is on each time with the buzzer playing the tone of “Mary had a little lamb”
The modes are switched by the push button and indicated by LEDs.
In mode 1 & 2, the vehicle will keep going forward until it detects an obstacle.
The vehicle will stop when detecting obstacles under gentle mode:

The vehicle will keep turning left until the route is clear under autonomous mode:

Under ice-cream Van mode, the vehicle will keep moving forward until an obstacle (a customer) is detected. Meanwhile, it will keep playing an ice-cream van tone. ( for which I choose “Mary Had a Little Lamb”)
Problems :
The problems I have are mainly hardware constraints that I haven’t solved.
- It is very hard to make the vehicle go in a straight line (two motors have to operate exactly the same way) due to the inconsistence of the motors.
- Ideally the vehicle should move in a straight line, but after adding the tone() function for the buzzer to play the tone, the behavior of the motors are hard to coordinate. (One of the motors always stops before the other, making the vehicle to move at an angle) At first I thought I can solve this by adjusting the code but nothing works after many trials. I guess this might be due to hardware constraints (like the two motors and the buzzer might not be able to operate at the same time).
- I couldn’t figure out why the vehicle tend to suddenly terminate and restart under ice-cream van mode (which is the reason why I don’t include gif for that mode) until Micheal pointed out in class that it might due to shortage of power which lead to the restarting of Arduino. This might be solved by adding extra power (the 4 batteries I used are all 1.2-Volt batteries which might be not enough).
Lessons learned:
Since most of the problems I faced are hardware issues, I learned that I should know more about the features of the hardware pieces before I use them in my project (i.e. use more consistent motors & stronger power input).
Also I feel like the acrylic board which I choose to be the main frame of the vehicle is too small in size and become a big constraint for me to add any other features to the vehicle. Next time I’ll be more thoughtful about the size of the project in the very beginning since it is rather hard to change after most components are already mounted.
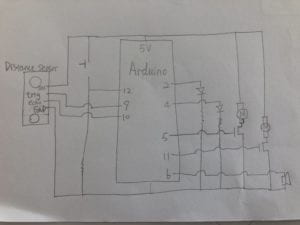
Below are the schematics for my project:
(1 Distance Sensor, 1 push button and 1 10k-ohm resistor on the left; 2 LEDs, 2 330-ohm resistors, 2 transistors, 2 motors and 1 buzzer on the right.)
(The pin names on the distance sensor are: (top to bottom) VCC, trig, echo, GND)

Below is the source code for my project:
#include "pitches.h"
// defines pins numbers
int blueLED = 2;
int greenLED = 4;
int Lmotor = 5;
int buzzer = 6;
const int trigPin = 9;
const int echoPin = 10;
int Rmotor = 11;
int modeSwitch = 12;
long duration;
int distance;
int thisNote = 0;
int blue = 0;

int mode = 0;
//modes = {0:power off,1:forward/stop, 2:icecream van, 3:forward/leftturn}
int switchVal;
int reading = false;


//melody and tempo for mary had a little lamb
int melody[] =
{ NOTE_E7, NOTE_D7, NOTE_C7, NOTE_D7, NOTE_E7, NOTE_E7, NOTE_E7,
  NOTE_D7, NOTE_D7, NOTE_D7, NOTE_E7, NOTE_G7, NOTE_G7,
  NOTE_E7, NOTE_D7, NOTE_C7, NOTE_D7, NOTE_E7, NOTE_E7, NOTE_E7,
  NOTE_E7, NOTE_D7, NOTE_D7, NOTE_E7, NOTE_D7, NOTE_C7
};


int noteDuration[] = {375, 125, 250, 250, 250, 250, 500,
                      250, 250, 500, 250, 250, 500,
                      375, 125, 250, 250, 250, 250, 250,
                      250, 250, 250, 250, 250, 1000
                     };

// the setup function runs once when you press reset or power the board
void setup() {
  // initialize digital pin LED_BUILTIN as an output.
  pinMode(Rmotor, OUTPUT);
  pinMode(Lmotor, OUTPUT);
  pinMode(trigPin, OUTPUT); // Sets the trigPin as an Output
  pinMode(echoPin, INPUT); // Sets the echoPin as an Input
  pinMode(blueLED, OUTPUT);
  pinMode(greenLED, OUTPUT);
  Serial.begin(9600);
}

// the loop function runs over and over again forever
void loop() {

  getDistance();

  switchVal = digitalRead(modeSwitch);
  //if statements to change the modes according to the push button
  if (switchVal) {
    reading = true;
  }
  Serial.println(switchVal);
  if (reading && !switchVal) {
    reading = false;
    mode = (mode + 1) % 4;
  }
  // mode 0, everything powered off
  if (mode ==0){
    digitalWrite(Rmotor, LOW);
    digitalWrite(Lmotor,LOW);
    digitalWrite(greenLED, LOW);
    digitalWrite(blueLED, LOW);
  }
  // mode 3, ice cream car (car move with a tone, stop if obstacle detected)
  else if (mode == 3) {
    tone(buzzer, melody[thisNote], noteDuration[thisNote]*0.8);
    int pause = noteDuration[thisNote] * 2.5;
    delay(pause);
    thisNote = (thisNote + 1) % 26;
    // if statements to turn one of the leds up
    if (blue) {
      digitalWrite(greenLED, LOW);
      digitalWrite(blueLED, HIGH);
    }
    else {
      digitalWrite(blueLED, LOW);
      digitalWrite(greenLED, HIGH);
    }
    blue = !blue;
    //stop if obstacle detected
    if (distance > 15) {

      analogWrite(Rmotor, 100);
      analogWrite(Lmotor, 100);
      delay(250);
      analogWrite(Rmotor, 110);
      delay(250);
    }
    else {
      digitalWrite(Rmotor, LOW);
      digitalWrite(Lmotor, LOW);
      delay(500);
    }
  }

    //mode 1, gentle - stop when obstacle detected
   else if (mode == 1){
      digitalWrite(greenLED, HIGH);
    digitalWrite(blueLED, HIGH);
    delay(100);
    digitalWrite(greenLED, LOW);
    digitalWrite(blueLED, LOW);
    delay(100);
    if (distance > 10) {
      analogWrite(Rmotor, 80);
      analogWrite(Lmotor, 100);
      delay(500);
    }
    else {
        digitalWrite(Rmotor, LOW);
      digitalWrite(Lmotor, LOW);
      delay(500);
    }}
    //mode 2, autonomous - turn when obstacle detected and keep going
    else{
    digitalWrite(greenLED, HIGH);
    digitalWrite(blueLED, HIGH);
    delay(100);
      if (distance > 15) {
      analogWrite(Rmotor, 80);
      analogWrite(Lmotor, 100);
      delay(500);
    }
    else {
        digitalWrite(Rmotor, LOW);
     //making a left turn
      delay(500);
    }}

  }


void getDistance() {
  // Clears the trigPin
  digitalWrite(trigPin, LOW);
  delayMicroseconds(2);
  // Sets the trigPin on HIGH state for 10 micro seconds
  digitalWrite(trigPin, HIGH);
  delayMicroseconds(10);
  digitalWrite(trigPin, LOW);
  // Reads the echoPin, returns the sound wave travel time in microseconds
  duration = pulseIn(echoPin, HIGH);
  // Calculating the distance
  distance = duration * 0.034 / 2;
  Serial.print("Distance: ");
  Serial.println(distance);
}
void straightline() {
  analogWrite(Rmotor, 90);
  analogWrite(Lmotor, 100);
  delay(500);                       // wait for a second
}
The code for distance sensor is taken from:https://howtomechatronics.com/tutorials/arduino/ultrasonic-sensor-hc-sr04/

Great job on this project and good documentation.
You made an interesting observation: “Since most of the problems I faced are hardware issues, I learned that I should know more about the features of the hardware pieces before I use them in my project (i.e. use more consistent motors & stronger power input).”
However sometimes we learn best from actually trying things out to see what happens! So I encourage you to allow yourself to experiment with new hardware even if you don’t know everything about them.
Your project was very effective and enjoyable and functioned very well.
Your code would benefit from a little more organization (e.g. use more functions) and better comments to explain what’s going on