Concept
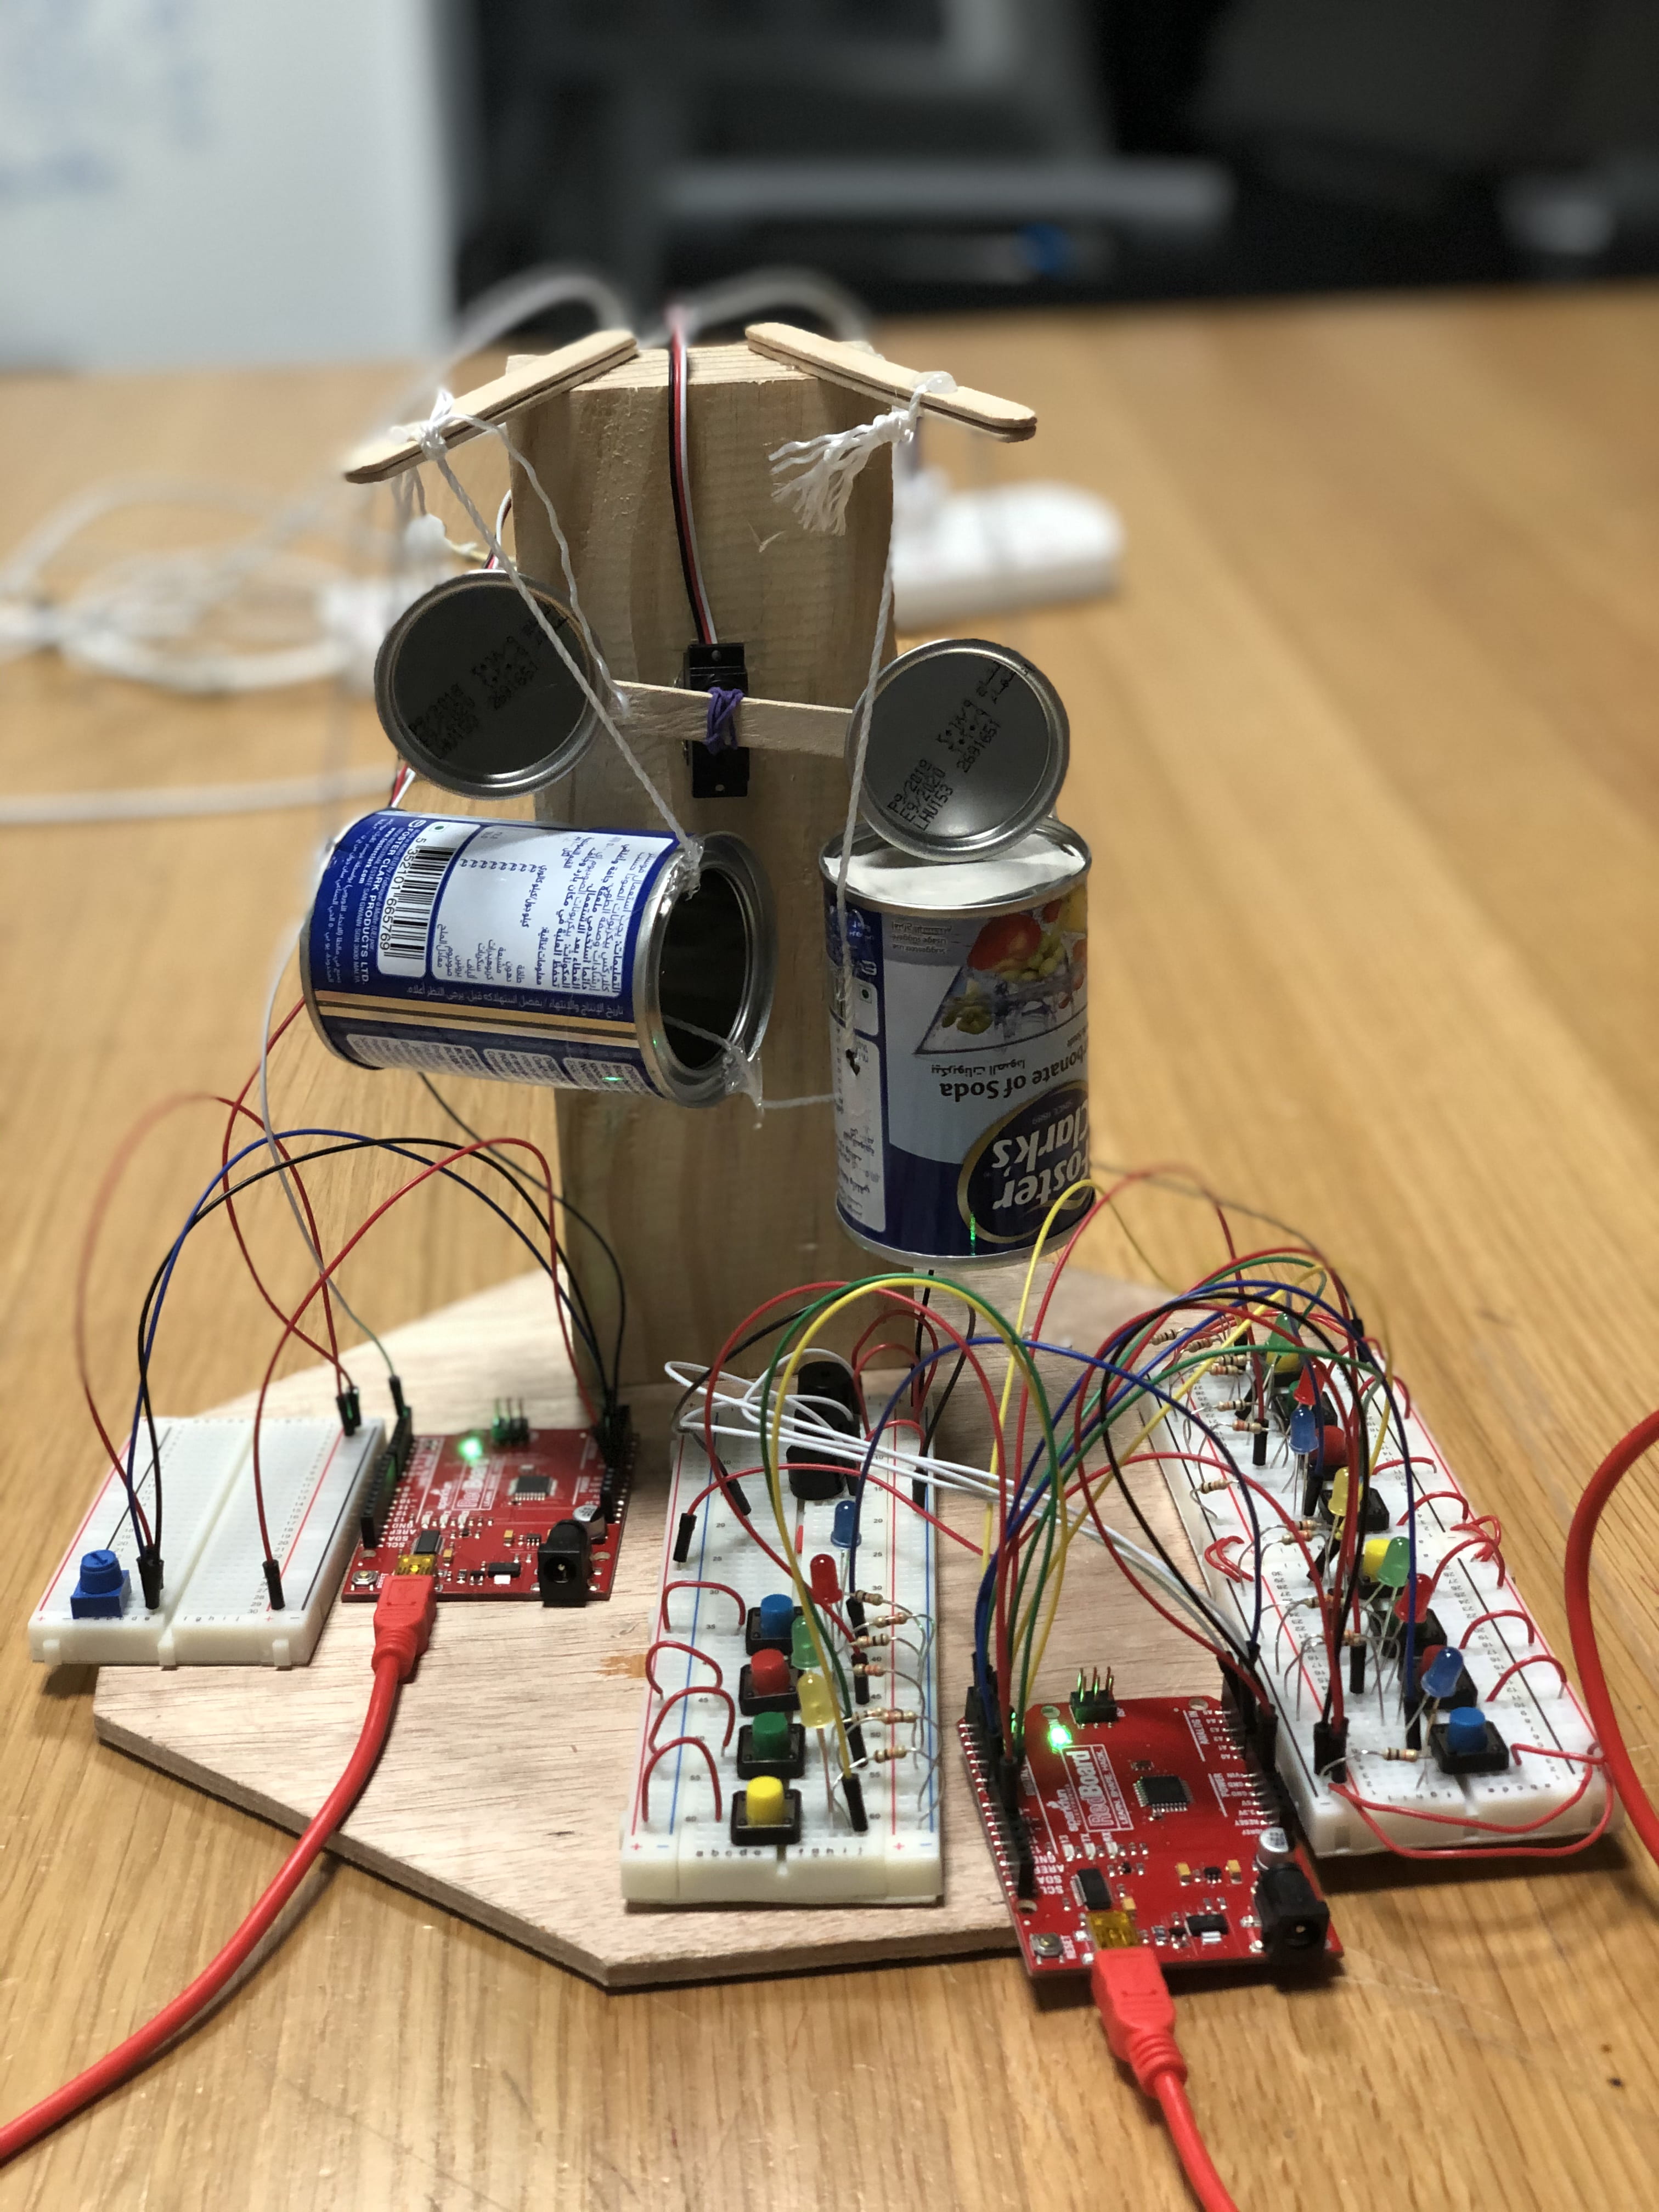
We created a simple two-player instrument. The instrument is controlled using 12 buttons and one potentiometer. One player controls eight buttons which play eight major chords, and the other player can press the other four buttons corresponding to the other four major chords, as well as the potentiometer which modifies the speed of the rhythm machine. The rhythm is given by a drum-like installation built using a servo, two metal cans, and a wooden frame. LEDs provide visual feedback as to which buttons are pressed. Cooperation between both players is required to create a pleasant melody.

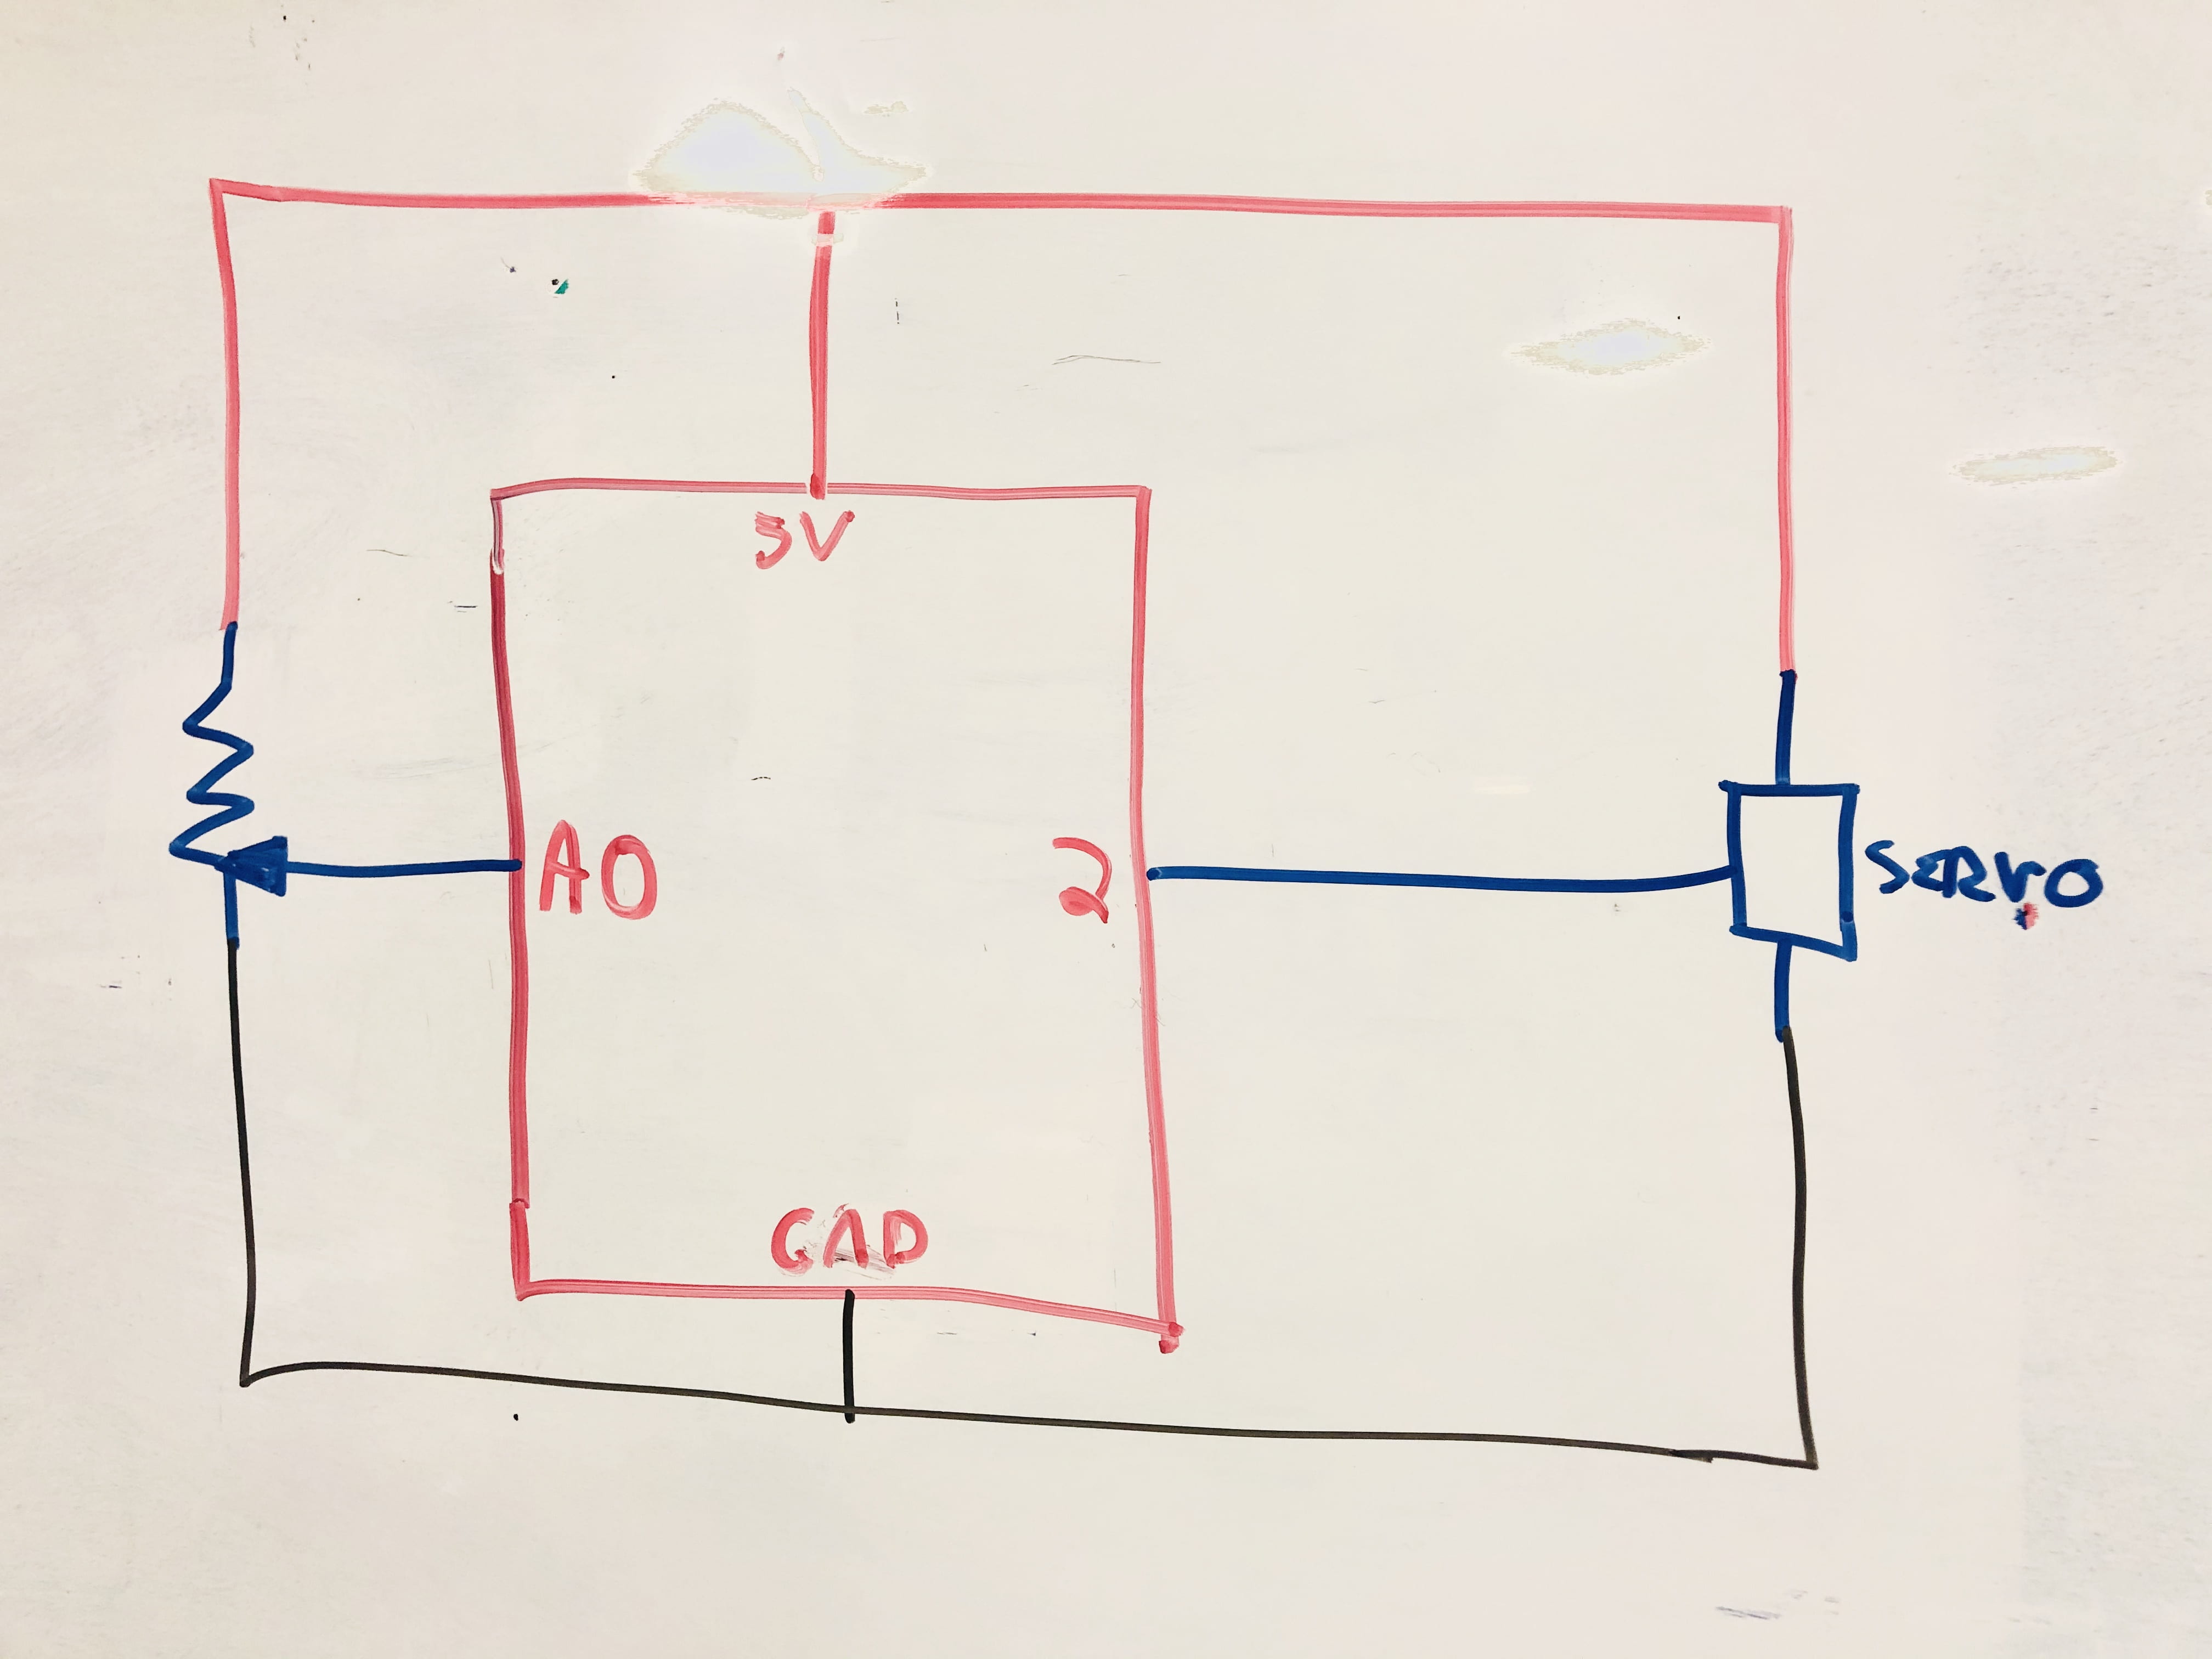
Schematic:
The button circuit
The servo circuit
Code:
Button program:
int yellow1 = 2; //C
int yellow2 = 6; //C sharp
int yellow3 = 10;   //D
int green1  = 3; //D sharp
int green2  = 7; //E
int green3  = 11;    //F
int red1    = 4; //F sharp
int red2    = 8; //G
int red3    = 12;   //G sharp
int blue1   = 5; //A
int blue2   = 9; //A sharp
int blue3   = A3;       //B
const int buzzer1 = A0;
const int buzzer2 = A1;
const int buzzer3 = A2;

#define C   262
#define E   330
#define G   392
#define Cs  277
#define F   349
#define Gs  415
#define D   294
#define A   440
#define Fs  370
#define Ab  415
#define B   494
#define Ds  311
#define As  466


void setup() {

  pinMode(yellow1, INPUT);
  pinMode(green1 , INPUT);
  pinMode(red1 , INPUT);
  pinMode(blue1 , INPUT);
  pinMode(yellow2 , INPUT);
  pinMode(green2 , INPUT);
  pinMode(red2 , INPUT);
  pinMode(blue2 , INPUT);
  pinMode(buzzer1, OUTPUT);
  pinMode(buzzer2, OUTPUT);
  pinMode(buzzer3, OUTPUT);

  Serial.begin(9600);
}

void loop() {
  if (digitalRead (yellow1) == true) {
    tone(buzzer1, C, 500);
    tone(buzzer2, E, 500);
    tone(buzzer2, G, 500);
  }
  else if (digitalRead (yellow2) == true) {
    tone(buzzer1, Cs, 500);
    tone(buzzer2, F, 500);
    tone(buzzer2, Gs, 500);
  }
  else if (digitalRead (yellow3) == true) {
    tone(buzzer1, D, 500);
    tone(buzzer2, Fs, 500);
    tone(buzzer2, A, 500);
  }

  else if (digitalRead (green1) == true) {
    tone(buzzer1, Ds, 500);
    tone(buzzer2, G, 500);
    tone(buzzer2, Ab, 500);
  }
  else if (digitalRead (green2) == true) {
    tone(buzzer1, E, 500);
    tone(buzzer2, Gs, 500);
    tone(buzzer3, B, 500);
  }
  else if (digitalRead (green3) == true) {
    tone(buzzer1, F, 500);
    tone(buzzer2, A, 500);
    tone(buzzer3, C, 500);
  }
  else if (digitalRead (red1) == true) {
    tone(buzzer1, Fs, 500);
    tone(buzzer2, Ab, 500);
    tone(buzzer3, Cs, 500);
  }
  else if (digitalRead (red2) == true) {
    tone(buzzer1, G, 500);
    tone(buzzer2, B, 500);
    tone(buzzer3, D, 500);
  }
  else if (digitalRead (red3) == true) {
    tone(buzzer1, Ab, 500);
    tone(buzzer2, C, 500);
    tone(buzzer3, Ds, 500);
  }
  else if (digitalRead (blue1) == true) {
    tone(buzzer1, A, 500);
    tone(buzzer2, Cs, 500);
    tone(buzzer3, E, 500);
  }
  else if (digitalRead (blue2) == true) {
    tone(buzzer1, As, 500);
    tone(buzzer2, D, 500);
    tone(buzzer3, F, 500);
  }
  else if (digitalRead (blue3) == true) {
    tone(buzzer1, B, 500);
    tone(buzzer2, Ds, 500);
    tone(buzzer3, Fs, 500);
  }
  else {
    noTone(buzzer1);
    noTone(buzzer2);
    noTone(buzzer3);
  }
}
Servo program:
#include <Servo.h>

Servo myservo;

int pos = 60;

void setup() {
  myservo.attach(2);
  Serial.begin(9600);

}

void loop() {
  int servoDelay = analogRead(A0);
  servoDelay = map(servoDelay, 0, 1023, 2, 15);
  for (pos = 60; pos <= 100; pos += 1) {
    myservo.write(pos);
    delay(servoDelay);
  }
  for (pos = 100; pos >= 60; pos -= 1) {
    myservo.write(pos);
    delay(servoDelay);
  }
}
Behavior
Each push button, when pressed, activates its corresponding LED and a chord is played. This happens by playing a different tone on each of the three buzzers. Altogether we have twelve buttons which can play the 12 common major chords. The servo instrument is controlled by a potentiometer, and the speed of rotation is directly related to the position of the potentiometer. We kept the servo circuit separate from the button circuit because this way there was more power in each circuit (and it made the coding much easier).

Great musical instrument! I like that you went for chords instead of single notes. Your construction was good and solid, and aesthetically pleasant as well. The schematic is interesting because you are using the switches directly to control the LEDs. Did you learn this technique elsewhere or did you come up with it on your own? It does work, as you discovered. Your schematic is missing a couple of 10K resistors for the switches; was this intentional or just a typo?
I’m pleased to see that you know that you can use the so-called “analog input” pins as digital pins as well. Since you’re using A3 as an output, you should draw it on the right hand side of the Arduino block, so you don’t have to run that wire all the way around the Arduino.
In your code, you’re comparing the result of a digitalRead() to the value “true”. Now technically digitalRead() does not return the value “true”, it returns the value “HIGH”. The reason this works is that in fact both “true” and “HIGH” have the numerical value of 1, but you shouldn’t rely upon this. Arduino might change the definitions so that “HIGH” is numerical 5 for instance, and then your program wouldn’t work.
I like that you control the servo from a second Arduino. This solves the problem of trying to detect button presses while moving the servo at the same time. Sometimes multiple Arduinos are a good solution to a problem. However, why is pos a global variable, and why is it initialized to 60? Global variables should be avoided whenever possible, and pos isn’t used anywhere except in the for() loops.
As for comments, your main program is pretty clear, but could use a few comments to explain that the three notes make a chord (although I suppose if I knew music theory that would be obvious). All in all a great project!