
Concept:
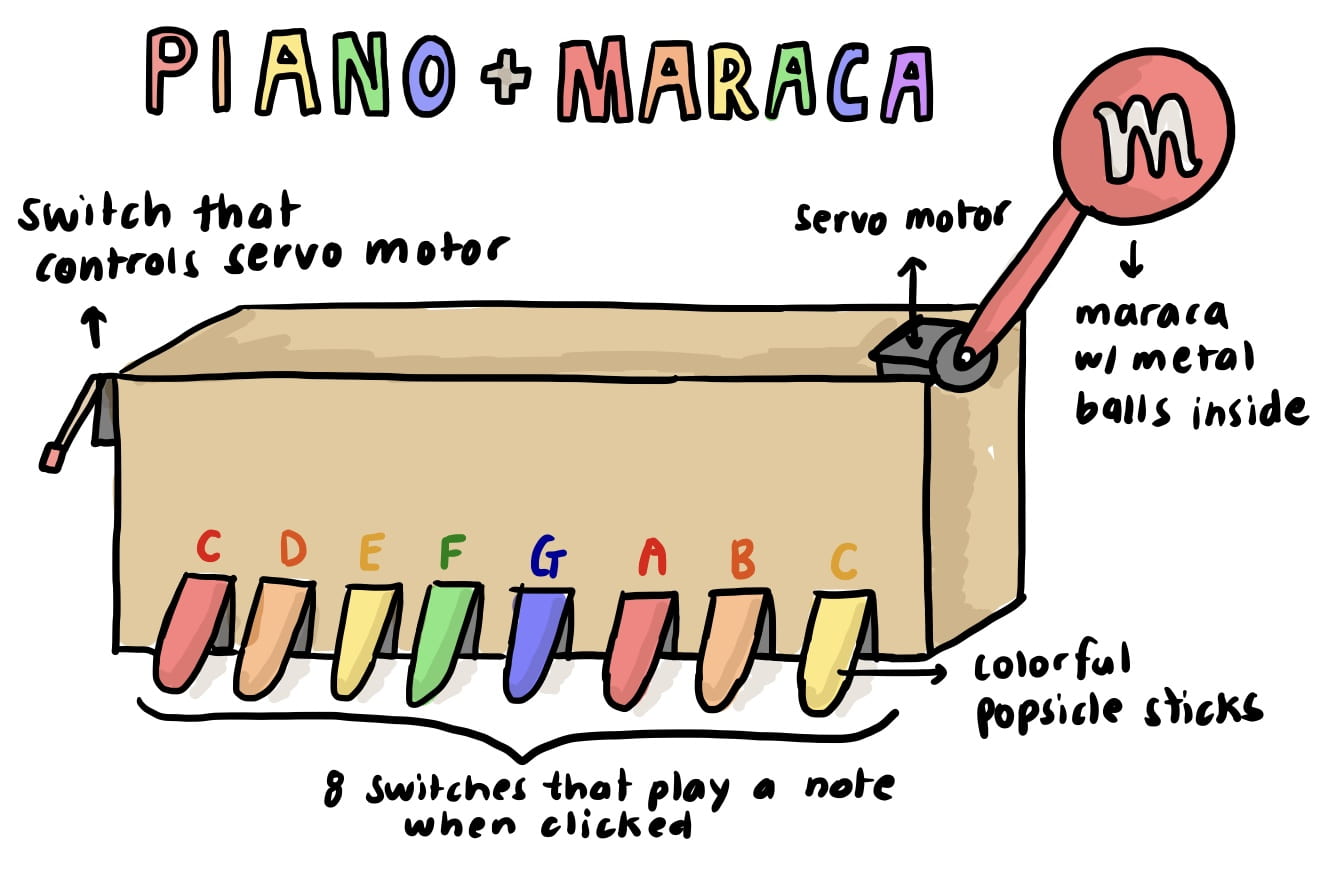
The initial concept of our instrument was to include a button which, when clicked, played a pre-programmed melody and another button which enabled the servo motor attached to a maraca – made from a metal m&m container with metal balls inside. However, we thought it would be more interactive if we included multiple switches that played the octaves of the piano when pressed, allowing the user to create their own melodies and another switch which moved the motor when clicked. Additionally, the switch that we have used to reproduce a key of the piano is a push-switch, meaning when not pressed, it reverts to its original position.
Behavior:
The system that we create satisfies the requirements of the assignment as…
- Uses Tone: The eight keyboards are connected to eight inputs which, when pressed, play a tone at different keys. For example, pressing the first red switch would play the C note, programmed as tone(buzzer,262). The keys are attached to a wooden block using glue gun that can be easily removed after the project or reuse.
- Uses Servos: The servos was used for the maraca. The movement of the maraca, which is connected to the motor, can be controlled using the switch.
The behavior of the instrument can be seen in the video where we are playing “twinkle twinkle little star”:
Problems:
One potential issue is the inability for the instrument to use both the maraca and the key boards simultaneously. This is due to the delay function that is present under tone and the nature of the loop function that can only run one thing at the same time. This is also the reason why the buzzer can not play two tones at once. A potential solution to this could be connected the servo motor to another computer’s arduino program so that the tone function and servos function can be used at the same time as there are two loops that are running at once.
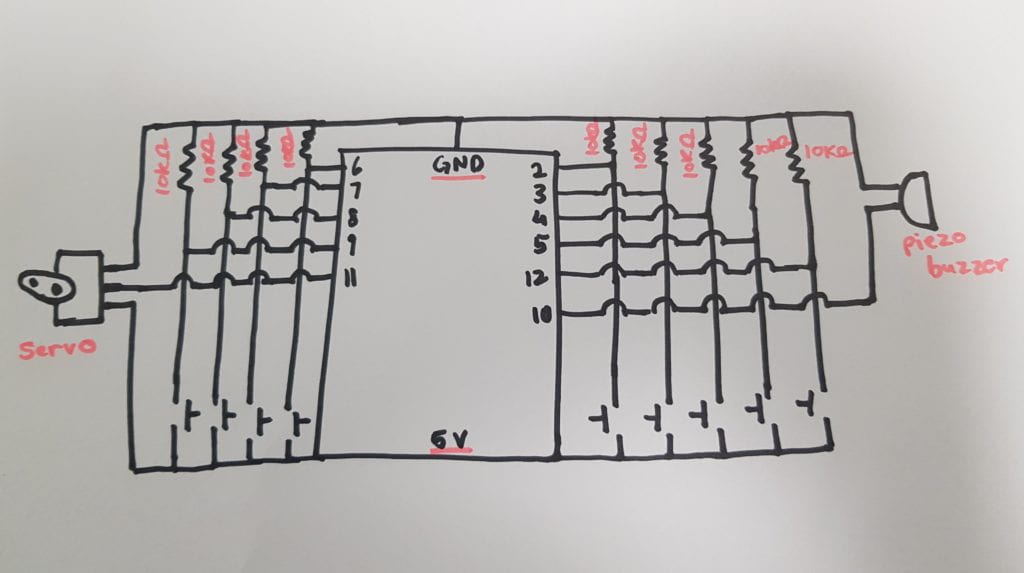
Circuit Schematic:
Program (code):
//INPUTS (BUTTONS)
#include <Servo.h>

int do1 = 2;
int re = 3;
int mi = 4;
int fa = 5;
int sol = 6;
int la = 7;
int si = 8;
int do2 = 9;
int value;
int pushButton = 12;
Servo myservo;
//OUTPUTS
int buzzer = 10;

//VALUES
void setup() {
// put your setup code here, to run once:
pinMode(pushButton, INPUT);
myservo.attach(11);
}

void loop() {
value = digitalRead(pushButton);
// put your main code here, to run repeatedly:
Serial.println(value);
//Read button state
if (value){
myservo.write(0);
delay (5);
myservo.write(20);
delay(5) ;
}

int do1_state = digitalRead(do1);
int re_state = digitalRead(re);
int mi_state = digitalRead(mi);
int fa_state = digitalRead(fa);
int sol_state = digitalRead(sol);
int la_state = digitalRead(la);
int si_state = digitalRead(si);
int do2_state = digitalRead(do2);

if (do1_state == 1) {
Serial.println(do1_state);
tone(buzzer, 262);
delay(300);
noTone(buzzer);
}

else if (re_state == 1) {
tone(buzzer, 294);
delay(300);
noTone(buzzer);
}

else if (mi_state == 1) {
tone(buzzer, 330);
delay(300);
noTone(buzzer);
}

else if (fa_state == 1) {
tone(buzzer, 349);
delay(300);
noTone(buzzer);
}

else if (sol_state == 1) {
tone(buzzer, 392);
delay(300);
noTone(buzzer);
}

else if (la_state == 1) {
tone(buzzer, 440);
delay(300);
noTone(buzzer);
}

else if (si_state == 1) {
tone(buzzer, 494);
delay(300);
noTone(buzzer);
}

else if (do2_state == 1) {
tone(buzzer, 524);
delay(300);
noTone(buzzer);
}
}
Great work on this project. The appearance as well as functionality was really delightful. I like that you used those special switches for the keys, and that you made levers out of colorful popsickle sticks. That took extra effort but it was so much nicer than the pushbuttons in the kit mounted on the breadboard. Your schematic is excellent, although in the future move all inputs to the left (think of information flowing left to right, from sensors, through the Arduino, and on to outputs).
The code looks like the indentation got lost. Did you forget to switch to “text” mode before you pasted it in your post? Also you need to improve your comments. Remove unnecessary things like “insert your code here”. Make your comments more useful: instead of “//Read button state” say “If the maraca switch is pressed move the servo to play the maraca”. Separate logical sections with a blank line, and use a comment to briefly introduce each section e.g. “Initialize all pins appropriately” or “read each keyboard switch and if pressed, play the appropriate tone”. By the way, you can move the servo and play a tone all at the same time if you get rid of the delay, using the logic of blinkWithoutDelay. Playing two tones at the same time is a different problem, although you can play multiple tones at the same time if you use different pins and multiple speakers. All told it’s a very good project!