For this lab, we were tasked to create our own instrument. At first, Alyazia and I created something that utilized that buttons. When you pressed a button, the speaker would play a note. We had five buttons: four of them gave off a note while the fifth one switched the pitch for the other four notes. As a result, we were able to play an entire octave. However, we didn’t find a use for the servo. After some thought, we decided to use the servos as drum sticks. Chopsticks were attached to the servos. When a button is a pressed, it would swing forward and hit a metal bucket (not exactly sure what it is but let’s just call it a bucket). Ultimately, we created something that would allow two people to make music: one would hit the buttons that would give off notes while the other controlled the “drum sticks.”
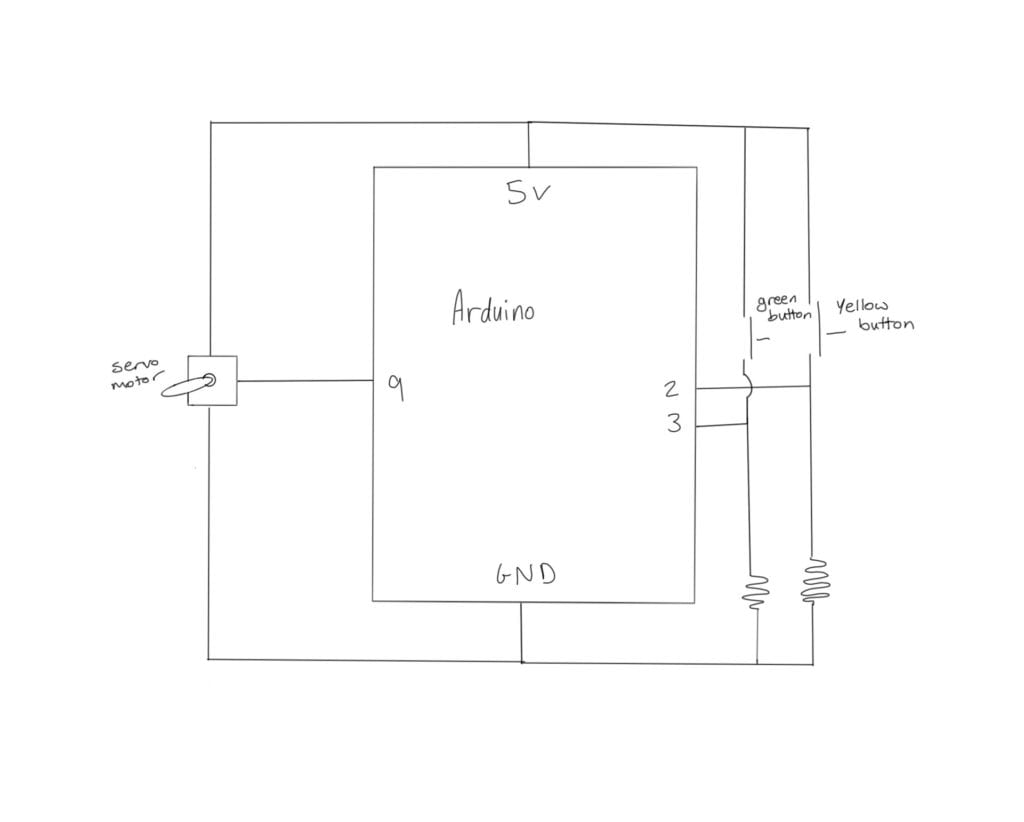
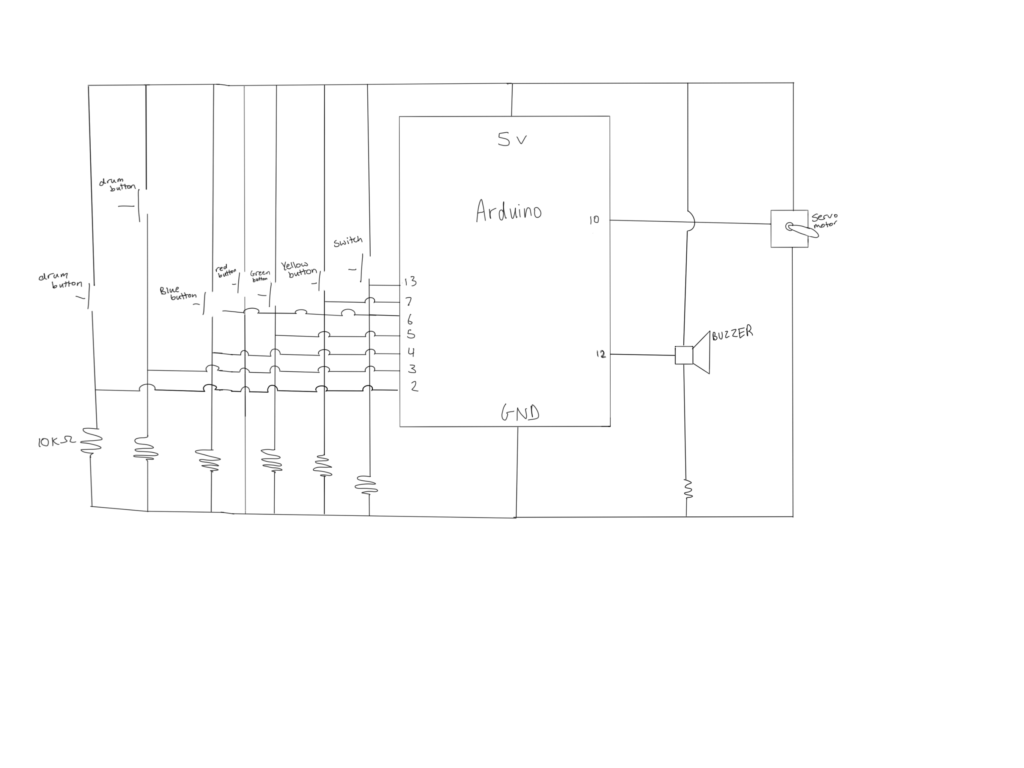
The schematic for our entire circuit is attached below (We utilized two Arduinos).

This is the schematic for the first Arduino (it controls one servo with two buttons).

This is the schematic for the second arduino that controls the other servo along with the speaker.
This is the code for the first Arduino:
const int yellowButton = 2;
const int greenButton = 3;
#include

Servo myservo;  // create servo object to control a servo
// twelve servo objects can be created on most boards

int pos = 0;    // variable to store the servo position

void setup() {
  myservo.attach(9);  // attaches the servo on pin 9 to the servo object
  pinMode(yellowButton, INPUT);
  pinMode(greenButton, INPUT);
  Serial.begin(9600);
}

int yellowState = 0;
int greenState = 0;

void loop() {


    yellowState = digitalRead(yellowButton);
    greenState = digitalRead(greenButton);

    Serial.println(yellowState);
    Serial.println(greenState);

    if (yellowState == 1){
      myservo.write(0);

    }
    if (greenState == 1){
      myservo.write(40);
    }
}
This is the code for the second Arduino:
int Blue = 4;
int Green = 5;
int Red = 6;
int Yellow = 7;
int Switch = 13;
int drum1 = 3;
int drum2 = 2;
#include "pitches.h"
#include

Servo servo1;
Servo servo2;

int pos = 0; //position of servo

void setup() {
  // put your setup code here, to run once:
  pinMode(Blue, INPUT);
  pinMode(Green, INPUT);
  pinMode(Red, INPUT);
  pinMode(Yellow, INPUT);
  pinMode(Switch, INPUT);
  Serial.begin(9600);
  servo1.attach(10);//blue
  servo2.attach(9);
}

void loop() {
  //BUTTONS


  // put your main code here, to run repeatedly:
  int buttonPressBlue = digitalRead(Blue);
  int buttonPressGreen = digitalRead(Green);
  int buttonPressRed = digitalRead(Red);
  int buttonPressYellow = digitalRead(Yellow);
  int buttonSwitch = digitalRead(Switch);
  int toggle = 0;
  int buttonDrum1 = digitalRead(drum1);
  int buttonDrum2 = digitalRead(drum2);
  int angle = 0;
  Serial.print("Blue is ");
  Serial.println(buttonPressBlue);
  Serial.print("Green is ");
  Serial.println(buttonPressGreen);
  Serial.print("Red is ");
  Serial.println(buttonPressRed);
  Serial.print("Yellow is ");
  Serial.println(buttonPressYellow);
  Serial.println(toggle);
  Serial.print("drum 1 is: ");
  Serial.println(buttonDrum1);
  if (buttonDrum1 ==1){
     servo1.write(0);
  }
  if (buttonDrum2 ==1){
     servo1.write(40);
  }

  if (buttonSwitch ==1){
    toggle = (toggle+1)%2;
  }
  if (toggle == 0){
    if (buttonPressBlue == 1) {
      tone(12, NOTE_C4, 250);
    }
    if (buttonPressGreen == 1) {
      tone(12, NOTE_D4, 250);
    }
    if (buttonPressRed == 1) {
      tone(12, NOTE_E4, 250);
    }
    if (buttonPressYellow == 1) {
      tone(12, NOTE_F4, 250);
    }
  }

  if(toggle ==1){
     if (buttonPressBlue == 1) {
      tone(12, NOTE_G4, 250);
    }
    if (buttonPressGreen == 1) {
      tone(12, NOTE_A4, 250);
    }
    if (buttonPressRed == 1) {
      tone(12, NOTE_B4, 250);
    }
    if (buttonPressYellow == 1) {
      tone(12, NOTE_C5, 250);
    }
  }
}
Our instrument utilizes two servos that act as drum sticks that strike a metal bucket. The “drum sticks” are controlled by buttons. It also has buttons that you can press that play notes (tones). Each button has a different tone, and when you hit the switch button, you are able to play the next four notes. A video of our instrument in action is attached below:
We attempted to attach two servos onto one arduino but it wouldn’t work no matter what we did. We thought it could be a power issue so we ended up using two arduino’s instead of just one.


Great project and it worked well. Your blog post is good but the comments in the code are quite weak. I want you to work on better comments; this will be especially important in the coming weeks as we learn Processing. Let me know if you want me to show you what I mean specifically.